异步编程
Isolate、Future、Stream 总结
Isolate 与 Future 如何选择
- 两者都可以执行异步操作, 但逻辑不同
- Isolate 的开销比 Future 要大
- Isolate 需要重新开启线程, Future 是单线程内的异步任务
- 异步任务耗时短, 推荐使用 Future, 耗时长, 推荐使用 Isolate
- 如果使用 Future 来处理耗时长的异步任务, 会造成阻塞
- 耗时 < 100 ms 选 Future; 耗时 > 100 ms 选 Isolate
Future : 异步返回一个值
Stream : 异步返回一系列的值 (数据流)
Isolate : 通过创建新线程的方式,来实现异步
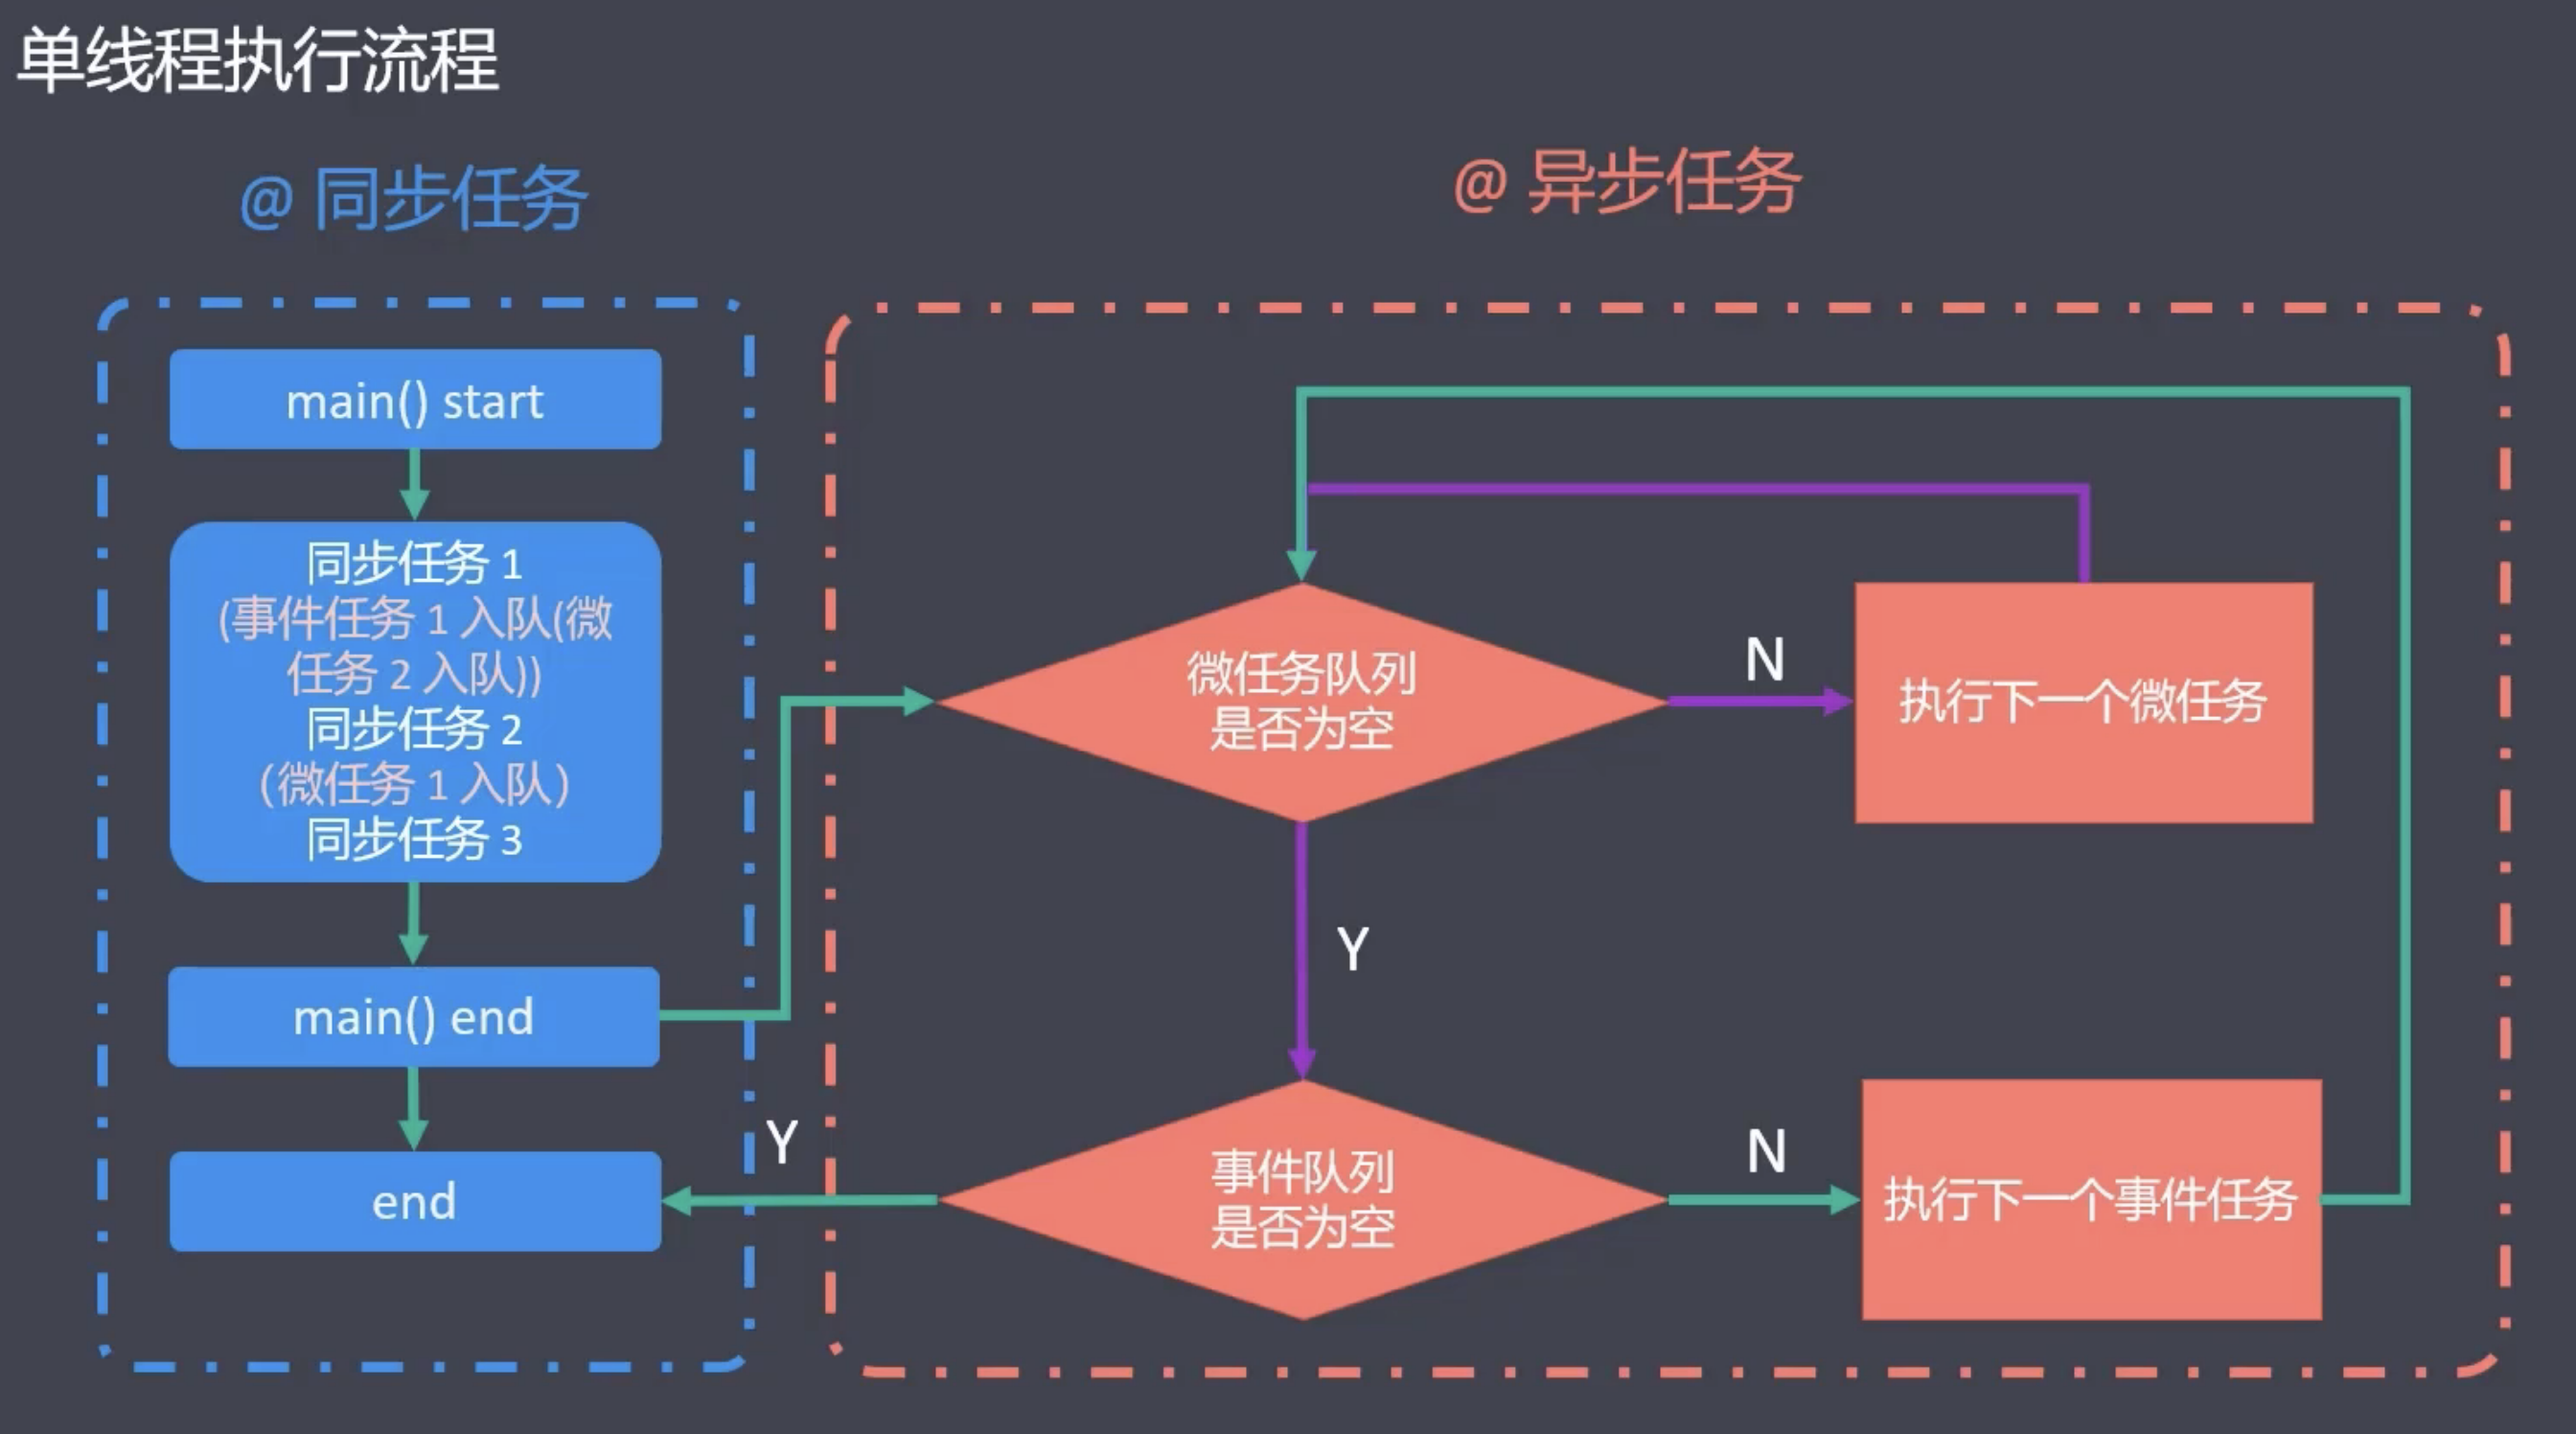
单线程 (事件轮询 EventLoop)
- Dart 单线程的核心包括: 主线程、微任务、和宏任务
- 微任务队列: 包含微任务, 主要通过 scheduleMicrotask 来调度
- 事件队列(宏任务): 包含外部事件, 例如 I/O 、Timer、绘制事件等
- 微任务优先级高于宏任务
- 同步与异步 (sync,async)
- 同步: (4 X 100 米)
- 异步: (100 米中有 8 个跑道)
多线程 (Isolate)
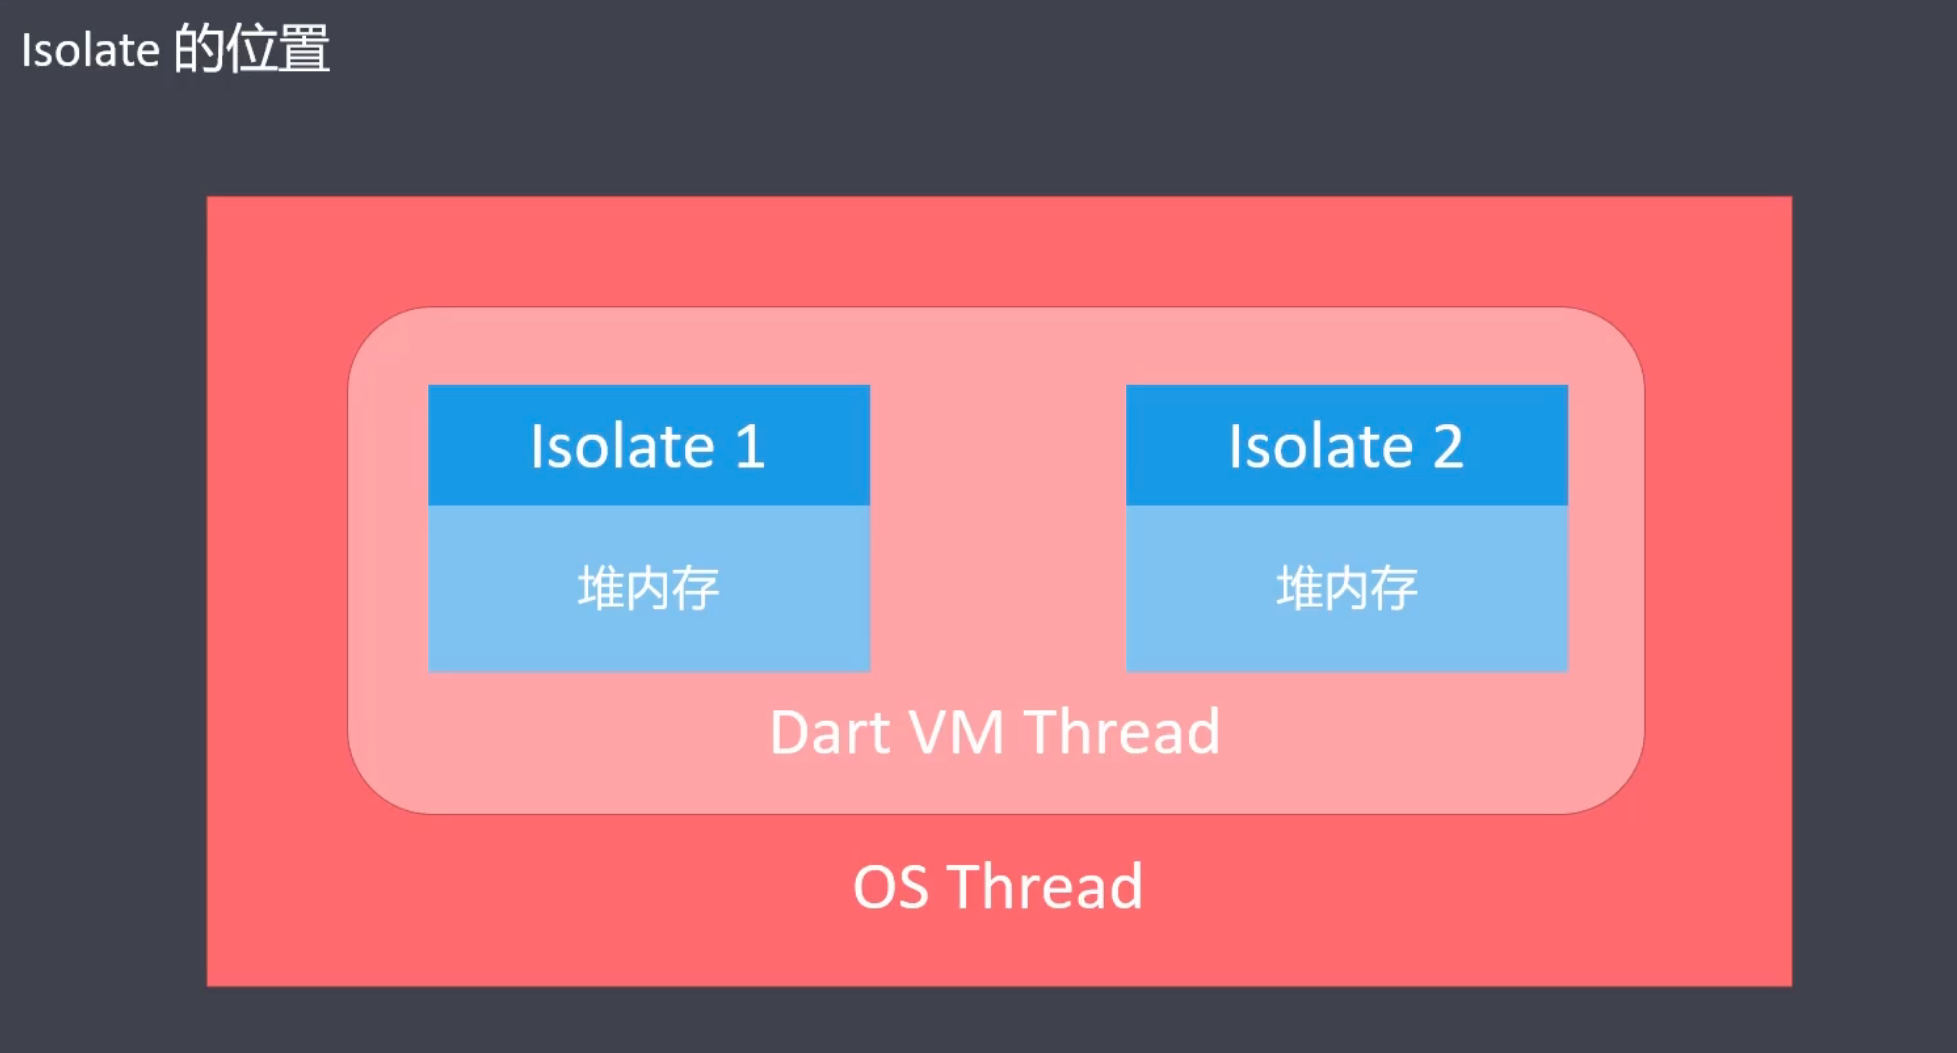
- Isolate 是 Dart 中的线程
- Dart 中的线程是以 隔离 (Isolate) 的方式存在的
- 每个 Isolate 都有自己的独立的私有内存块 (多个线程不共享内存)
- 没有共享内存, 就不需要竞争资源, 就不需要锁 (不用担心死锁问题)
创建 Isolate
Isolate 类用来管理线程 (创建、暂停、杀死 Isolate 线程)
👉
Isolate.spawn(): 创建一个新的 Isolate,它执行一个提供的函数,并允许你在不同的执行线程中运行代码。这是实现并行计算的常用方法。
👉Isolate.spawnUri(): 用于根据指定的 URI 在一个新的 Isolate 中启动 Dart 代码。它允许你异步地在新 Isolate 中加载和运行一个 Dart 文件。
👉Isolate.pause(): 暂停 Isolate 的执行,这通常用于调试或控制 Isolate 的执行。
👉Isolate.kill(): 立即终止 Isolate 的执行。
Future<Isolate> Isolate.spawn(entryPoint,message)import 'dart:isolate';- entryPoint (必须是一个顶层方法或静态方法)
- message
- ① Dart 原始数据类型, 如 null、bool、int、double、String 等
- ② SendPort 实例 -
ReceivePort().sendPort - 包含 ① 和 ② 的 List 和 Map, 也可以嵌套
// 导入 Isolate 包
import 'dart:isolate';

void main() {
  // multiThread start
  // 当前线程:main
  // 当前线程:newThread
  // hello
  // multiThread end
  multipleThread();
}

void multipleThread() {
  print('multiThread start');
  print('当前线程:' + Isolate.current.debugName!);
  Isolate.spawn(newThread,'hello'); // 创建多个线程需要不同命名的函数
  print('multiThread end');
}

void newThread(String message){
    print('当前线程:' + Isolate.current.debugName!);
    print(message);
}
通信机制
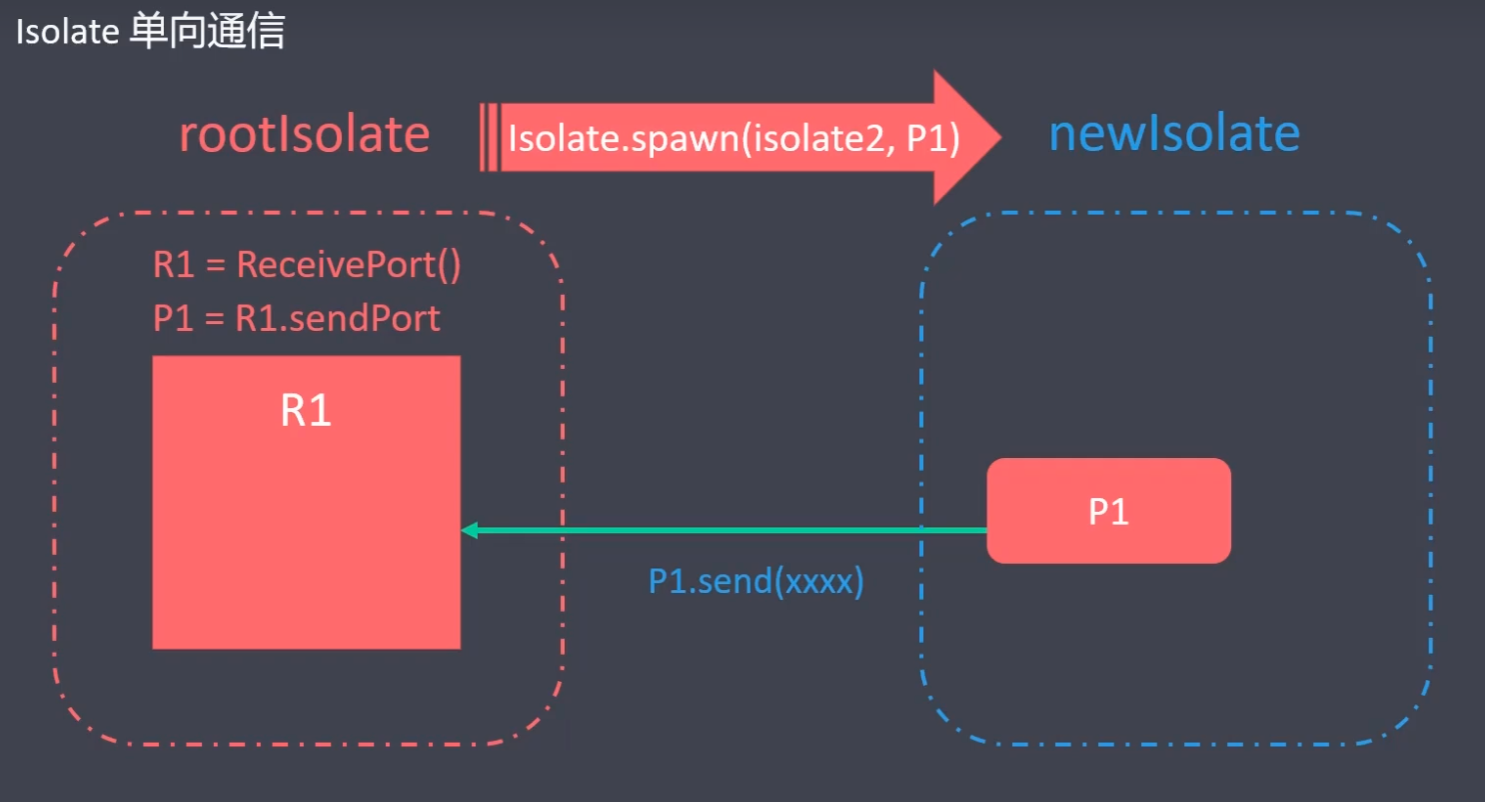
- Isolate 多线程之间, 通信的唯一方式就是 Port
- ReceivePort 类
- 初始化接收端口, 创建发送端口、接收消息、监听消息、关闭端口
- SendPort 类
- 将消息发送给 ReceivePort
- 通信方式
- 单向通信 (A -> B)
- 双向通信 (A <-> B)
单向通信过程: 在 rootIsolate 通过 ReceivePort() 实例化一个 R1 对象接收消息,再通过 R1 生成一个 P1,用来发送消息.在创建 Isolate 的时候把 P1 传到 newIsolate 里面,负责传递 newIsolate 的消息.
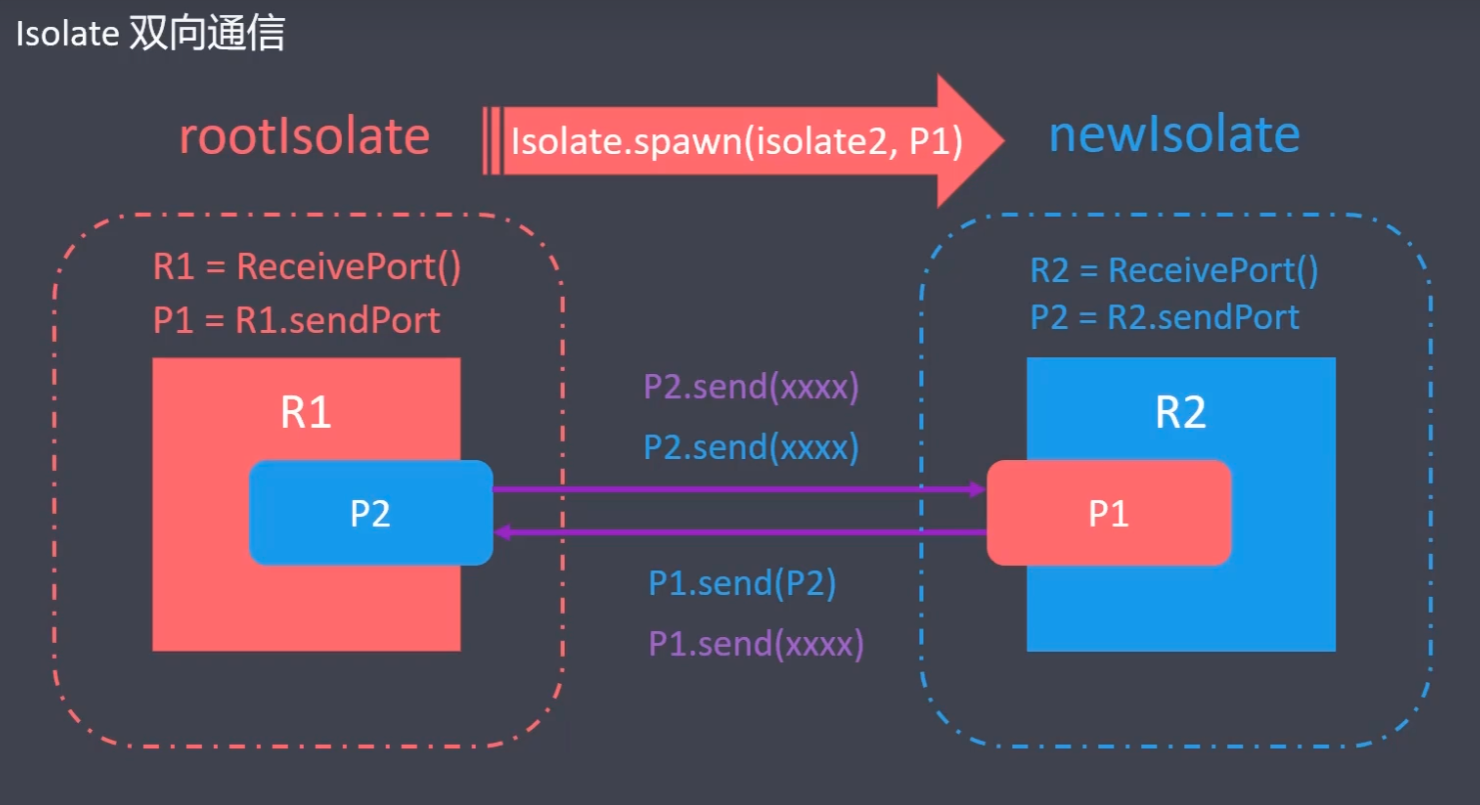
双向通信过程: 在 rootIsolate 通过 ReceivePort() 实例化一个 R1 对象接收消息,再通过 R1 生成一个 P1,用来发送消息.在创建 Isolate 的时候把 P1 传到 newIsolate 里面,负责传递 newIsolate 的消息.在 newIsolate 里面再通过 ReceivePort() 实例化一个 R2,R2 再生成一个 P2,通过 P1 的 send 方法把 P2 传递给 R1.于是 R1 有了 P2 发送消息,R2 有了 P1 发送消息.
单向通信实现
import 'dart:isolate';

void main() {
  multipleThread();
}

void multipleThread() {
  print('multipleThread start');
  print('当前线程:' + Isolate.current.debugName!);

  ReceivePort R1 = ReceivePort(); // 创建一个接口端口实例
  SendPort P1 = R1.sendPort; // 创建一个发送端口实例
  Isolate.spawn(newThread, P1); // 开启一个新的线程

  // 接收消息
  // dynamic msg = R1.first; // 接收 newThread 发送的消息
  // print(msg.toString());

  // 监听消息
  R1.listen((message) {
    print('接收到消息:' + message.toString());
    R1.close(); // 关闭接口端口
  });

  print('multipleThread end');
}

void newThread(SendPort P1) {
  print('newThread start');
  print('当前线程:' + Isolate.current.debugName!);
  P1.send('Hello World'); // 发送消息给 multipleThread
  print('newThread end');
}
双向通信实现
import 'dart:isolate';

void main() {
  multipleThread();
}

// 主线程
void multipleThread() async {
  print('Multiple thread start');
  print('Current thread: ${Isolate.current.debugName}');

  final mainToNewThread = ReceivePort(); // 用于主线程接收消息的端口
  Isolate.spawn(newThread, mainToNewThread.sendPort); // 开启一个新的线程

  // 监听从新线程发来的消息
  final newThreadSendPort = await mainToNewThread.first as SendPort;

  final msg1 = await sendMessage(newThreadSendPort, 'Who is you?');
  print('Main thread received: $msg1');

  final msg2 = await sendMessage(newThreadSendPort, 'You is sun?');
  print('Main thread received: $msg2');

  mainToNewThread.close(); // 监听完成,关闭端口
  print('Multiple thread end');
}

// 新线程
void newThread(SendPort mainToNewThreadSendPort) async {
  print('New thread start');
  print('Current thread: ${Isolate.current.debugName}');
  final newToMainThread = ReceivePort(); // 用于新线程接收消息的端口
  mainToNewThreadSendPort.send(newToMainThread.sendPort); // 发送端口给主线程

  // 持续监听从主线程发来的消息
  await for (var message in newToMainThread) {
    final data = message[0];
    final SendPort replyToMainThread = message[1];
    print('New thread received message from main thread: $data');

    // 根据收到的消息来回复主线程
    if (data == 'Who is you?') {
      replyToMainThread.send('I am Sun!');
    } else if (data == 'You is sun?') {
      replyToMainThread.send('Yes, I am!');
    } else {
      replyToMainThread.send('I don’t understand the question.');
    }
  }
  print('New thread end');
}

// 封装发送消息
Future<dynamic> sendMessage(SendPort sendPort, String message) {
  print('Sending message to new thread: $message');
  dynamic response = ReceivePort();
  sendPort.send([message, response.sendPort]);
  return response.first;
}
spawnUri 创建 Isolate
- spawnUri 和 spawn 区别就是一个在一个文件里面创建 Isolate ,一个是打开另外一个文件创建 Isolate ,主要还是方便代码工程化
import 'dart:isolate';

void main() {
  start();

  newIsolate();

  init();
}

void start() {
  print('应用启动:' + DateTime.now().microsecondsSinceEpoch.toString());
}

void newIsolate() async {
  print('新线程创建');
  ReceivePort r = ReceivePort();
  SendPort p = r.sendPort;
  // 使用 spawnUri 创建新线程
  Isolate childIsolate = await Isolate.spawnUri(
      Uri(path: './childIsolate.dart'), ['data1', 'data2', 'data3'], p);

  // 监听消息
  r.listen((message) {
    print('主线程接收到消息:${message[0]}');
    if (message[1] == 1) {
      //异步任务正在处理
    } else if (message[1] == 2) {
      r.close(); // 取消监听
      childIsolate.kill(); // 杀死新线程,释放资源
      print('子线程已经释放');
    }
  });
}

void init() {
  print('项目初始化');
}import 'dart:io';
import 'dart:isolate';
main(List<String> args, SendPort mainSendPort) {
print('新线程接收到的参数$args');
mainSendPort.send(['开始执行异步操作', 0]);
sleep(Duration(seconds: 1));
mainSendPort.send(['加载中', 1]);
sleep(Duration(seconds: 1));
mainSendPort.send(['异步任务完成', 2]);
sleep(Duration(seconds: 1));
}Future
- 概念
- Future 是 Dart 中的类, 我们可以通过 Future 实例, 封装一些异步任务
- Future 的含义是未来, 未来要执行的任务, 我们可以放到 Future 中
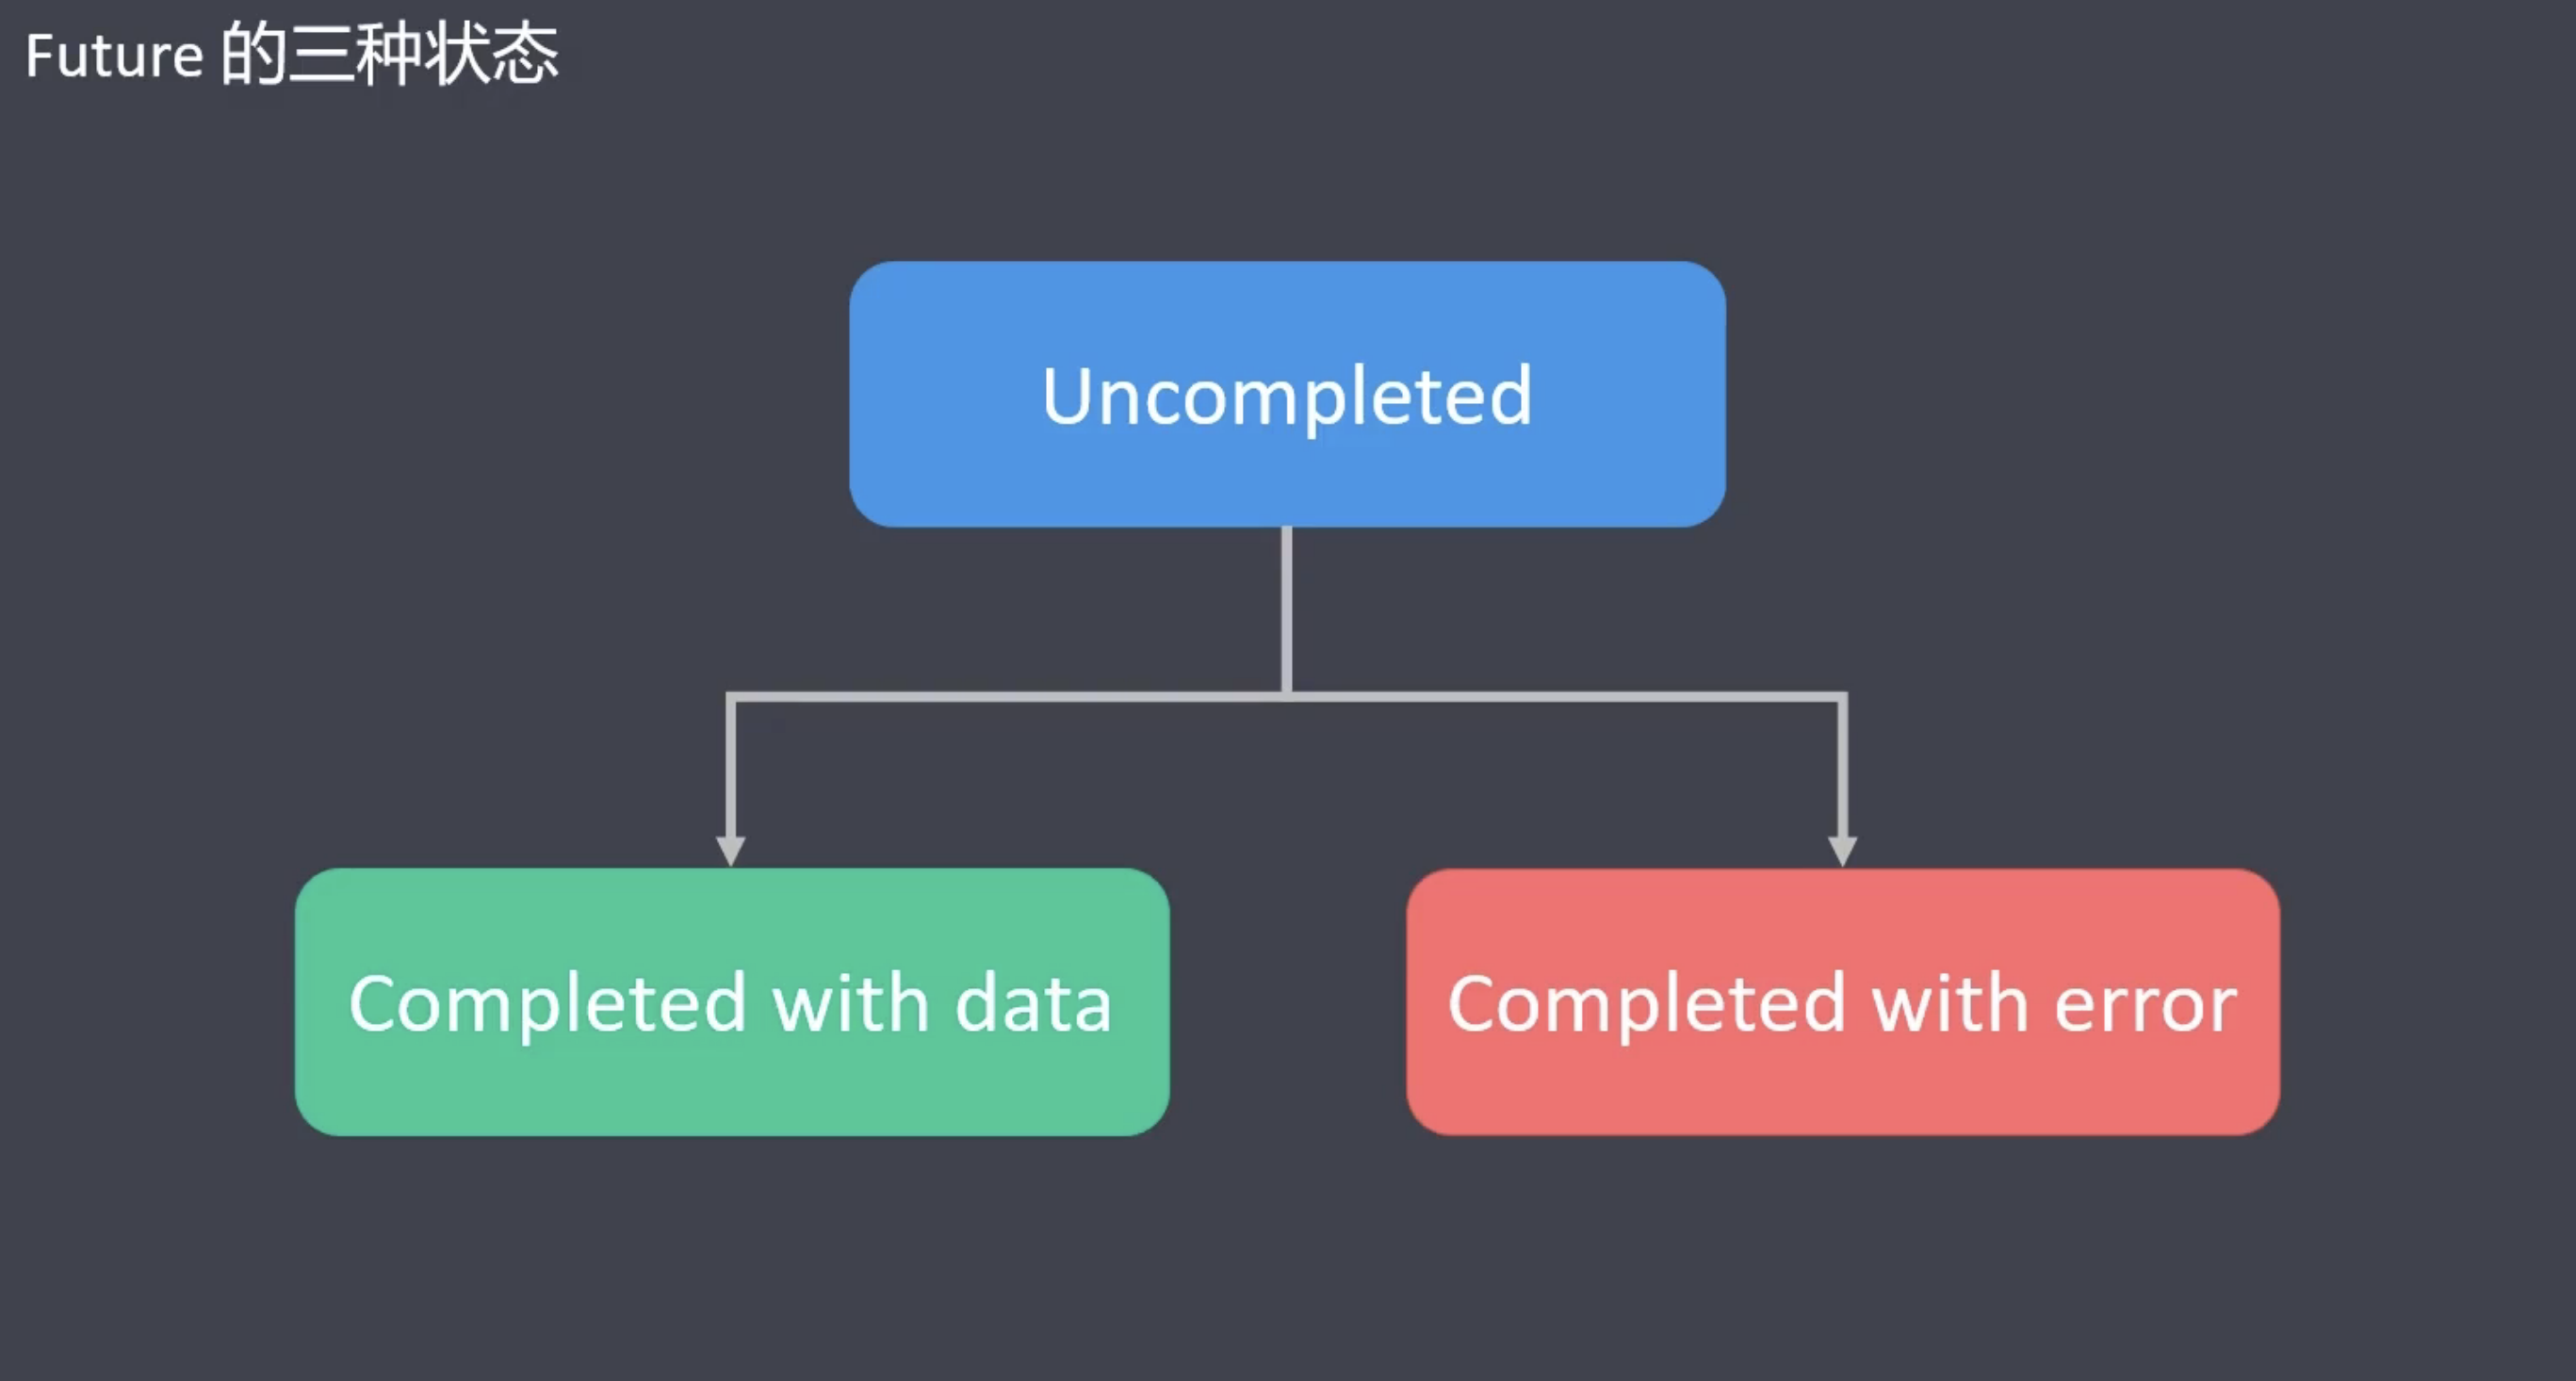
- Future 有三种状态
- 未完成 (Uncompleted)
- 已完成, 并返回数据 (Completed with data)
- 已完成, 但返回报错 (Completed with error)
获取 future 实例
- 自动返回
final myFuture = http.get(Uri.https('https://google.com'));final myFuture = SharedPreferences.getInstance;
- 手动创建
final myFuture = Future((){return 123;})final myFuture = Future.error(Exception());final myFuture = Future.delayed(Duration(seconds:5),() => 123)
Future 状态相关的方法
- 创建
- Uncompleted
- then()
- Completed with data
- catchError()
- Completed with error
- whenComplete()
- Completed with data + Completed with error
// 数字是执行的顺序
void main(){
  // 创建 Future 实例
  final f = Future((){
    print('Create the future');
    return 123;
  });

  /// result:
  /// 1. Instance of 'Future<int>'
  /// 3. Create the future
  print(f);

  f.then((value) => print(value));  // result: 4. 123

  print('Done with main');  // result: 2. Done with main
}
Future delayed
void main() {
  Future.delayed(Duration(seconds: 2), () {
    return 123;
    // throw Error(); // 注:执行这个抛出错误会跳到 catchError 代码块执行
  }).then((value) {
    print(value); // result: 2 注:在延迟两秒后输出了2
  }).catchError((err) {
    // test
    print(err); // 无错误不打印
  }, test: (error) => error.runtimeType == String).whenComplete(
      () => print('不管对错,代码都会执行'));
}
Future 执行顺序
- Future 默认是异步任务, 会被丢到事件队列 (event queue) 中
- Future.sync()
- 同步任务, 同步执行 (不会被丢到异步队列中)
- Future.microtask()
- 微任务, 会丢到 microtask queue 中,优先级比事件任务高
- Future.value(val)
- val 是常量 (等同于 microtask)
- val 是异步 (按照异步逻辑处理)
// 优先级:同步 > 异步(微任务) > 异步(宏任务), 当优先级同样的时候,按先进先出事件队列规则执行
// 数字是执行的顺序
void main() {
  print('start'); // result: 1. start
  // event queue
  Future(() => print('Future() task')); // result: 6. Future() task

  Future.sync(() => print('Future.sync() task')); // 2. result: Future.sync() task

  // 如果 value 后面的值 ,是一个 Future ,那么 Future.value 创建的是宏任务,优先级低
  Future.value(Future(() =>
      print('Future.value future task'))); // result: 7. Future.value future task

  // 如果 value 后面的值 ,是常量 ,那么 Future.value 创建的是微任务
  Future.value('Future.value() const task')
      .then((value) => print(value)); // result: 4. Future.value() const task

  // microtask queue
  Future.microtask(() =>
      print('Future.microtask() task')); // result: 5. Future.microtask() task

  print('end'); // result: 3. end
}
Future 多任务
Future.any(futures): 返回最先完成的 Future 结果, 其余的抛弃Future.wait(futures): 等待所有 Future 执行, 并收集所有 Future 的返回结果Future.doWhile(action): 按照条件遍历执行多个 FutureFuture.forEach(elements,action): 遍历一个给定的集合,根据集合元素执行多个 Future
Futrue.any()
// Futrue.any()
void main() {
  print('start');

  // 返回最先完成的异步任务的结果,result: 3
  Future.any([
    Future.delayed(Duration(seconds: 4)).then((value) => 1),
    Future.delayed(Duration(seconds: 2)).then((value) => 3),
    Future.delayed(Duration(seconds: 3)).then((value) => 2),
  ]).then((value) => print(value));

  print('end');
}
Futrue.wait()
// Futrue.wait()
void main() {
  print('start');

  // 等待所有异步任务完成,并返回所有异步任务的结果,result: [1,3,2]
  Future.wait([
    Future.delayed(Duration(seconds: 4)).then((value) => 1),
    Future.delayed(Duration(seconds: 2)).then((value) => 3),
    Future.delayed(Duration(seconds: 3)).then((value) => 2),
  ]).then((value) => print(value));

  print('end');
}
Futrue.doWhile()
// Futrue.doWhile()
void main() {
  print('start');
  int i = 0;
  // 等待所有异步任务完成,并返回所有异步任务的结果,result: [1,3,2]
  Future.doWhile(() {
    i++;
    return Future.delayed(new Duration(seconds: 1), () {
      print(i); // result: 1  2  3
      return i < 3;
    }).then((value) {
      print(value);   // result: true  true  false
      return value;
    });
  });
  print('end');
}
Futrue.forEach()
// Futrue.forEach()
void main() {
  print('start');
  Future.forEach([1, 2, 3], (ele) {
    return Future.delayed(Duration(seconds: 2), () {
      print('当前元素:$ele'); // 当前元素:1  当前元素:2  当前元素:3
      return '$ele aaa'.toString();
    });
  });
  print('end');
}
FutureBuilder
- FutureBuilder 是 Flutter SDK 中提供的异步组件
- FutureBuilder 是一个类, 接受 Future 数据, 并将数据渲染成界面
import 'package:flutter/material.dart';
- FutureBuilder 里面有三个属性
- future
- initialData
- builder(context,snapshot)
snapshot
- snapshot.connectionState
ConnectionState.none(未连接异步任务)ConnectionState.waining(连接异步任务,等待交互)ConnectionState.active(正在交互)ConnectionState.done(异步任务完成)
- snapshot.hasData (Completed with data)
- snapshot.data
- snapshot.hasError (Completed with error)

Stream
- Stream 是 Dart 中的异步数据流, 可以连续不断的返回多个数据
- Future 是异步, 但只返回一个值
- Stream 也是异步, 可以返回多个值 (数据流)
- Stream 相关的 API
- 通过 listen 进行数据监听
- 通过 error 接收失败状态
- 通过 done 接收结束状态
Stream 类型
- Single-Subscription (单一订阅)
- 数据流只能被 listen 一次 (listen 多次会报错)
StreamController().streamStream stream = Stream.fromIterable(data)
- Broadcast (广播)
- 数据流可以被 listen 多次
StreamController<int>.broadcast();stream.asBroadcastStream()
单一订阅
import 'dart:async';
void main(){
  // 创建单一订阅数据流
  final StreamController controller = StreamController();

  // 第一次监听
  controller.stream.listen((event){
    print('Data is $event');  // result: Data is abc , Data is 123
  });

  // 给数据流添加数据
  controller.sink.add('abc');
  controller.sink.add('123');
}
广播
import 'dart:async';
/// result:
/// Data1 is abc
/// Data2 is 123
/// Data1 is 123
/// 因为第一次时候只有一个监听者,所以只打印一条,第二次就有两个监听者,打印两次
void main(){
  // 创建广播流
  StreamController controller = StreamController.broadcast();

  // 第一次监听
  controller.stream.listen((event){
    print('Data1 is $event');  // result: Data is abc , Data is 123
  });

  // 给数据流添加数据
  controller.sink.add('abc');

  // 第二次监听
  controller.stream.listen((event){
    print('Data2 is $event');  // result: Data is abc , Data is 123
  });

  // 给数据流添加数据
  controller.sink.add('123');
}
创建 Stream 实例
- StreamController 类
- sink
- stream
- Stream 类
Stream.fromFuture()Stream.fromFutures()Stream.fromIterable()Stream.periodic()
Stream.fromFuture()
// Stream.fromFuture()
void main() {
  /// result:
  /// Stream.fromFuture: 当前时间:2024-05-02 19:53:22.905560
  /// Stream.fromFuture: done
  Stream.fromFuture(getData())
      .listen((event) => print('Stream.fromFuture: $event'))
      .onDone(() {
    print('Stream.fromFuture: done');
  });
}

Future<String> getData() {
  return Future.delayed(Duration(seconds: 1), () {
    return '当前时间:${DateTime.now()}';
  });
}
Stream.fromFutures()
// Stream.fromFutures()
void main() {
  /// result:
  /// Stream.fromFutures: 当前时间:2024-05-02 19:51:52.976389
  /// Stream.fromFutures: 当前时间:2024-05-02 19:51:52.979460
  /// Stream.fromFutures: 当前时间:2024-05-02 19:51:52.979502
  /// Stream.fromFutures: 当前时间:2024-05-02 19:51:52.979514
  /// Stream.fromFutures: 当前时间:2024-05-02 19:51:52.979523
  /// Stream.fromFutures: done
  List<Future> futures = [getData(),getData(),getData(),getData(),getData()];
  Stream.fromFutures(futures)
      .listen((event) => print('Stream.fromFutures: $event'))
      .onDone(() {
    print('Stream.fromFutures: done');
  });
}

Future<String> getData() {
  return Future.delayed(Duration(seconds: 1), () {
    return '当前时间:${DateTime.now()}';
  });
}
Stream.fromIterable()
// Stream.fromIterable()
void main() {
  /// result:
  /// Stream.fromIterable: 1
  /// Stream.fromIterable: 2
  /// Stream.fromIterable: hello
  /// Stream.fromIterable: true
  /// Stream.fromIterable: null
  /// Stream.fromIterable: done
  List data = [1, 2, 'hello', true, null];
  Stream.fromIterable(data)
      .listen((event) => print('Stream.fromIterable: $event'))
      .onDone(() {
    print('Stream.fromIterable: done');
  });
}
Stream.periodic()
// Stream.periodic():周期性任务
void main() {
  /// result:
  /// Stream.periodic: 1
  /// Stream.periodic: 2
  /// Stream.periodic: hello
  /// Stream.periodic: true
  /// Stream.periodic: null
  /// Stream.periodic: done
  Duration interval = Duration(seconds: 1);
  // 如果不设定第二个参数,返回值是 null , 带有第二个参数,则返回具体的数据
  // 加个 take(5) 限制只循环5次,不然会无限循环
  Stream.periodic(interval, (data) => data)
      .take(5)
      .listen((event) => print('Stream.periodic: $event'))
      .onDone(() {
    print('Stream.periodic: done');
  });
}
操作 Stream
take()
- take() : 方法用于从源 Stream 中获取前 count 个事件,然后自动关闭流。这个方法非常有用当你只需要处理流中的固定数量事件时。
- 参数:count —— 表示要从流中接收的事件数量。
- 返回:一个新的 Stream,它只发射源流的前 count 个事件。
// 例子: take(3)创建了一个新的流,它只发射前三个数字然后结束。
void main(){
  Stream.fromIterable([1, 2, 3, 4, 5])
    .take(3)
    .listen(print); // result: 1, 2, 3
}
takeWhile()
- takeWhile() : 方法用于接收源流中的事件,直到遇到一个不符合条件的事件为止。一旦条件不满足,流会自动关闭,后续的事件即使符合条件也不会被处理。
- 参数:test —— 一个返回布尔值的函数,用于检查每个事件是否应该被包括在新的流中。
- 返回:一个新的 Stream,它根据 test 函数的结果来发射事件。
// 例子: 只要遇到数字小于4的,takeWhile就会继续发射,一旦遇到4,流就关闭了,即使5也小于4,它也不会被处理。
void main(){
  Stream.fromIterable([1, 2, 3, 4, 5])
    .takeWhile((x) => x < 4)
    .listen(print); // result: 1, 2, 3
}
where()
- where() : 方法用于从一个 Stream 中筛选出符合特定条件的事件。
- 参数:test —— 一个返回布尔值的函数,用来检查每个事件是否符合条件。
- 返回:一个新的 Stream,只包含满足给定条件的事件。
- 使用场景
- 数据筛选:在实际的应用中,你可能需要从一个包含多种数据类型或值的流中筛选出符合特定条件的数据。例如,从一个设备状态更新的流中筛选出错误状态的事件。
- 流的条件处理:在构建具有条件逻辑的复杂流处理管道时,where 方法可以作为过滤器使用,确保只有符合条件的数据项能够进入下一个处理阶段。
// 例子: 创建了一个新的流,它只包含原始流中大于2的数字。
void main(){
  Stream.fromIterable([1, 2, 3, 4, 5])
    .where((x) => x > 2)
    .listen(print); // result: 3, 4, 5
}
distinct()
- distinct() : 方法用于从流中移除连续重复的事件。
- 参数:equals —— 可选参数,一个比较两个事件是否相等的函数。如果未提供,将使用对象的 == 运算符来判断是否相等。
- 返回:一个新的 Stream,包含从原始流中去除了重复项后的事件。
- 使用场景
- 数据去重:当从外部源(如数据库或网络请求)接收数据时,可能会收到重复的数据。使用 distinct 可以确保处理的数据是唯一的。
- 事件去重:在用户界面编程中,可能会遇到多次触发相同事件的情况。distinct 方法可以防止因重复事件而造成的不必要的界面更新或逻辑处理。
// 例子: 创建了一个新的流,只包含没有连续重复的整数。
void main(){
  Stream.fromIterable([1, 2, 2, 3, 4, 4, 4, 5, 4])
    .distinct()
    .listen(print); // result: 1, 2, 3, 4, 5, 4
}// 例子: 自定义的 equals 函数使得字符串比较不区分大小写,因此只保留了不同的词,忽略了大小写的差异。
void main(){
Stream.fromIterable(['apple', 'banana', 'APPLE', 'Apple'])
.distinct((a, b) => a.toLowerCase() == b.toLowerCase())
.listen(print); // result: 'apple', 'banana', ‘APPLE
}skip()
- skip() : 方法用于跳过流中的前 count 个事件。这对于需要忽略流开始部分的数据时非常有用。
- 参数:count —— 表示要跳过的事件数量。
- 返回:一个新的 Stream,该流不包含被跳过的前 count 个事件。
// 例子: skip(2)将跳过前两个事件,因此输出从第三个事件开始。
void main(){
  Stream.fromIterable([1, 2, 3, 4, 5])
    .skip(2)
    .listen(print); // result: 3, 4, 5
}
skipWhile()
- skipWhile() : 方法用于跳过流中满足给定条件的连续事件,直到遇到不满足条件的事件为止。一旦有事件不符合条件,剩余的事件都将被包含在返回的流中。
- 参数:test —— 一个返回布尔值的函数,用于检查每个事件是否应该被跳过。
- 返回:一个新的 Stream,只包含在不满足 test 函数的条件后的事件。
- 使用场景
- 数据预处理:skip()和 skipWhile()可以用于预处理阶段,去除不需要的数据项,比如跳过文件的头部信息或者日志开始的无用部分。
- 条件过滤:skipWhile()在流处理中尤其有用,它允许基于动态条件(可能依赖于流中之前的数据)来跳过数据。
// 例子: 只要数字小于4,skipWhile就会继续跳过,当遇到4时,跳过行为停止,4和5都会输出。
main(){
  Stream.fromIterable([1, 2, 3, 4, 5])
    .skipWhile((x) => x < 4)
    .listen(print); // result: 4, 5
}
map()
- map() : 方法用于将流中的每个事件通过给定的函数转换成一个新的形式。这种转换操作对于在异步数据流中进行数据处理和转换尤其有用,和 JS 中的 map() 功能差不多
- 参数:convert —— 一个函数,接受当前流中的一个事件,并返回一个新的值。
- 返回:一个新的 Stream,它发射原始流中每个事件经过 convert 函数处理后的结果。
- 使用场景
- 数据转换:当需要将流中的原始数据转换为另一种格式或结构时,map 是非常有用的工具。
- 流的增强:可以使用 map 来增加或修改流中的数据,例如添加标签、计算新值等。
- 链式处理:map 可以与其他流操作如 where、skip 等结合使用,形成强大的处理管道。
// 例子: 创建了一个新的流,其中包含原始流每个整数加倍后的结果。
void main(){
  Stream.fromIterable([1, 2, 3, 4, 5])
    .map((x) => x * 2)
    .listen(print); // result: 2, 4, 6, 8, 10
}// 更复杂的使用情况
// 例子: 先通过 int.parse 将字符串转换为整数,然后再通过另一个 map 转换成字符串,前面加上一些描述性的文字。
void main(){
Stream.fromIterable(['1', '2', '3', '4', '5'])
.map(int.parse)
.map((number) => 'Number is $number')
.listen(print); // result: 'Number is 1', 'Number is 2', ..., 'Number is 5'
}expand()
- expand() : 方法用于将流中的每个事件转换成一个或多个事件。这个方法对于处理那些需要将单个事件扩展成多个输出事件的场景非常有用。
- 参数:convert —— 一个函数,接受当前流中的一个事件,并返回一个 Iterable,这个 Iterable 包含了一个或多个新的事件。
- 返回:一个新的 Stream,它将原始流中的每个事件通过 convert 函数展开成多个事件。
- 使用场景
- 数据展开:当流中的事件包含复杂数据结构或聚合数据时,expand 可以用来展开这些结构,使每个子部分都可以作为单独的事件进行处理。
- 增加流的事件数量:如果需要从现有的数据生成更多的事件,比如进行数据扩增或详细分析时,expand 提供了一种灵活的方式来实现这一点。
// 例子: 每个字符串首先被 split(',') 方法分割成单独的数字字符串,然后通过 map(int.parse) 转换成整数。expand 方法将这些整数作为独立的事件发射。
void main(){
  Stream.fromIterable(["1,2,3", "4,5", "6,7,8,9"])
    .expand((item) => item.split(',').map(int.parse))
    .listen(print); // 输出 1, 2, 3, 4, 5, 6, 7, 8, 9
}
toList()
- toList() : 方法将流中的所有事件收集到一个 List 中。这是一个异步操作,因此返回的是一个 Future<List<T>>
- 返回:Future<List<T>> —— 包含流中所有事件的列表。
- 使用场景
- toList() 在需要对流中的所有数据进行操作或者需要等待所有数据处理完成时非常有用。
// 例子: 流中的所有整数都被收集到一个列表中
void main(){
  Stream.fromIterable([1, 2, 3, 4, 5])
    .toList()
    .then((List<int> result) {
        print(result); // result [1, 2, 3, 4, 5]
    });
}
toSet()
- toSet() : 方法将流中的所有事件收集到一个 Set 中。与 toList() 类似,这也是异步操作,因此返回的是一个 Future<Set<T>>。
- 返回:Future<Set<T>> —— 包含流中所有事件的集合,自动去除重复项。
- 使用场景
- toSet() 在需要从流中移除重复数据时非常有效。
// 例子: 重复的元素在集合中自动被去除
void main(){
  Stream.fromIterable([1, 2, 2, 3, 3, 3])
    .toSet()
    .then((Set<int> result) {
        print(result); // result: {1, 2, 3}
    });
}
toString()
- toString() : 对于 Stream 来说,toString() 不会返回流中的数据,而是返回描述这个 Stream 对象的字符串。
- 使用场景
- toString() 在调试过程中可以用来验证流的类型或状态。
// 例子: 只显示流的类型信息,并不会展示流的内容
void main(){
  Stream<int> stream = Stream.fromIterable([1, 2, 3]);
  print(stream.toString()); // result: Stream<int>
}
length | first | last
- length : 方法用于获取流中的事件总数。这是一个异步方法,因为只有当流完成时,才能确定里面有多少事件。它返回一个 Future<int>,表示流中事件的数量。
- 返回:Future<int> —— 流中的事件数量。
- first : 方法用于获取流中的第一个事件。如果流为空,则返回的 Future 会抛出 NoSuchElementException。此方法返回的是一个 Future<T>。
- 返回:Future<T> —— 流中的第一个事件。
- last : 方法用于获取流中的最后一个事件。如果流为空,返回的 Future 也会抛出 NoSuchElementException。它返回的是一个 Future<T>。
- 返回:Future<T> —— 流中的最后一个事件。
- 使用场景
- 数据计数:length 可以用来计算流中事件的总数,这对于数据分析和监控很有帮助。
- 访问特定事件:first 和 last 可以用来访问流中的特定事件,这在你只关心开始或结束的数据时非常有用。
// length
// 例子: length 返回流中的事件数量。
void main(){
  Stream.fromIterable([1, 2, 3, 4, 5])
    .length
    .then((int count) {
        print(count); // result: 5
    });
}// first
// 例子: first 获取并输出流中的第一个事件。
void main(){
Stream.fromIterable([1, 2, 3])
.first
.then((int first) {
print(first); // result: 1
});
}// last
// 例子: last 获取并输出流中的最后一个事件。
void main(){
Stream.fromIterable([1, 2, 3, 4, 5])
.last
.then((int last) {
print(last); // result: 5
});
}StreamBuilder
- StreamBuilder 是 Flutter SDK 中提供的异步组件
- StreamBuilder 是一个类, 接收 Stream 数据, 并将数据渲染成界面
import 'package:flutter/material.dart';
- StreamBuilder 中, 有三个属性
- stream
- initialData
- builder(context,snapshot)
snapshot
- snapshot.connectionState
ConnectionState.none(未连接异步任务)ConnectionState.waining(连接异步任务,等待交互)ConnectionState.active(正在交互)ConnectionState.done(异步任务完成)
- snapshot.hasData (Completed with data)
- snapshot.data
- snapshot.hasError (Completed with error)
async / await
- async : 标记函数是一个异步函数, 其返回值类型是 Future
- await : 等待某个异步方法执行完毕
- 用来等待耗时操作的返回结果, 这个操作会阻塞后面要执行的代码
- 作用
- await 会等待异步任务执行 (相当于将异步转换成同步)
- async-await 简化代码, 防止回调地域的产生
void main() {
  /// 执行顺序
  /// result:
  /// 1. start
  /// 2. end
  /// 3. Future.delayed
  print('start');

  text();

  print('end');
}

Future text() {
  return Future.delayed(Duration(seconds: 1), () {
    print('Future.delayed');
    return 123;
  });
}void main() async {
/// 执行顺序
/// result:
/// 1. start
/// 2. Future.delayed
/// 3. end
print('start');
// 会等待 text() 执行完成后,再执行下面的代码
await text();
print('end');
}
Future text() {
return Future.delayed(Duration(seconds: 1), () {
print('Future.delayed');
return 123;
});
}Generator (生成器)
- 生么是生成器
- 生成器是一种特殊的函数, 返回值通过 yield 关键词来指定
- 生成器的分类
- 同步生成器 ( sync + yield )
- 使用 sync* , 返回的是 Iterable 对象
- yield 会返回 moveNext 为 true , 并等待 moveNext 指令
- 异步生成器 ( async + yield )
- 使用 async* , 返回的是 Stream 对象
- yield 不用暂停, 数据以流的方式一次性推送
- 递归生成器 (yield*)
- yield* 是指针, 指向递归函数
- 同步生成器 ( sync + yield )
sync (同步生成器)
void main() {
  /// result:
  /// 1. start
  /// 2. 0
  /// 3. 1
  /// 4. 2
  /// 5. 3
  /// 6. 4
  /// 7. end

  var res = getNumber(5).iterator;
  while (res.moveNext()) {
    print(res.current);
  }
}

// 同步生成器
Iterable<int> getNumber(int? n) sync* {
  print('start');
  int i = 0;
  while (i < n!) {
    yield i++;
  }
  print('end');
}
async (异步生成器)
main() {
  /// result:
  /// 1. start
  /// 2. end
  /// 3. 3
  /// 4. 2
  /// 5. 1
  /// 6. Done

  print('start');

  Stream<int> s = asyncCountDown(3);
  s.listen((val) => print(val)).onDone(() => print('Done'));

  print('end');
}

// 异步生成器
Stream<int> asyncCountDown(int n) async* {
  while (n > 0) {
    yield n--;
  }
}
yield* (递归生成器)
void main() {
  /// result:
  /// start
  /// 1
  /// 2
  /// 3
  /// end
  final Iterable s = getRange(1, 3);
  print('start');
  s.forEach((ele) => print(ele));
  print('end');
}

// 同步递归生成器
Iterable<int> getRange(int start, int end) sync* {
  if (start <= end) {
    yield start;
    // 实现递归调用
    //for (final val in getRange(start + 1, end)) {
    //  yield val;
    //}
    // 使用 yield* 实现递归调用
    yield* getRange(start + 1, end);
  }
}