Widget
Base Widget
Text() - 文本
- Text
- TextDirection (文本方向)
- TextStyle (文本样式)
- color (文本颜色)
- fontSize (字体大小)
- fontStyle (字体样式)
- fontWeight (字体粗细)
- TextAlign (文本对其)
- TextOverflow (文本溢出)
- maxLines (指定显示最大行数)
- RichText 与 TextSpan
dart
// Text() 示例
class TextDemo extends StatelessWidget {
  const TextDemo({super.key});
  @override
  Widget build(BuildContext context) {
    return const Column(children: [
      Text(
        "Flutter 是一个由 Google 开发并开源的 UI 工具包,用于从单一代码库构建跨平台的美观、原生速度的移动、Web 和桌面应用程序。它首次推出于 2017 年,并迅速成为开发者社区中的热门选择,特别是对于那些寻求一种高效方式来开发 iOS 和 Android 应用的开发者。",
        textDirection: TextDirection.ltr,
        style: TextStyle(
            fontSize: 30,
            color: Colors.purple,
            fontWeight: FontWeight.w500,
            fontStyle: FontStyle.italic,
            overflow: TextOverflow.ellipsis,
            decoration: TextDecoration.lineThrough,
            decorationColor: Colors.purple),
        textAlign: TextAlign.center,
        maxLines: 3,
      )
    ]);
  }
}
1
2
3
4
5
6
7
8
9
10
11
12
13
14
15
16
17
18
19
20
21
22
23
2
3
4
5
6
7
8
9
10
11
12
13
14
15
16
17
18
19
20
21
22
23

Text 展示效果
RichText() - 副文本
dart
// RichText() 示例
class TextDemo extends StatelessWidget {
  const TextDemo({super.key});
  @override
  Widget build(BuildContext context) {
    return Column(children: [
      Center(
        child: RichText(
            text: const TextSpan(
                text: "Hello ",
                style: TextStyle(
                    color: Colors.black,
                    fontSize: 30,
                    fontWeight: FontWeight.bold),
                children: [
              TextSpan(
                  text: "Flutter! ",
                  style: TextStyle(
                      color: Colors.purple,
                      fontSize: 30,
                      fontWeight: FontWeight.bold)),
              TextSpan(
                  text: "你好,世界!",
                  style: TextStyle(
                      backgroundColor: Colors.yellow,
                      color: Colors.white,
                      fontSize: 30,
                      fontWeight: FontWeight.bold))
            ])),
      )
    ]);
  }
}
1
2
3
4
5
6
7
8
9
10
11
12
13
14
15
16
17
18
19
20
21
22
23
24
25
26
27
28
29
30
31
32
33
2
3
4
5
6
7
8
9
10
11
12
13
14
15
16
17
18
19
20
21
22
23
24
25
26
27
28
29
30
31
32
33

RichText 展示效果
Icon() - 图标
- Icon
- Flutter 中的图标库
- Icon (使用:
Icons.add)
- 在线预览
Color() - 颜色
- Color (自定义颜色)
- Flutter 中通过 ARGB 来声明颜色
const Color(0xFF42a5f5);// 16 进制的 ARGB = 透明度 + 六位十六进制颜色const Color.fromARGB(0xFF, 0x42, 0xA5, 0xF5);const Color.fromARGB(255, 66, 255, 245);const Color.fromRGBO(66, 165, 245, 1);// O = Opacity, 透明度
- Colors (英文字母声明的颜色)
Colors.redColors.greenColors.blue
Container() - 容器
- Container
- child (子组件)
- padding & margin
- EdgeInsets: all(),fromLTRB(),only()
- decoration
- BoxDecoration (边框、圆角、渐变、阴影、背景色、背景图片)
- alignment
- Alignment (内容对其)
- transform
- Matrix4 (平移 - translate、 旋转 - rotate、 缩放 - scale、 斜切 - skew)
dart
// Container 示例
class ContainerDemo extends StatelessWidget {
  const ContainerDemo({super.key});

  @override
  Widget build(BuildContext context) {
    return Container(
      // width: 200,
      // height: 200,
      width: double.infinity, // 宽度撑满父元素
      height: double.infinity, // 高度撑满父元素
      padding: const EdgeInsets.all(30),
      margin: const EdgeInsets.fromLTRB(10, 20, 100, 40),
      alignment: Alignment.bottomRight,
      transform: Matrix4.skew(0.1, 0)
        ..scale(0.8)
        ..rotateZ(-0.05)
        ..leftTranslate(40.0, 60), // 链式调用
      decoration: const BoxDecoration(
          color: Colors.lightBlue,
          gradient: LinearGradient(
              colors: [Colors.purple, Colors.lightGreen, Colors.blue],
              begin: Alignment.topCenter,
              end: Alignment.bottomCenter,
              stops: [0.1, 0.5, 0.9]), // 渐变后背景色失效
          border: Border(
            top: BorderSide(color: Colors.purple, width: 5),
            right: BorderSide(color: Colors.purple, width: 15),
            bottom: BorderSide(color: Colors.purple, width: 15),
            left: BorderSide(color: Colors.purple, width: 5),
          ),
          borderRadius: BorderRadius.all(Radius.circular(20))),
      child: const Text(
        'Flutter 是一个由 Google 开发并开源的 UI 工具包,用于从单一代码库构建跨平台的美观、原生速度的移动、Web 和桌面应用程序。它首次推出于 2017 年,并迅速成为开发者社区中的热门选择,特别是对于那些寻求一种高效方式来开发 iOS 和 Android 应用的开发者。',
        style: TextStyle(
            fontSize: 20, color: Colors.white, fontWeight: FontWeight.w600),
      ),
    );
  }
}
1
2
3
4
5
6
7
8
9
10
11
12
13
14
15
16
17
18
19
20
21
22
23
24
25
26
27
28
29
30
31
32
33
34
35
36
37
38
39
40
2
3
4
5
6
7
8
9
10
11
12
13
14
15
16
17
18
19
20
21
22
23
24
25
26
27
28
29
30
31
32
33
34
35
36
37
38
39
40
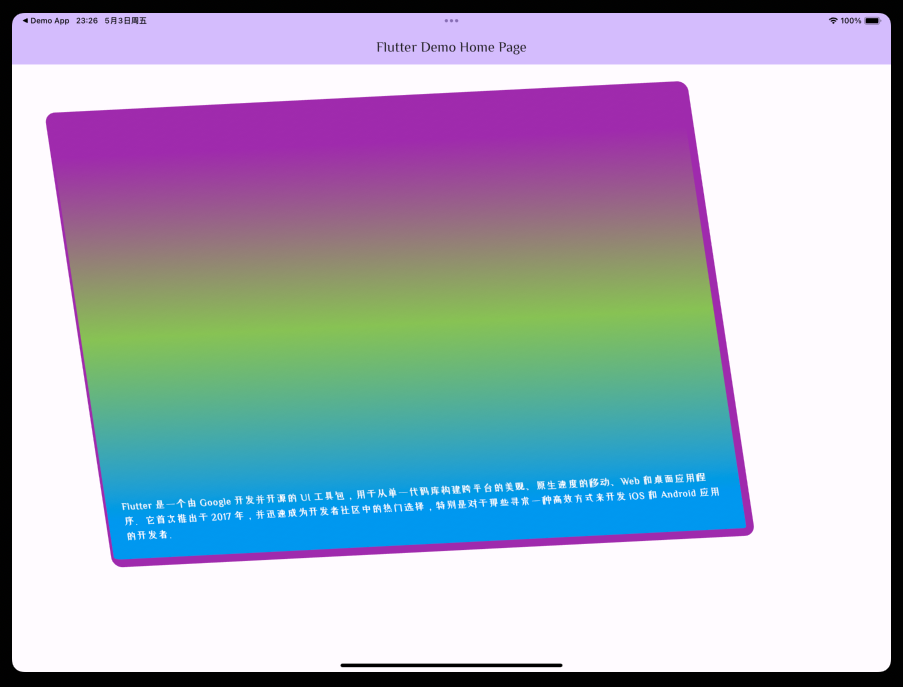
Container 展示效果
Column() - 线性布局
- Column
- Column 中的主轴方向是垂直方向
- mainAxiaAlignment: MainAxisAlignment 主轴对其方式
- crossAxisAlignment: CrossAxisAlignment 交叉轴对其方式
- children: 可放置多个子组件
dart
// Column 示例
class ColumnDemo extends StatelessWidget {
  const ColumnDemo({super.key});

  @override
  Widget build(BuildContext context) {
    return SizedBox(
      width: double.infinity,
      child: Column(
          mainAxisAlignment: MainAxisAlignment.spaceEvenly,   // 主轴垂直方向平均分布
          crossAxisAlignment: CrossAxisAlignment.center, // 交叉轴水平方向居中
          children: [
            Container(
              color: Colors.red,
              height: 100,
              width: 100,
              child: const Icon(
                Icons.ac_unit,
                size: 60,
                color: Colors.white,
              ),
            ),
            Container(
              color: Colors.orange,
              height: 100,
              width: 100,
              child: const Icon(
                Icons.abc,
                size: 60,
                color: Colors.white,
              ),
            ),
            Container(
              color: Colors.green,
              height: 100,
              width: 100,
              child: const Icon(
                Icons.baby_changing_station,
                size: 60,
                color: Colors.white,
              ),
            ),
            Container(
              color: Colors.blue,
              height: 100,
              width: 100,
              child: const Icon(
                Icons.cabin,
                size: 60,
                color: Colors.white,
              ),
            ),
          ]),
    );
  }
}
1
2
3
4
5
6
7
8
9
10
11
12
13
14
15
16
17
18
19
20
21
22
23
24
25
26
27
28
29
30
31
32
33
34
35
36
37
38
39
40
41
42
43
44
45
46
47
48
49
50
51
52
53
54
55
56
2
3
4
5
6
7
8
9
10
11
12
13
14
15
16
17
18
19
20
21
22
23
24
25
26
27
28
29
30
31
32
33
34
35
36
37
38
39
40
41
42
43
44
45
46
47
48
49
50
51
52
53
54
55
56
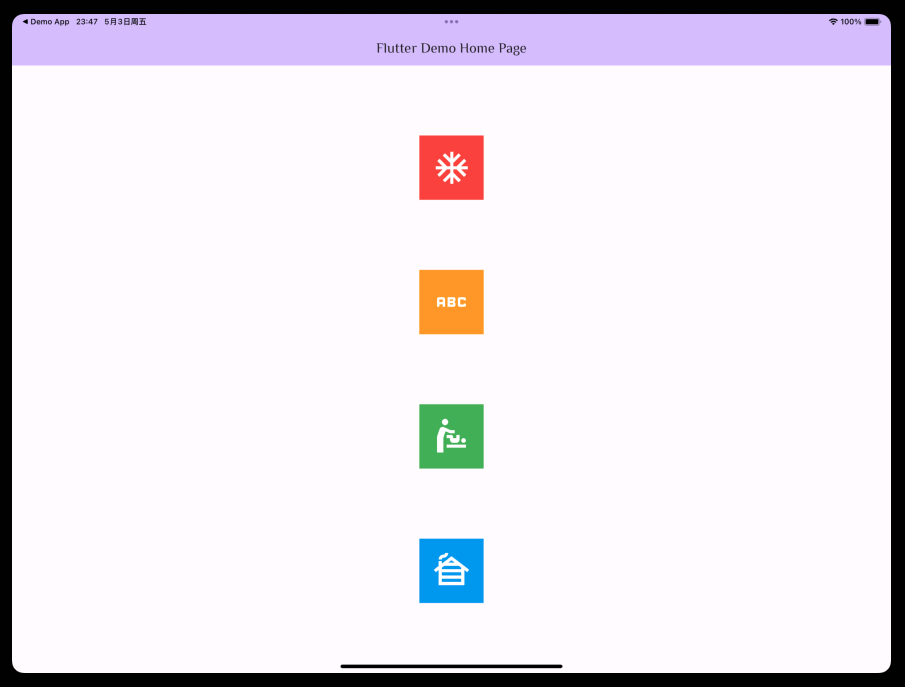
Column 展示效果
Row() - 线性布局
- Row
- Row 中的主轴方向是水平方向
- mainAxiaAlignment: MainAxisAlignment 主轴对其方式
- crossAxisAlignment: CrossAxisAlignment 交叉轴对其方式
- children: 可放置多个子组件
dart
// Row 示例
class RowDemo extends StatelessWidget {
  const RowDemo({super.key});

  @override
  Widget build(BuildContext context) {
    return SizedBox(
      height: double.infinity,
      child: Row(
          mainAxisAlignment: MainAxisAlignment.spaceEvenly, // 主轴水平方向平均分布
          crossAxisAlignment: CrossAxisAlignment.center, // 交叉轴垂直方向居底部
          children: [
            Container(
              color: Colors.red,
              height: 100,
              width: 100,
              child: const Icon(
                Icons.ac_unit,
                size: 60,
                color: Colors.white,
              ),
            ),
            Container(
              color: Colors.orange,
              height: 100,
              width: 100,
              child: const Icon(
                Icons.abc,
                size: 60,
                color: Colors.white,
              ),
            ),
            Container(
              color: Colors.green,
              height: 100,
              width: 100,
              child: const Icon(
                Icons.baby_changing_station,
                size: 60,
                color: Colors.white,
              ),
            ),
            Container(
              color: Colors.blue,
              height: 100,
              width: 100,
              child: const Icon(
                Icons.cabin,
                size: 60,
                color: Colors.white,
              ),
            ),
          ]),
    );
  }
}
1
2
3
4
5
6
7
8
9
10
11
12
13
14
15
16
17
18
19
20
21
22
23
24
25
26
27
28
29
30
31
32
33
34
35
36
37
38
39
40
41
42
43
44
45
46
47
48
49
50
51
52
53
54
55
56
2
3
4
5
6
7
8
9
10
11
12
13
14
15
16
17
18
19
20
21
22
23
24
25
26
27
28
29
30
31
32
33
34
35
36
37
38
39
40
41
42
43
44
45
46
47
48
49
50
51
52
53
54
55
56
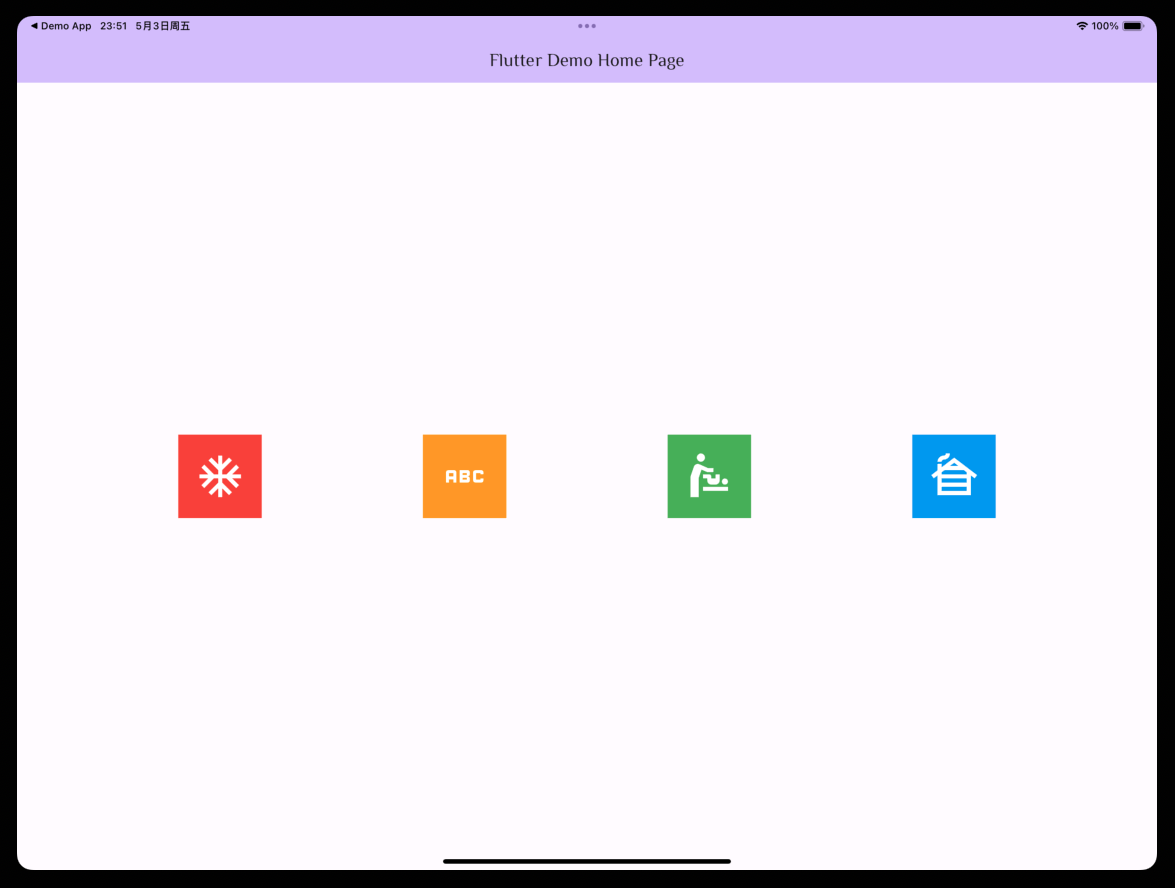
Row 展示效果
Flex() - 弹性布局
- Flex
- direction (声明主轴方向)
- mainAxisAlignment (声明主轴对其方式)
- textDirection (声明水平方向的排列顺序)
- crossAxisAlignment (声明交叉轴对其方式)
- verticalDirection (声明垂直方向的排列顺序)
- children (声明子组件)
- Expanded (可伸缩组件,配套 Flex 使用)
- flex (声明弹性布局所占比例)
- child (声明子组件)
- Flexible (可伸缩组件,配套 Flex 使用)
- flex (声明弹性布局所占比例)
- child (声明子组件)
- fit (默认属性: FlexFit.loose, 子部件可以最多扩展到分配的空间,但也可以更小)
- Spacer (弹性布局里面的占位组件)
- flex (声明弹性布局所占比例)
dart
// Flex 示例
class FlexDemo extends StatelessWidget {
  const FlexDemo({super.key});

  @override
  Widget build(BuildContext context) {
    return Column(
      children: [
        Flex(direction: Axis.horizontal, children: [
          Expanded(
            flex: 1,
            child: Container(
              color: Colors.purple,
              height: 100,
              child: const Icon(
                Icons.abc,
                color: Colors.white,
                size: 50,
              ),
            ),
          ),
          Expanded(
            flex: 1,
            child: Container(
              color: Colors.red,
              height: 100,
              child: const Icon(
                Icons.abc,
                color: Colors.white,
                size: 50,
              ),
            ),
          ),
          Expanded(
            flex: 2,
            child: Container(
              color: Colors.green,
              height: 100,
              child: const Icon(
                Icons.abc,
                color: Colors.white,
                size: 50,
              ),
            ),
          ),
          Expanded(
            flex: 3,
            child: Container(
              color: Colors.blue,
              height: 100,
              child: const Icon(
                Icons.abc,
                color: Colors.white,
                size: 50,
              ),
            ),
          ),
        ]),
        const SizedBox(height: 100),
        Flex(
            direction: Axis.vertical,
            mainAxisSize: MainAxisSize.min,
            children: [
              Flexible(
                flex: 1,
                child: Container(
                  color: Colors.purple,
                  height: 100,
                  child: const Icon(
                    Icons.abc,
                    color: Colors.white,
                    size: 50,
                  ),
                ),
              ),
              Flexible(
                flex: 1,
                child: Container(
                  color: Colors.red,
                  height: 100,
                  child: const Icon(
                    Icons.abc,
                    color: Colors.white,
                    size: 50,
                  ),
                ),
              ),
              Flexible(
                flex: 2,
                child: Container(
                  color: Colors.green,
                  height: 100,
                ),
              ),
              Flexible(
                flex: 3,
                child: Container(
                  color: Colors.blue,
                  height: 100,
                ),
              ),
            ]),
      ],
    );
  }
}
1
2
3
4
5
6
7
8
9
10
11
12
13
14
15
16
17
18
19
20
21
22
23
24
25
26
27
28
29
30
31
32
33
34
35
36
37
38
39
40
41
42
43
44
45
46
47
48
49
50
51
52
53
54
55
56
57
58
59
60
61
62
63
64
65
66
67
68
69
70
71
72
73
74
75
76
77
78
79
80
81
82
83
84
85
86
87
88
89
90
91
92
93
94
95
96
97
98
99
100
101
102
103
104
105
106
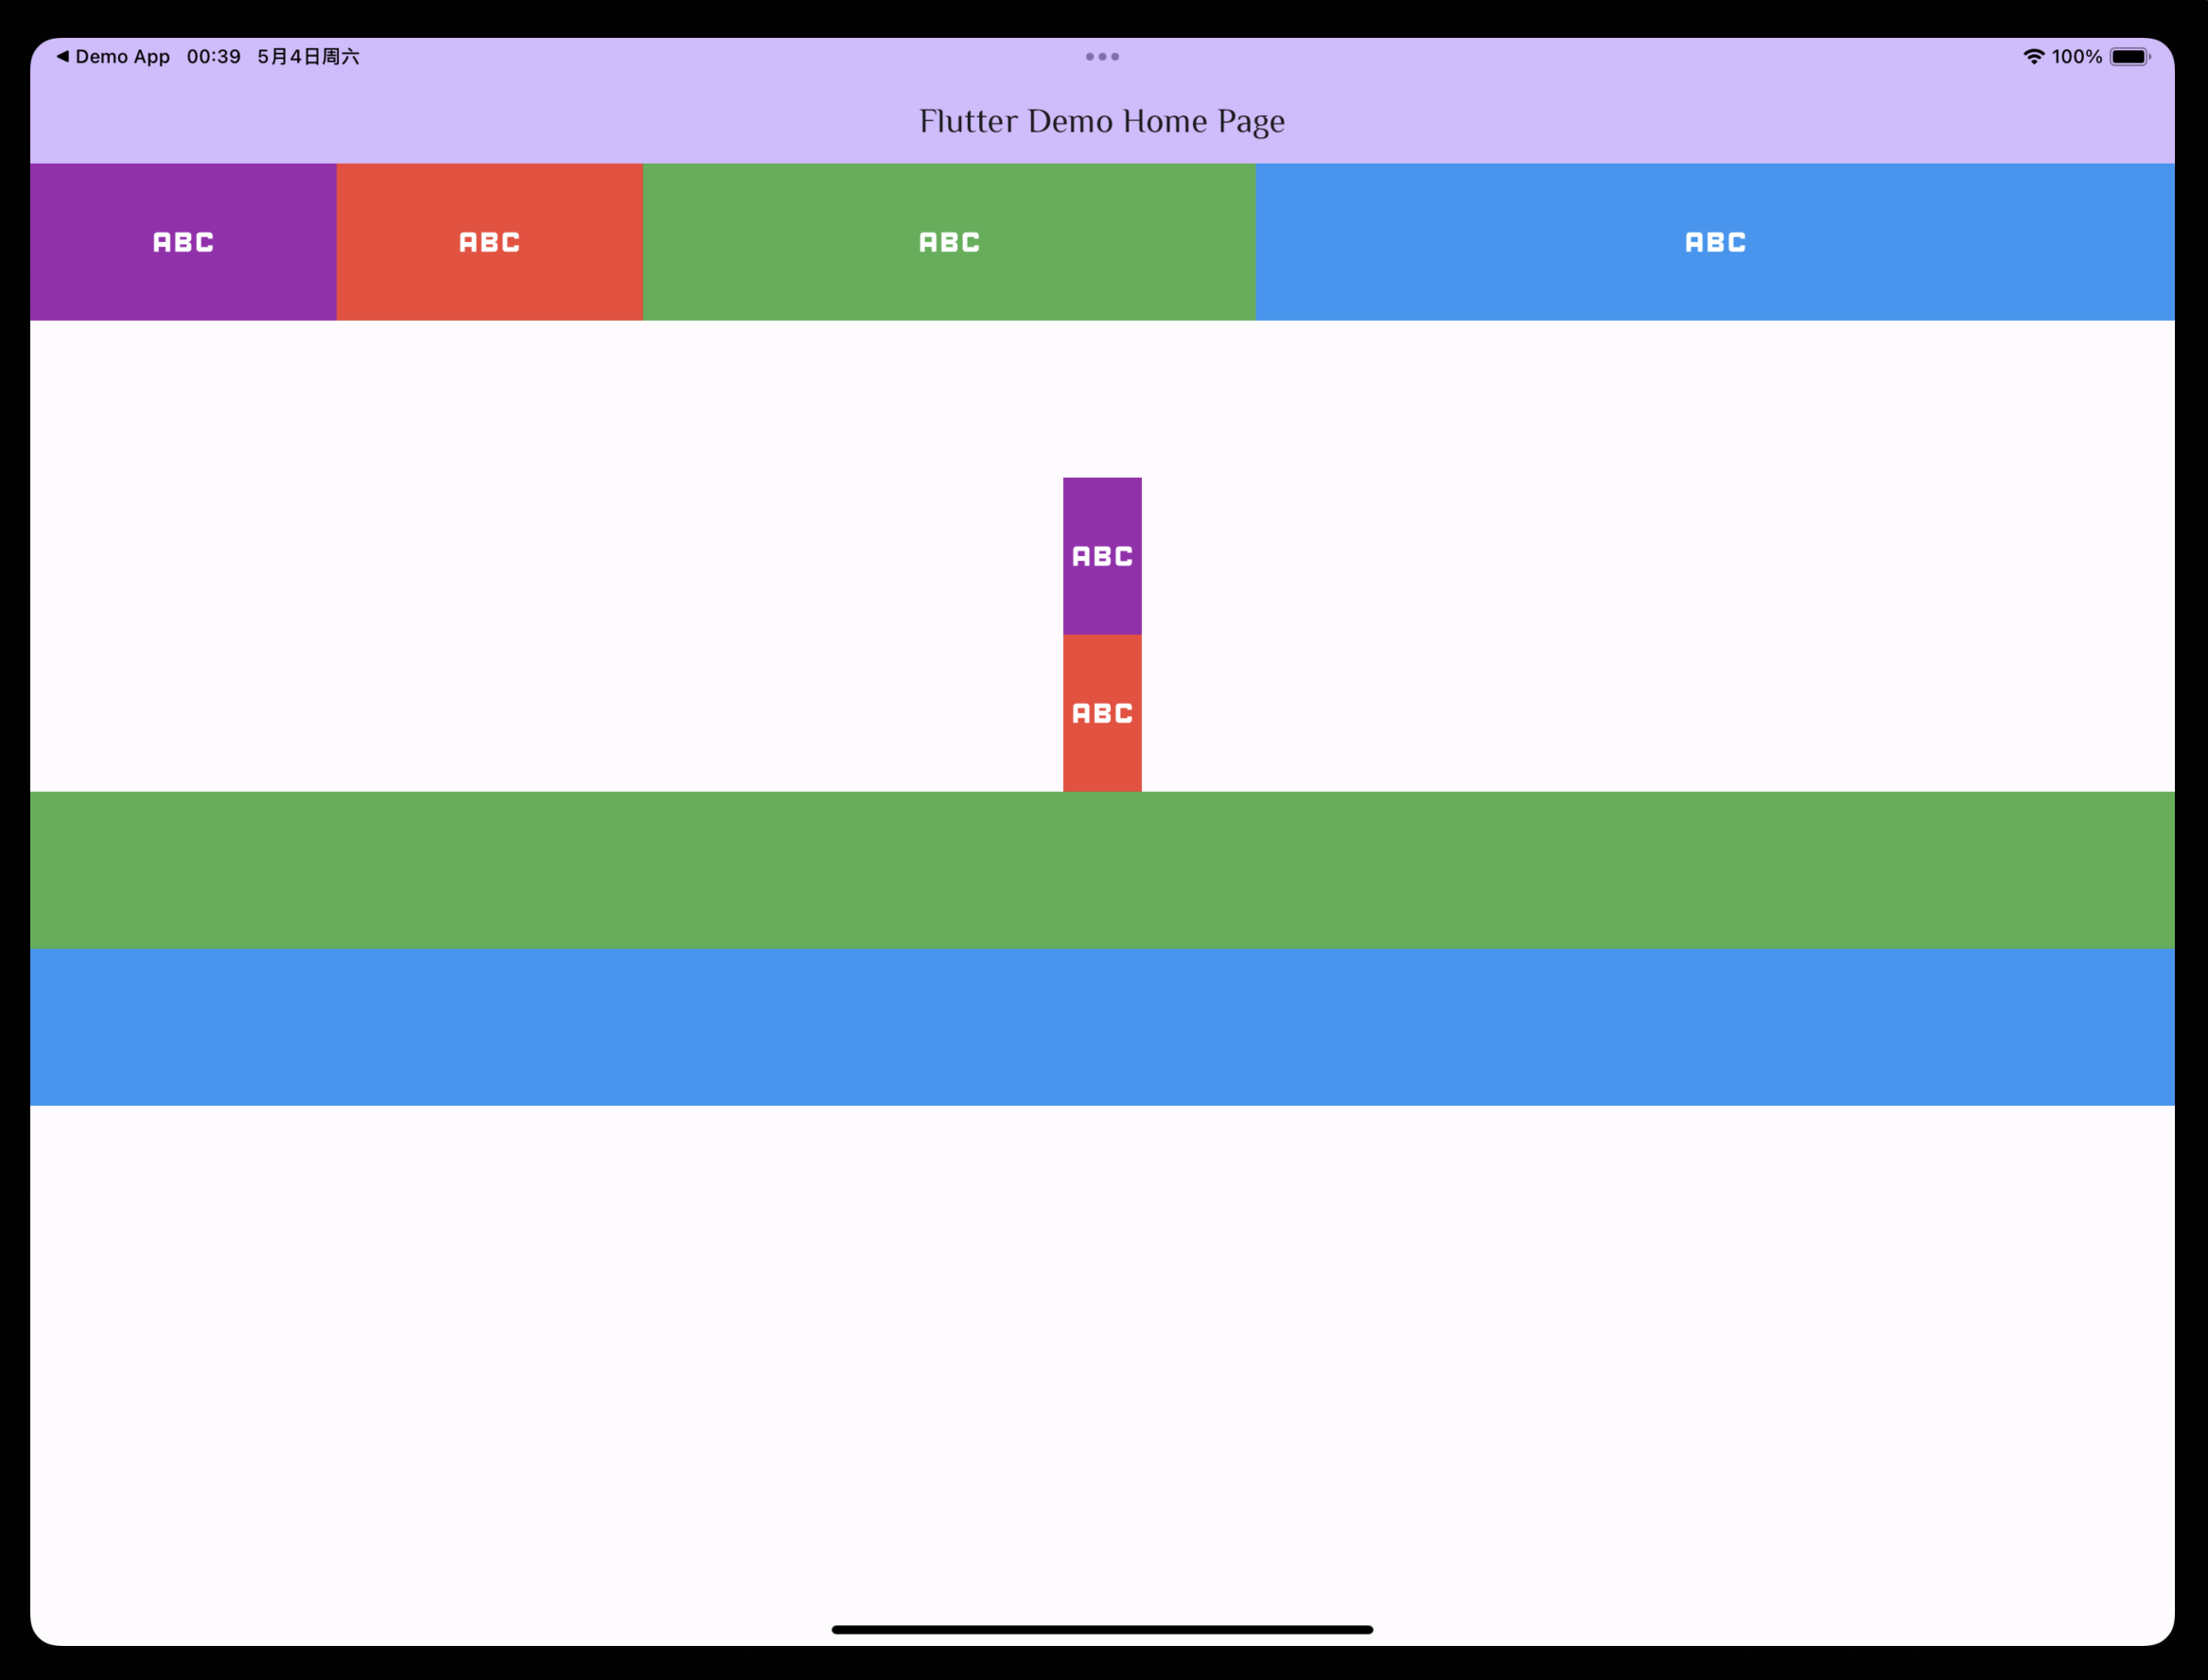
Flex 展示效果
Wrap() - 流式布局
- Wrap
- spacing (主轴方向子组件的间距)
- alignment (主轴方向的对齐方式)
- runSpacing (纵轴方向子组件间距)
- runAlignment (纵轴方向的对齐方式)
- Chip (标签)
- CircleAvatar (圆形头像)
dart
// Wrap 示例
class WrapDemo extends StatelessWidget {
  WrapDemo({super.key});

  final List<String> _list = [
    '刘备',
    '诸葛亮',
    '关羽',
    '张飞',
    '赵云',
    '黄忠',
    '马超',
  ];

  List<Widget> shuCountry() {
    return _list.map((item) {
      return Chip(
        label: Text(
          item,
          style: const TextStyle(fontSize: 30),
        ),
        avatar: const CircleAvatar(
          backgroundColor: Colors.blue,
          child: Text('蜀', style: TextStyle(fontSize: 30, color: Colors.white)),
        ),
      );
    }).toList();
  }

  @override
  Widget build(BuildContext context) {
    return Container(
      padding: const EdgeInsets.all(50),
      child: Column(
        mainAxisAlignment: MainAxisAlignment.center,
        children: [
          Wrap(
            spacing: 20,
            runSpacing: 20,
            alignment: WrapAlignment.center,
            children: shuCountry(),
          )
        ],
      ),
    );
  }
}
1
2
3
4
5
6
7
8
9
10
11
12
13
14
15
16
17
18
19
20
21
22
23
24
25
26
27
28
29
30
31
32
33
34
35
36
37
38
39
40
41
42
43
44
45
46
47
2
3
4
5
6
7
8
9
10
11
12
13
14
15
16
17
18
19
20
21
22
23
24
25
26
27
28
29
30
31
32
33
34
35
36
37
38
39
40
41
42
43
44
45
46
47
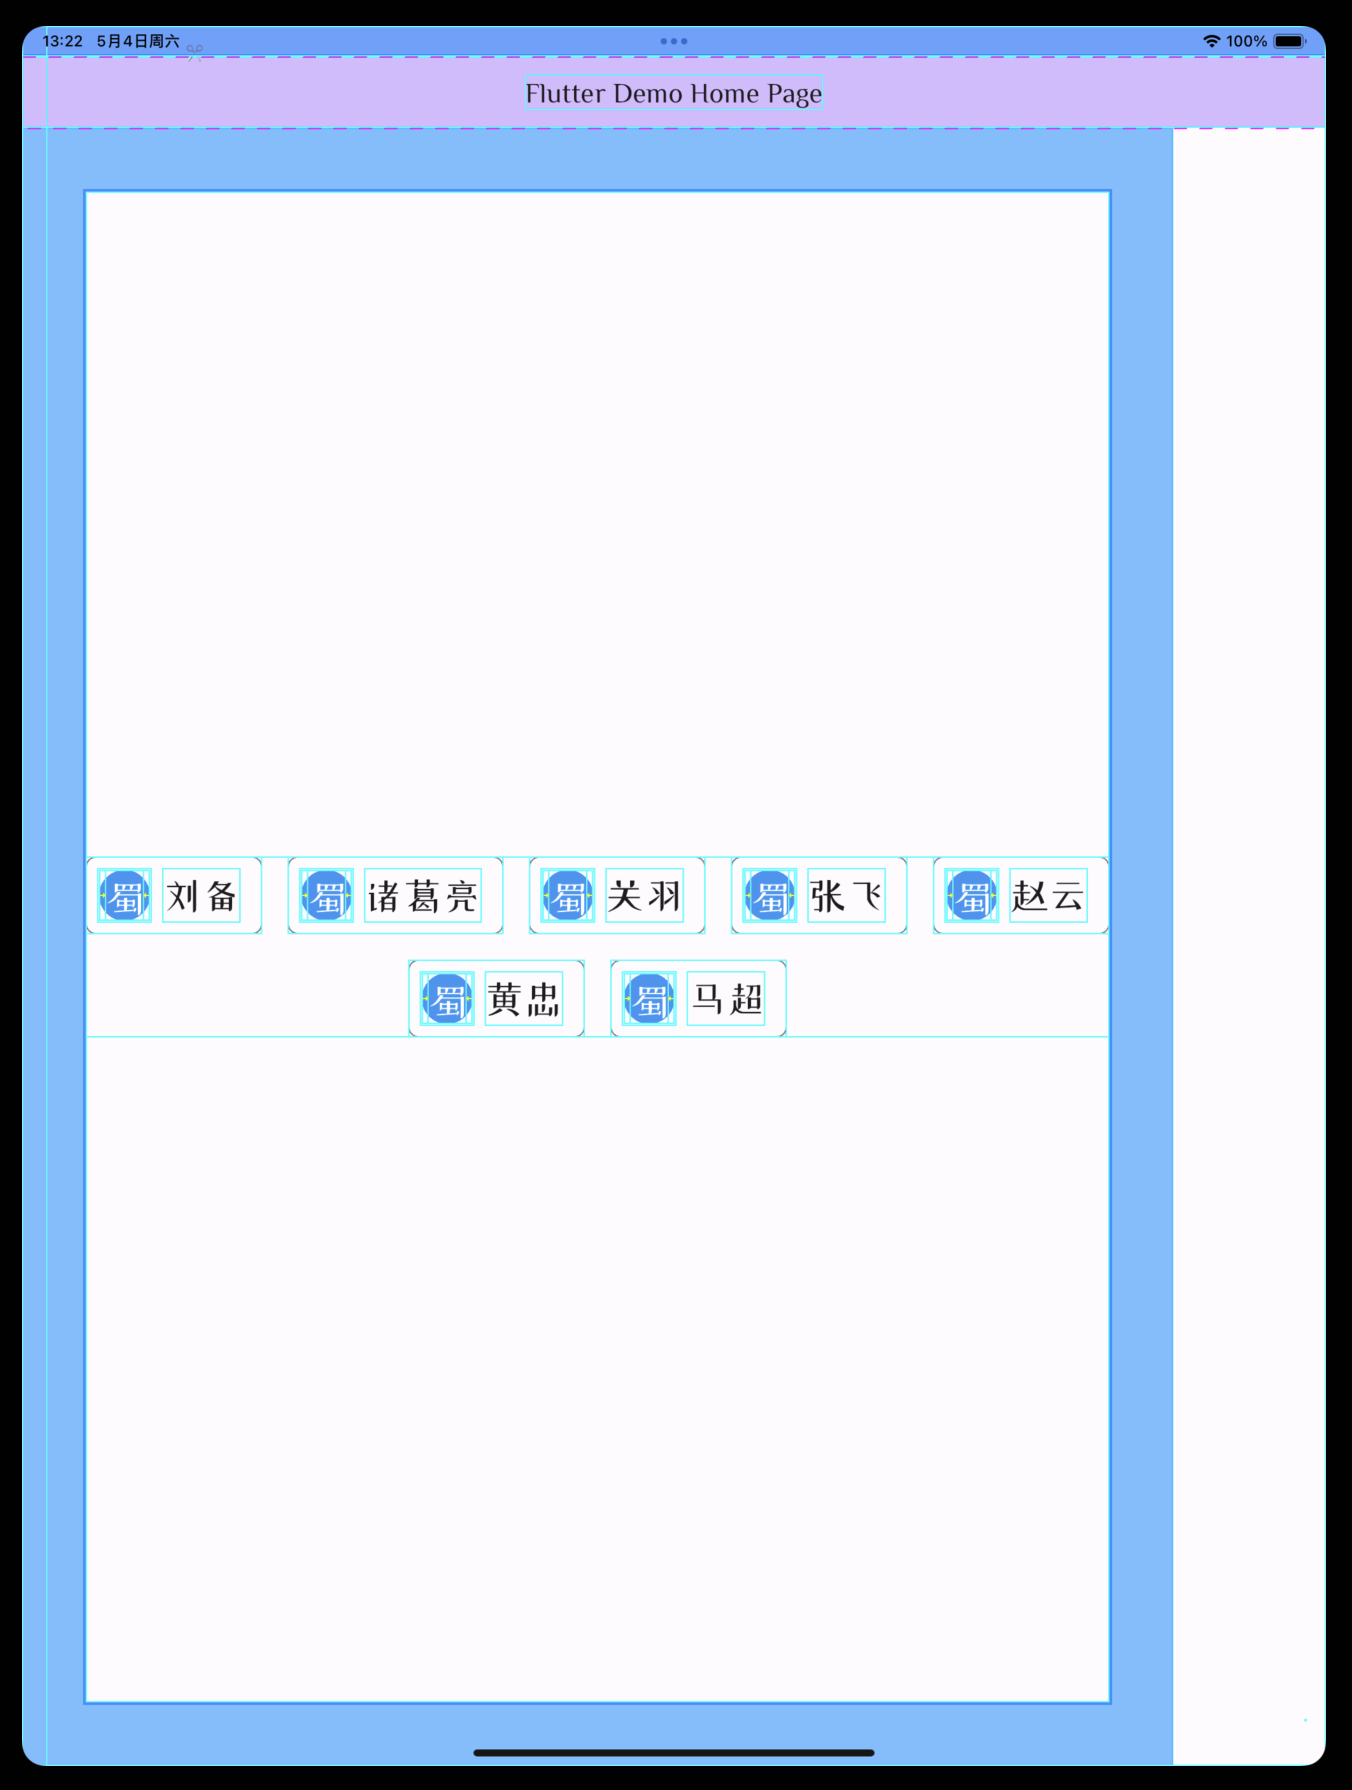
Wrap 展示效果
Stack() - 层叠布局
- Stack (层叠组件 - 类似 CSS 中的 z-index)
- alignment (声明未定位子组件的对齐方式)
- textDirection (声明未定位子组件的排列顺序)
- 写在 Stack 里面的 children , 越后面的 Widget 层级越高
- Positioned (绝对定位组件)
- child (声明子组件)
- left, top, right, bottom
- width, height
- NetworkImage (网络图片组件)
- NetworkImage('图片地址')
<uses-permission android:name="android.permission.INTERNET"/>
dart
// Stack 示例
class StackDemo extends StatelessWidget {
  const StackDemo({super.key});

  @override
  Widget build(BuildContext context) {
    return Stack(
      alignment: Alignment.center,
      children: [
        const CircleAvatar(
          radius: 200,
          backgroundImage: NetworkImage('https://picsum.photos/200/300'),
        ),
        Positioned(
            top: 100,
            left: 100,
            child: Container(
              padding: const EdgeInsets.all(8),
              color: Colors.blue,
              child: const Text(
                '风景',
                style: TextStyle(fontSize: 48, color: Colors.white),
              ),
            )),
        const Text(
          'Hello',
          style: TextStyle(fontSize: 48, color: Colors.white),
        ),
      ],
    );
  }
}
1
2
3
4
5
6
7
8
9
10
11
12
13
14
15
16
17
18
19
20
21
22
23
24
25
26
27
28
29
30
31
32
2
3
4
5
6
7
8
9
10
11
12
13
14
15
16
17
18
19
20
21
22
23
24
25
26
27
28
29
30
31
32
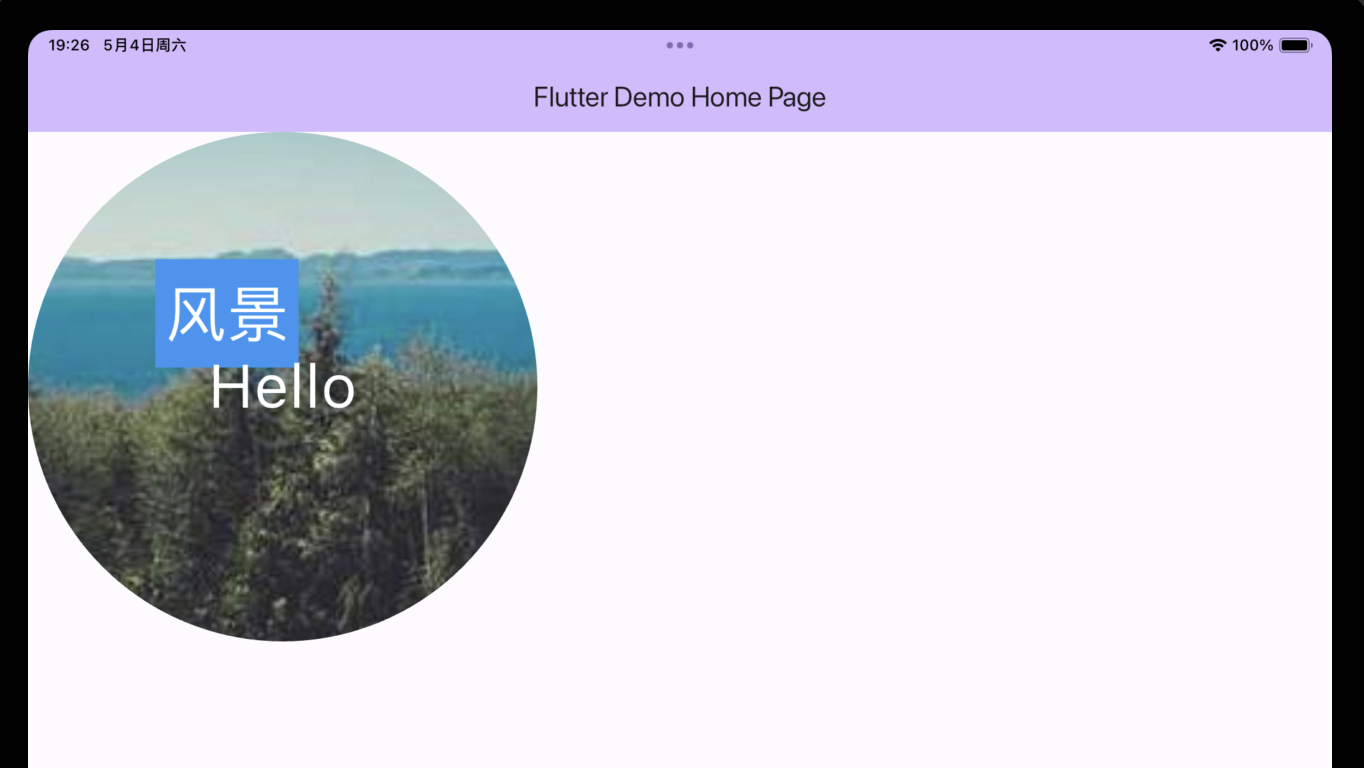
Stack 展示效果
Card() - 卡片
- Card
- child (子组件)
- color (背景色)
- shadowColor (阴影色)
- elevation (阴影高度)
- shape (边框样式)
- margin (外边距)
- ListTile (列表瓦片)
- leading (头部组件)
- title (标题)
- subtitle (子标题)
dart
// Card 示例
class CardDemo extends StatelessWidget {
  const CardDemo({super.key});

  @override
  Widget build(BuildContext context) {
    return Container(
        width: 500,
        height: 300,
        margin: const EdgeInsets.all(100),
        child: const Card(
            margin: EdgeInsets.only(left:100),
            color: Colors.white,
            elevation: 20,  // 阴影
            shadowColor: Colors.purple, // 阴影颜色
            shape: RoundedRectangleBorder(
              borderRadius: BorderRadius.all(Radius.circular(50)),  // 边框圆角
              side: BorderSide(color: Colors.purple, width: 2)  // 边框样式
            ),
            child: Column(children: [
              ListTile(
                title: Text(
                  '1625 Main Street',
                ),
                subtitle: Text('My City, CA 9998fd4'),
                leading: Icon(Icons.restaurant_menu),
                trailing: Text('2021-09-09'),
              ),
              Divider(),
              ListTile(
                title: Text('(408) 555-xxxx'),
                leading: Icon(Icons.contact_phone),
              ),
              ListTile(
                title: Text(
                  '这是卡片的内容',
                ),
              ),
            ])));
  }
}
1
2
3
4
5
6
7
8
9
10
11
12
13
14
15
16
17
18
19
20
21
22
23
24
25
26
27
28
29
30
31
32
33
34
35
36
37
38
39
40
41
2
3
4
5
6
7
8
9
10
11
12
13
14
15
16
17
18
19
20
21
22
23
24
25
26
27
28
29
30
31
32
33
34
35
36
37
38
39
40
41
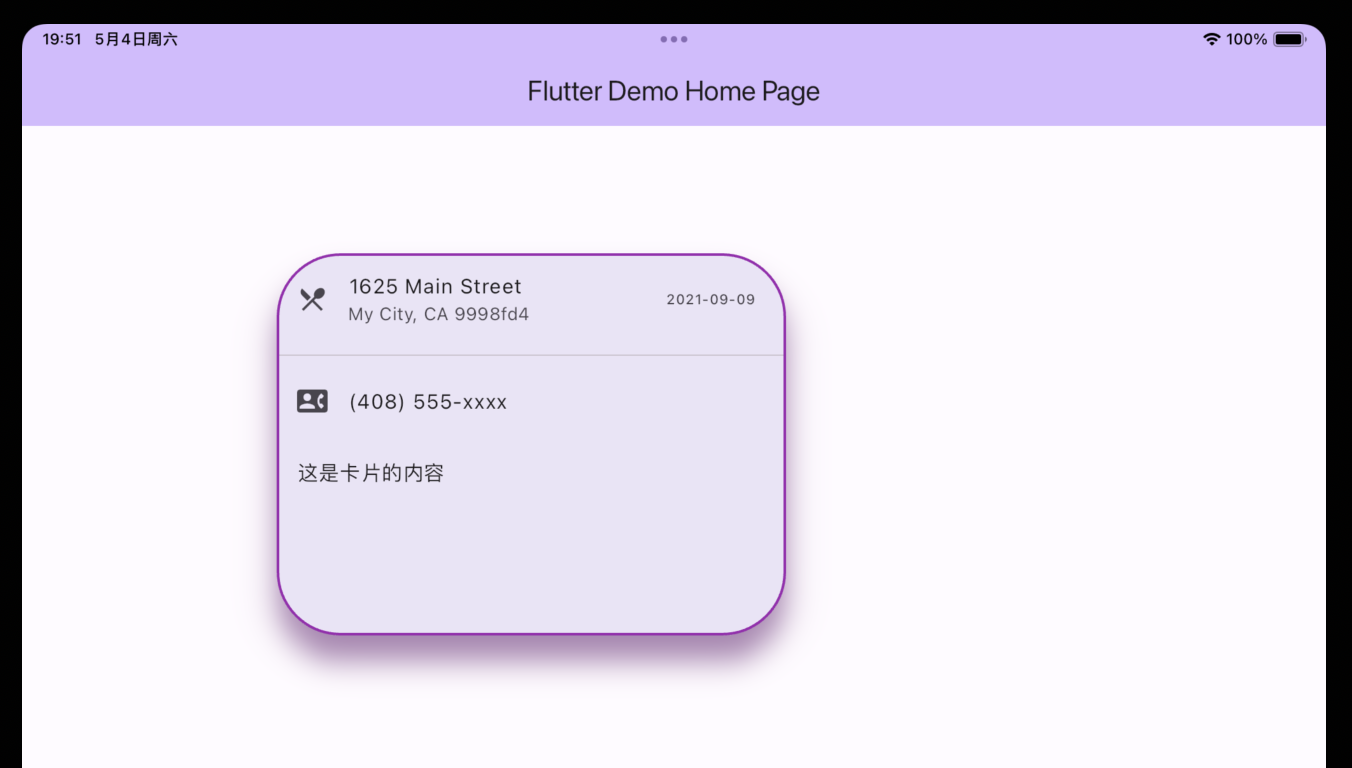
Card 展示效果
Button - 按钮
- Flutter 1.22 之前
- FlatButton (扁平按钮)
- RaisedButton (凸起按钮)
- OutlineButton (轮廓按钮)
- Flutter 1.22 之后
- TextButton (文本按钮 - 用来替换 FlatButton)
- ElevatedButton (凸起按钮 - 用来替换 RaisedButton)
- OutlinedButton (轮廓按钮 - 用来替换 OutlineButton)
按钮主题
| 1.22 版本前的按钮 | 主题 | 1.22 版本后的按钮 | 主题 |
|---|---|---|---|
| FlatButton | ButtonTheme | TextButton | TextButtonTheme |
| OutlineButton | ButtonTheme | OutlinedButton | OutlinedButtonTheme |
| RaisedButton | ButtonTheme | ElevatedButton | ElevatedButtonTheme |
- 图标按钮
- IconButton
- TextButton.icon()
- ElevatedButton.icon()
- OutlinedButton.icon()
- ButtonBar (按钮组)
- FloatingActionButton (浮动按钮)
- BackButton (回退按钮)
- CloseButton (关闭按钮)
dart
// Button 示例一
class ButtonDemo extends StatelessWidget {
  const ButtonDemo({super.key});

  @override
  Widget build(BuildContext context) {
    return Container(
      padding: const EdgeInsets.all(10),
      child: Wrap(
        spacing: 10,
        children: [
          TextButton(
              onPressed: () {
                // ignore: avoid_print
                print('Text Button: onPressed');
              },
              child: const Text(
                'Text Button',
                style: TextStyle(color: Colors.black, fontSize: 40),
              )),
          ElevatedButton(
              onPressed: () {
                // ignore: avoid_print
                print('Elevated Button: onPressed');
              },
              child: const Text(
                'Elevated Button',
                style: TextStyle(fontSize: 40),
              )),
          OutlinedButton(
              onPressed: () {
                // ignore: avoid_print
                print('Outlined Button: onPressed');
              },
              child: const Text(
                'Outlined Button',
                style: TextStyle(fontSize: 40),
              )),
        ],
      ),
    );
  }
}
1
2
3
4
5
6
7
8
9
10
11
12
13
14
15
16
17
18
19
20
21
22
23
24
25
26
27
28
29
30
31
32
33
34
35
36
37
38
39
40
41
42
43
2
3
4
5
6
7
8
9
10
11
12
13
14
15
16
17
18
19
20
21
22
23
24
25
26
27
28
29
30
31
32
33
34
35
36
37
38
39
40
41
42
43

Button 展示效果
dart
// Button 示例二
class ButtonDemo extends StatelessWidget {
  const ButtonDemo({super.key});

  @override
  Widget build(BuildContext context) {
    return Container(
      padding: const EdgeInsets.all(10),
      child: Wrap(
        spacing: 10,
        children: [
          OutlinedButton(
              onPressed: () {
                // ignore: avoid_print
                print('轮廓按钮: onPressed');
              },
              style: ButtonStyle(
                textStyle:
                    MaterialStateProperty.all(const TextStyle(fontSize: 50)),
                foregroundColor: MaterialStateProperty.resolveWith((states) {
                  if (states.contains(MaterialState.pressed)) {
                    // 按下按钮时的前景色(字体)
                    return Colors.blue;
                  }
                  // 默认状态下的前景色(字体)
                  return Colors.green;
                }),
                backgroundColor: MaterialStateProperty.resolveWith((states) {
                  if (states.contains(MaterialState.pressed)) {
                    // 按下按钮时的背景色
                    return Colors.purple;
                  }
                  // 默认状态下的背景色
                  return Colors.white;
                }),
                shadowColor: MaterialStateProperty.all(Colors.black), // 阴影颜色
                elevation: MaterialStateProperty.all(10), // 阴影高度
                side: MaterialStateProperty.all(
                    const BorderSide(color: Colors.green, width: 3)), // 边框
                shape: MaterialStateProperty.all(const StadiumBorder()), // 按钮形状
                minimumSize:
                    MaterialStateProperty.all(const Size(400, 400)), // 按钮最小尺寸
                overlayColor:
                    MaterialStateProperty.all(Colors.blue), // 设置点击后水波纹颜色
              ),
              child: const Text('轮廓按钮')),
        ],
      ),
    );
  }
}
1
2
3
4
5
6
7
8
9
10
11
12
13
14
15
16
17
18
19
20
21
22
23
24
25
26
27
28
29
30
31
32
33
34
35
36
37
38
39
40
41
42
43
44
45
46
47
48
49
50
51
2
3
4
5
6
7
8
9
10
11
12
13
14
15
16
17
18
19
20
21
22
23
24
25
26
27
28
29
30
31
32
33
34
35
36
37
38
39
40
41
42
43
44
45
46
47
48
49
50
51
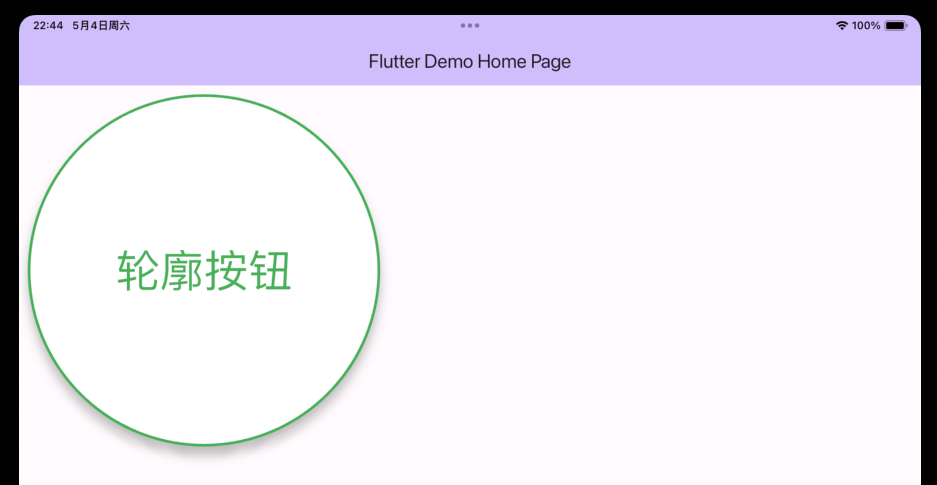
Button 展示效果
dart
// Button 示例三
class ButtonDemo extends StatelessWidget {
  const ButtonDemo({super.key});

  @override
  Widget build(BuildContext context) {
    return Container(
      padding: const EdgeInsets.all(10),
      child: Wrap(
        spacing: 10,
        children: [
          // 设置按钮主题
          OutlinedButtonTheme(
              data: OutlinedButtonThemeData(
                  style: ButtonStyle(
                overlayColor: MaterialStateProperty.all(
                    const Color.fromRGBO(23, 43, 32, 0.3)),
              )),
              child: OutlinedButton(
                  onPressed: () {}, child: const Text('主题设定按钮'))),
          // 图标按钮
          IconButton(
            onPressed: () {},
            icon: const Icon(Icons.notifications_none),
            color: Colors.black, // 图标颜色
            splashColor: Colors.lightBlue, // 水波纹
            highlightColor: Colors.purple, // 高亮颜色,持续按住时的颜色,设置这个后,水波纹颜色会失效
            tooltip: '我是一个消息通知!', // 长按按钮会出现的提示
          ),
          // 文本图标按钮
          TextButton.icon(
            onPressed: () {},
            icon: const Icon(
              Icons.adf_scanner,
              color: Colors.black,
            ),
            label: const Text('打印', style: TextStyle(color: Colors.black)),
          ),
          // 凸起图标按钮
          ElevatedButton.icon(
            onPressed: () {},
            icon: const Icon(
              Icons.adf_scanner,
              color: Colors.black,
            ),
            label: const Text('打印', style: TextStyle(color: Colors.black)),
          ),
          // 镂空图标按钮
          OutlinedButton.icon(
            onPressed: () {},
            icon: const Icon(
              Icons.adf_scanner,
              color: Colors.black,
            ),
            label: const Text('打印', style: TextStyle(color: Colors.black)),
          ),
          // 按钮组
          Container(
            color: Colors.purple[100],
            width: double.infinity,
            child: ButtonBar(
              children: [
                ElevatedButton(
                  onPressed: () {},
                  child: const Text('确定'),
                ),
                ElevatedButton(
                  onPressed: () {},
                  child: const Text('取消'),
                ),
              ],
            ),
          ),
          // 回退按钮
          const BackButton(),
        ],
      ),
    );
  }
}
1
2
3
4
5
6
7
8
9
10
11
12
13
14
15
16
17
18
19
20
21
22
23
24
25
26
27
28
29
30
31
32
33
34
35
36
37
38
39
40
41
42
43
44
45
46
47
48
49
50
51
52
53
54
55
56
57
58
59
60
61
62
63
64
65
66
67
68
69
70
71
72
73
74
75
76
77
78
79
80
2
3
4
5
6
7
8
9
10
11
12
13
14
15
16
17
18
19
20
21
22
23
24
25
26
27
28
29
30
31
32
33
34
35
36
37
38
39
40
41
42
43
44
45
46
47
48
49
50
51
52
53
54
55
56
57
58
59
60
61
62
63
64
65
66
67
68
69
70
71
72
73
74
75
76
77
78
79
80

Button 展示效果
Image() - 图片
- Image.asset (加载本地图片)
- 在 Flutter 项目下, 创建图片存储目录
- 在 pubspec.yaml 中的 flutter 部分添加图片配置
- 在代码中加载图片
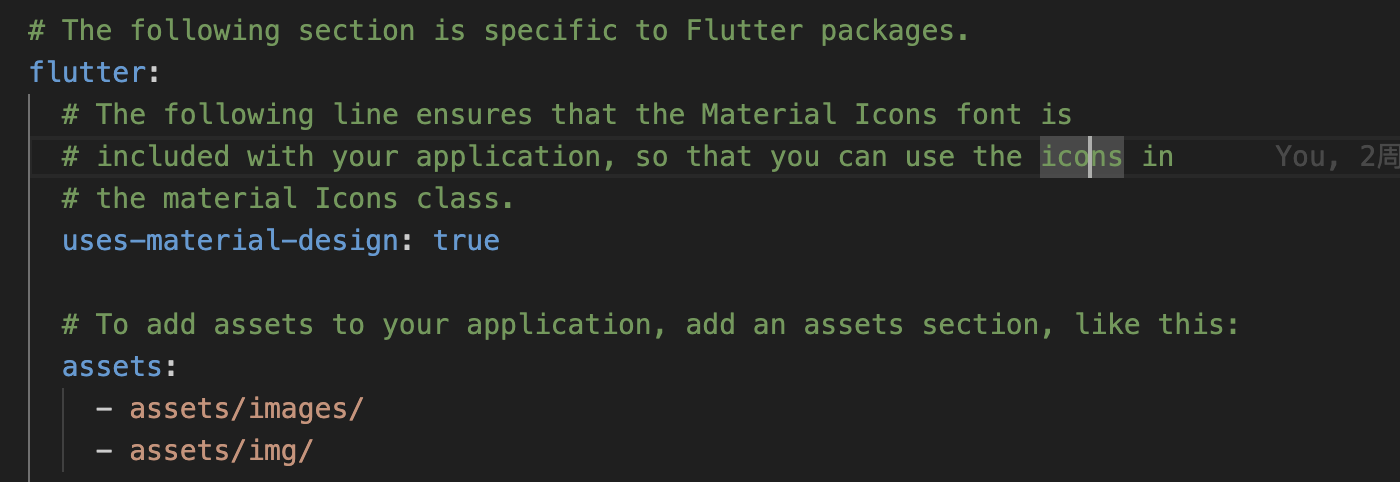
本地图片路径配置
- Image.network (加载网络图片)
- 保证网络畅通
- 设置网络访问权限
- 允许 http 协议访问

安卓下网络权限配置
dart
// Image 示例
class ImageDemo extends StatelessWidget {
  const ImageDemo({super.key});

  @override
  Widget build(BuildContext context) {
    return Row(
      children: [
        // 加载本地图片
        Image.asset('assets/img/product1.png',
            width: 300, height: 450, fit: BoxFit.fill),
        // 加载网络图片
        Image.network('https://picsum.photos/250?image=9',
            width: 300,
            height: 450,
            fit: BoxFit.fill,
            repeat: ImageRepeat.repeatY, // 重复方式
            colorBlendMode: BlendMode.colorBurn, // 模式模式: 和背景混合
            color: Colors.blue),
      ],
    );
  }
}
1
2
3
4
5
6
7
8
9
10
11
12
13
14
15
16
17
18
19
20
21
22
23
2
3
4
5
6
7
8
9
10
11
12
13
14
15
16
17
18
19
20
21
22
23

Image 展示效果
SingleChildScrollView() - 滚动列表
- SingleChildScrollView (类似 Android 中的 ScrollView)
- child (子组件)
- padding (内边距)
- scrollDirection (滚动方向: Axis.horizontal | Axis.vertical)
- reverse (初始滚动位置, false 头部、true 尾部)
- physics
- ClampingScrollPhysics: Android 下微光效果
- BouncingScrollPhysics: iOS 下弹性效果
dart
// SingleChildScrollView 示例
class SingleChildScrollViewDemo extends StatelessWidget {
  const SingleChildScrollViewDemo({super.key});

  @override
  Widget build(BuildContext context) {
    return Stack(
      children: [
        // 验证水平滚动
        SingleChildScrollView(
          scrollDirection: Axis.horizontal,
          physics: const ClampingScrollPhysics(),
          child: Row(
            children: List.generate(
              20,
              (index) => Container(
                width: 100,
                height: 100,
                color: Colors.primaries[index % Colors.primaries.length],
                child: Center(
                  child: Text(
                    'Item $index',
                    style: const TextStyle(
                      color: Colors.white,
                      fontSize: 20,
                    ),
                  ),
                ),
              ),
            ),
          ),
        ),
        // 验证垂直滚动
        SingleChildScrollView(
          scrollDirection: Axis.vertical,
          physics: const BouncingScrollPhysics(), // 弹跳效果
          child: Column(
            children: List.generate(
              20,
              (index) => Container(
                width: 100,
                height: 100,
                color: Colors.primaries[index % Colors.primaries.length],
                child: Center(
                  child: Text(
                    'Item $index',
                    style: const TextStyle(
                      color: Colors.white,
                      fontSize: 20,
                    ),
                  ),
                ),
              ),
            ),
          ),
        ),
      ],
    );
  }
}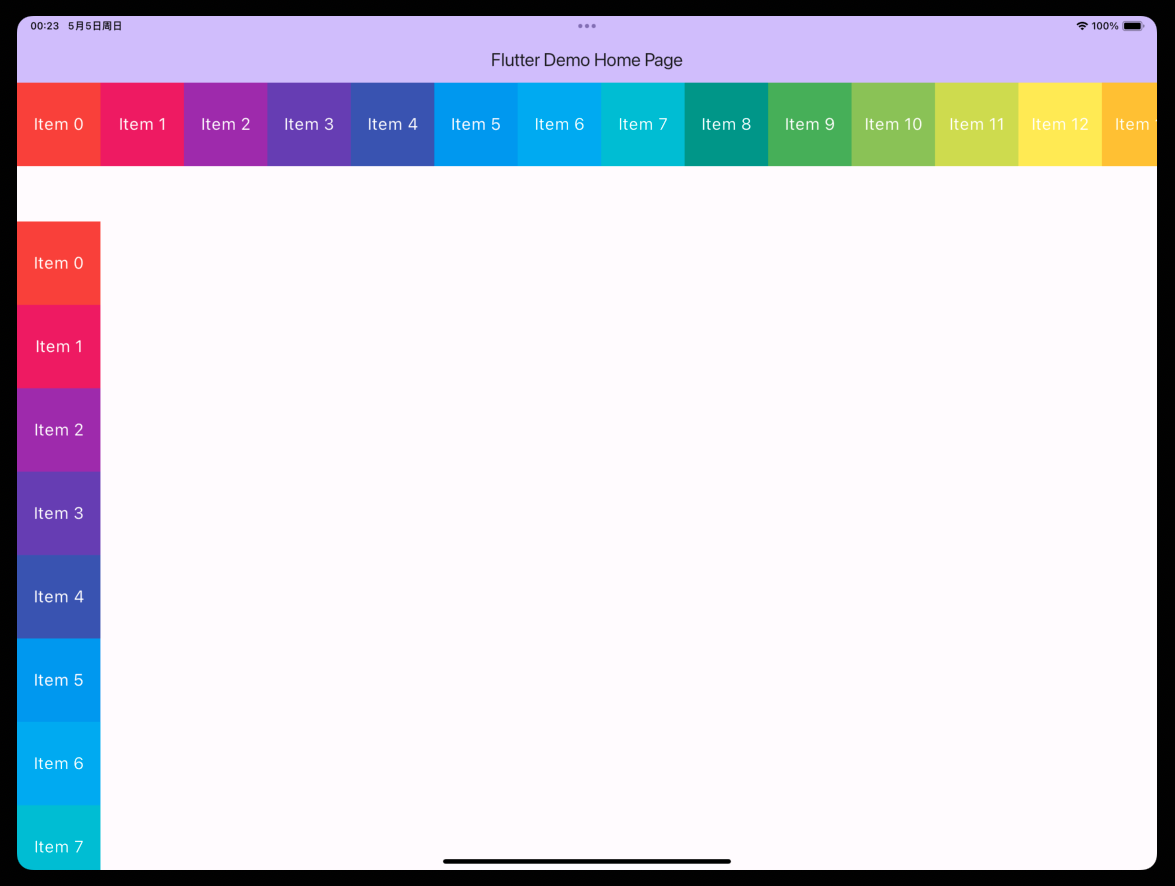
SingleChildScrollView 展示效果
ListView() - 列表
- ListView
- 加载列表的组件 (加载所有 Widgets, 适用 Widget 较少的场景)
- ListTile (leading、title、subtitle、trailing、selected)
- ListView.builder
- 按需加载 Widget, 性能比默认构造函数高, 适用 Widget 较多的场景
- ListView.separated
- 比 ListView.builder 多了分隔器
dart
// ListView 示例
class ListViewDemo extends StatelessWidget {
  const ListViewDemo({super.key});

  @override
  Widget build(BuildContext context) {
    return const SingleChildScrollView(
        child: Column(
      children: [ListViewBasic(), ListViewHorizontal()],
    ));
  }
}

class ListViewBasic extends StatelessWidget {
  const ListViewBasic({super.key});

  @override
  Widget build(BuildContext context) {
    return Container(
      height: 200,
      child: ListView(
        scrollDirection: Axis.vertical,
        children: [
          const ListTile(
            title: Text('Sun'),
            subtitle: Text('Sun is a star'),
            leading: Icon(Icons.wb_sunny),
            trailing: Icon(Icons.keyboard_arrow_right),
          ),
          ListTile(
            title: const Text('Moon'),
            subtitle: const Text('Moon is a satellite'),
            leading: const Icon(Icons.nights_stay),
            trailing: const Icon(Icons.keyboard_arrow_right),
            selected: true,
            selectedTileColor: Colors.purple[50],
          ),
          const ListTile(
            title: Text('Earth'),
            subtitle: Text('Earth is a planet'),
            leading: Icon(Icons.public),
            trailing: Icon(Icons.keyboard_arrow_right),
          ),
          const ListTile(
            title: Text('Mars'),
            subtitle: Text('Mars is a planet'),
            leading: Icon(Icons.public),
            trailing: Icon(Icons.keyboard_arrow_right),
          ),
        ],
      ),
    );
  }
}

class ListViewHorizontal extends StatelessWidget {
  const ListViewHorizontal({super.key});

  @override
  Widget build(BuildContext context) {
    return Container(
        height: 100,
        child: ListView(
          scrollDirection: Axis.horizontal,
          children: [
            Container(
              width: 300,
              height: 100,
              color: Colors.red,
            ),
            Container(
              width: 300,
              height: 100,
              color: Colors.green,
            ),
            Container(
              width: 300,
              height: 100,
              color: Colors.blue,
            ),
            Container(
              width: 300,
              height: 100,
              color: Colors.yellow,
            )
          ],
        ));
  }
}
1
2
3
4
5
6
7
8
9
10
11
12
13
14
15
16
17
18
19
20
21
22
23
24
25
26
27
28
29
30
31
32
33
34
35
36
37
38
39
40
41
42
43
44
45
46
47
48
49
50
51
52
53
54
55
56
57
58
59
60
61
62
63
64
65
66
67
68
69
70
71
72
73
74
75
76
77
78
79
80
81
82
83
84
85
86
87
88
89
2
3
4
5
6
7
8
9
10
11
12
13
14
15
16
17
18
19
20
21
22
23
24
25
26
27
28
29
30
31
32
33
34
35
36
37
38
39
40
41
42
43
44
45
46
47
48
49
50
51
52
53
54
55
56
57
58
59
60
61
62
63
64
65
66
67
68
69
70
71
72
73
74
75
76
77
78
79
80
81
82
83
84
85
86
87
88
89
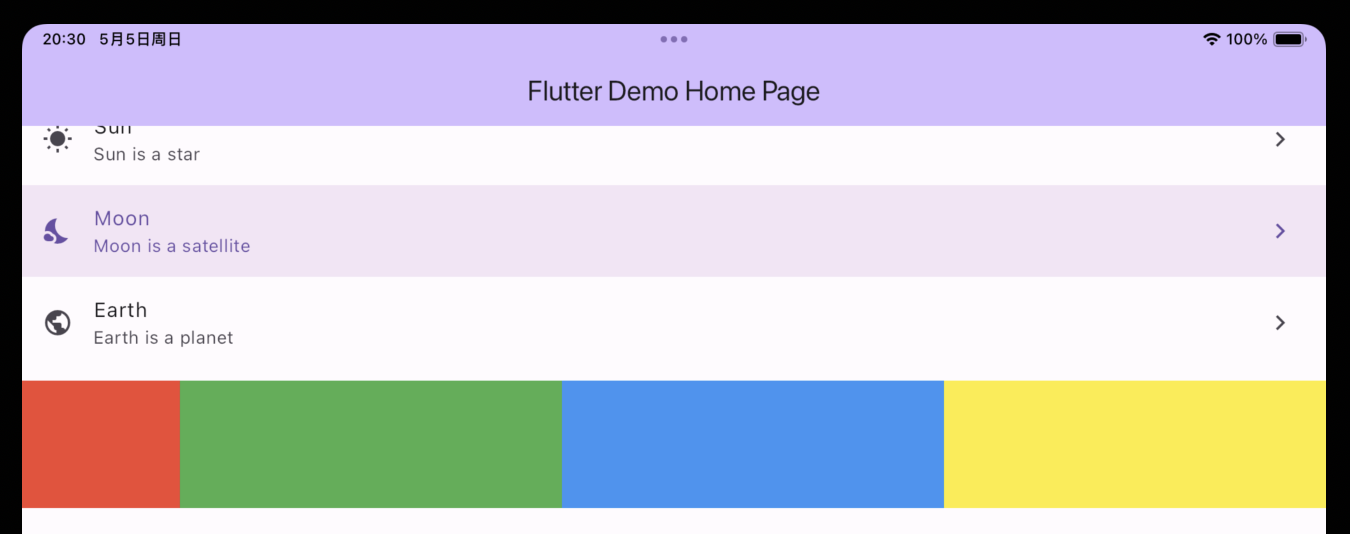
ListView 展示效果1
dart
// ListView.builder 和 ListView.separated 示例
class ListViewDemo extends StatelessWidget {
  const ListViewDemo({super.key});

  @override
  Widget build(BuildContext context) {
    return const SingleChildScrollView(
        child: Column(
      children: [ListViewBuilderDemo(), ListViewSeparatedDemo()],
    ));
  }
}

class ListViewBuilderDemo extends StatelessWidget {
  const ListViewBuilderDemo({super.key});

  @override
  Widget build(BuildContext context) {
    return Container(
        height: 150,
        child: ListView.builder(
          scrollDirection: Axis.horizontal,
          itemCount: 10,
          itemExtent: 200, // 当前元素的主轴方向的长度
          itemBuilder: (BuildContext context, int index) {
            return Container(
              width: 150,
              margin: const EdgeInsets.all(10),
              decoration: BoxDecoration(
                color: Colors.purple[200],
                borderRadius: BorderRadius.circular(20),
              ),
              child: Center(
                child: Text(
                  'Item ${index + 1}',
                  style: const TextStyle(color: Colors.white),
                ),
              ),
            );
          },
        ));
  }
}

class ListViewSeparatedDemo extends StatelessWidget {
  const ListViewSeparatedDemo({super.key});

  @override
  Widget build(BuildContext context) {
    final List<Widget> products = List.generate(20, (index) {
      return ListTile(
        leading: const Icon(Icons.ac_unit),
        title: Text('商品列表${index + 1}'),
        subtitle: const Text('子标题'),
        trailing: const Icon(Icons.arrow_circle_down_rounded),
      );
    });
    return Column(
      children: [
        const ListTile(
          title: Text('商品列表'),
        ),
        // 要给ListView添加高度,否则会报错
        SizedBox(
          height: 300,
          child: ListView.separated(
              itemBuilder: (BuildContext context, int index) {
                return products[index];
              },
              // 分隔器的构造器
              separatorBuilder: (BuildContext context, int index) {
                return Divider(
                  height: 1,
                  // 奇数行为紫色分割线,偶数行为蓝色分割线
                  color: index % 2 == 0 ? Colors.purple : Colors.blue,
                );
              },
              itemCount: products.length),
        )
      ],
    );
  }
}
1
2
3
4
5
6
7
8
9
10
11
12
13
14
15
16
17
18
19
20
21
22
23
24
25
26
27
28
29
30
31
32
33
34
35
36
37
38
39
40
41
42
43
44
45
46
47
48
49
50
51
52
53
54
55
56
57
58
59
60
61
62
63
64
65
66
67
68
69
70
71
72
73
74
75
76
77
78
79
80
81
82
83
2
3
4
5
6
7
8
9
10
11
12
13
14
15
16
17
18
19
20
21
22
23
24
25
26
27
28
29
30
31
32
33
34
35
36
37
38
39
40
41
42
43
44
45
46
47
48
49
50
51
52
53
54
55
56
57
58
59
60
61
62
63
64
65
66
67
68
69
70
71
72
73
74
75
76
77
78
79
80
81
82
83
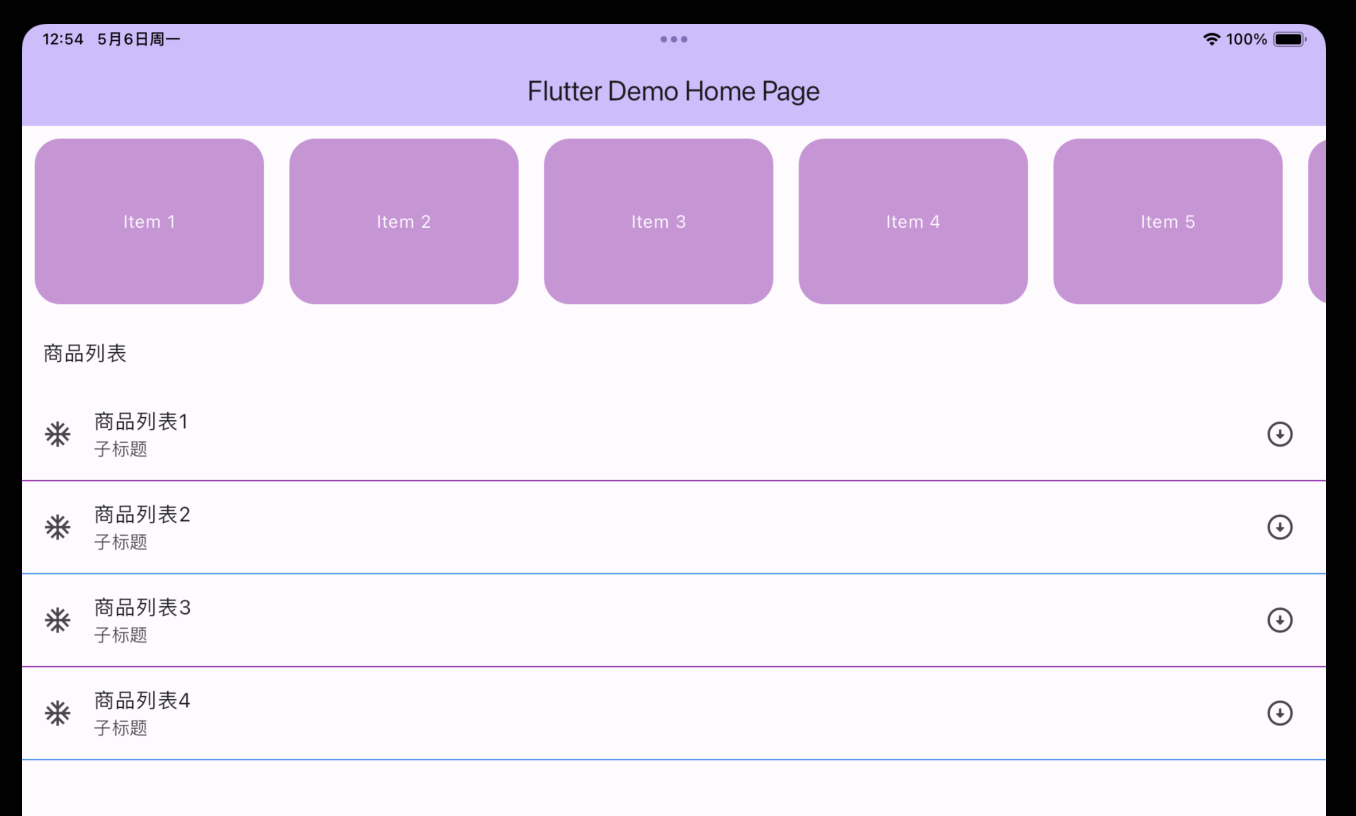
ListView 展示效果2
GridView() - 网格布局
- GridView
- children (子组件)
- scrollDirection (滚动方向)
- gridDelegate
- SliverGridDelegateWithFixedCrossAxisCount (指定列数 - 子组件宽度自适应)
- SliverGridDelegateWithMaxCrossAxisExtent (指定子组件宽度 - 列数自适应)
- GridView.count (列数固定)
- GridView.extend (子组件宽度固定)
- GridView.builder (动态网格布局)
- ScrollPhysice physice (确定可滚动控件的物理特性)
- BouncingScrollPhysics (允许超出边界 - 反弹效果)
- ClampingScrollPhysics (防止超出边界 - 夹住效果)
- AlwaysScrollableScrollPhysics (始终响应滚动)(默认效果)
- NeverScrollableScrollPhysics (不响应滚动)
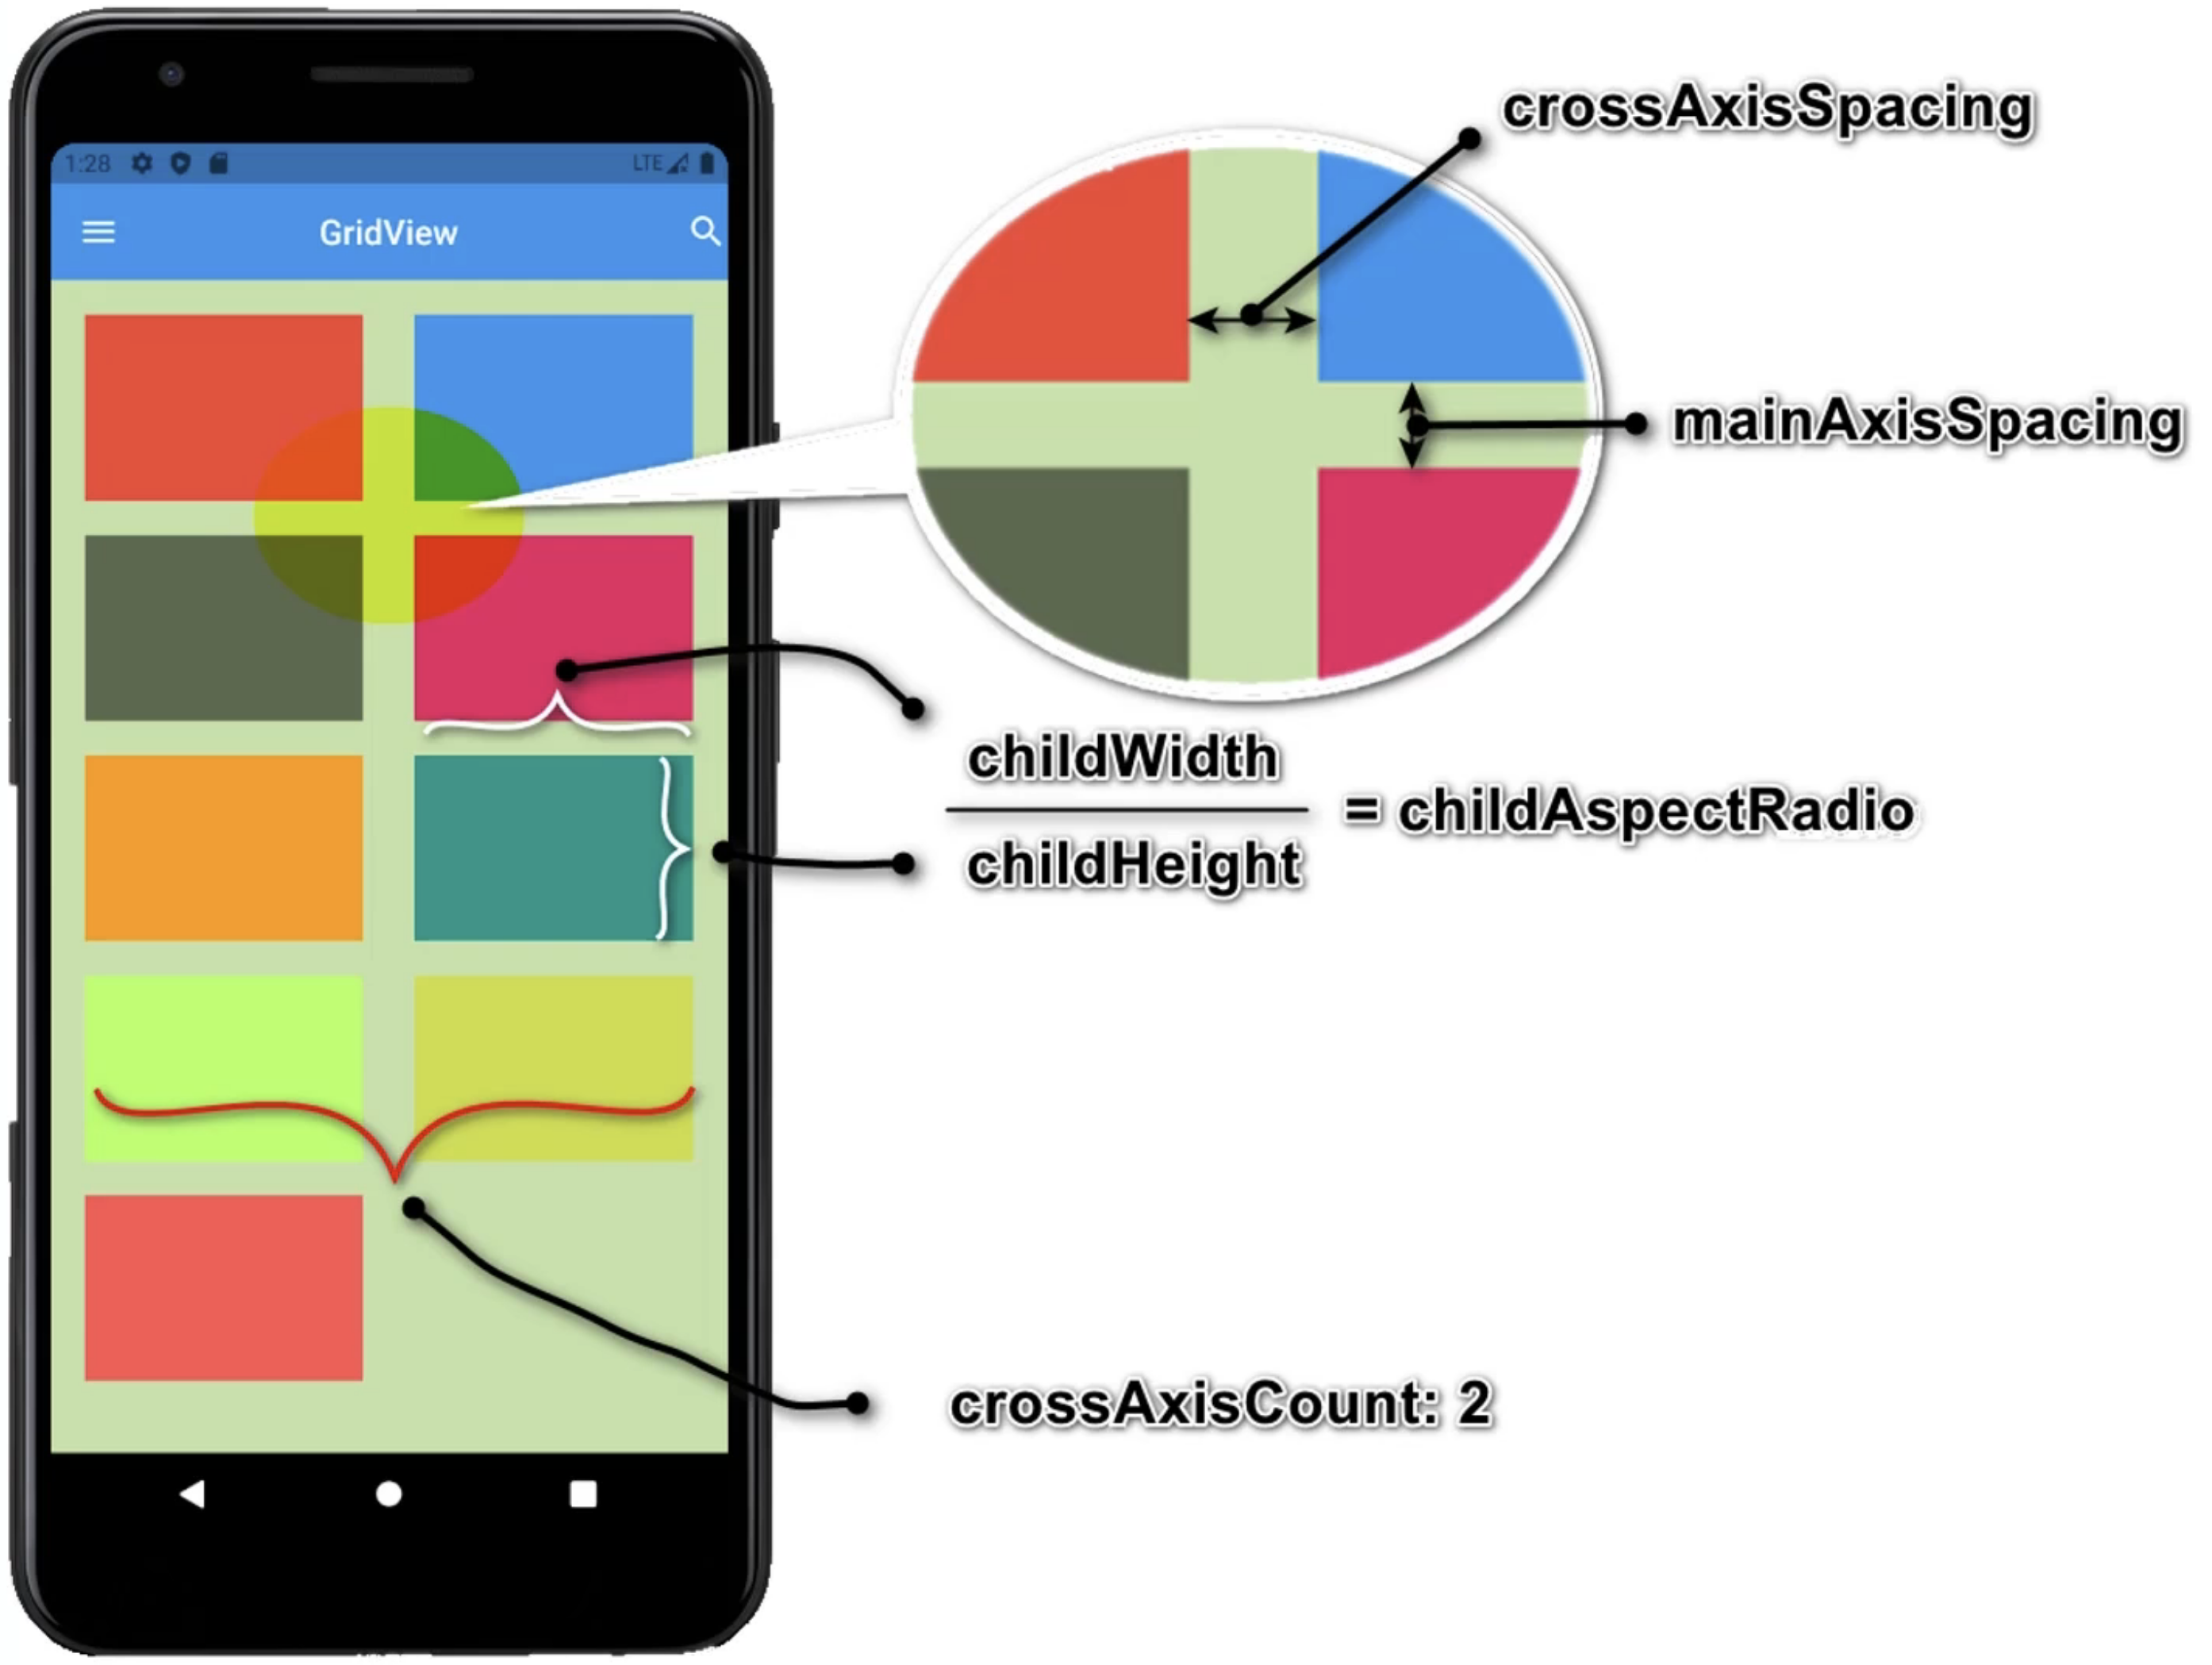
GridView 布局说明
dart
// GridView 示例
class GridViewDemo extends StatelessWidget {
  const GridViewDemo({super.key});

  @override
  Widget build(BuildContext context) {
    return Column(
      children: [
        Container(
          height: 500,
          child: GridView(
            padding: const EdgeInsets.all(20),
            gridDelegate: const SliverGridDelegateWithFixedCrossAxisCount(
                // 指定列数
                crossAxisCount: 3,
                // 主轴方向的间距
                mainAxisSpacing: 20,
                // 交叉轴方向的间距
                crossAxisSpacing: 20,
                // 子组件宽高比,1就是正方形
                childAspectRatio: 1),
            children: [
              Container(
                color: Colors.blue,
              ),
              Container(
                color: Colors.green,
              ),
              Container(
                color: Colors.pink,
              ),
              Container(
                color: Colors.purple,
              ),
              Container(
                color: Colors.red,
              ),
              Container(
                color: Colors.yellow,
              )
            ],
          ),
        ),
        Container(
          height: 500,
          child: GridView(
            padding: const EdgeInsets.all(20),
            gridDelegate: const SliverGridDelegateWithMaxCrossAxisExtent(
                // 指定子组件最大宽度
                maxCrossAxisExtent: 300,
                // 主轴方向的间距
                mainAxisSpacing: 20,
                // 交叉轴方向的间距
                crossAxisSpacing: 20,
                // 子组件宽高比,1就是正方形
                childAspectRatio: 0.8),
            children: [
              Container(
                color: Colors.blue,
              ),
              Container(
                color: Colors.green,
              ),
              Container(
                color: Colors.pink,
              ),
              Container(
                color: Colors.purple,
              ),
              Container(
                color: Colors.red,
              ),
              Container(
                color: Colors.yellow,
              )
            ],
          ),
        ),
      ],
    );
  }
}
1
2
3
4
5
6
7
8
9
10
11
12
13
14
15
16
17
18
19
20
21
22
23
24
25
26
27
28
29
30
31
32
33
34
35
36
37
38
39
40
41
42
43
44
45
46
47
48
49
50
51
52
53
54
55
56
57
58
59
60
61
62
63
64
65
66
67
68
69
70
71
72
73
74
75
76
77
78
79
80
81
82
2
3
4
5
6
7
8
9
10
11
12
13
14
15
16
17
18
19
20
21
22
23
24
25
26
27
28
29
30
31
32
33
34
35
36
37
38
39
40
41
42
43
44
45
46
47
48
49
50
51
52
53
54
55
56
57
58
59
60
61
62
63
64
65
66
67
68
69
70
71
72
73
74
75
76
77
78
79
80
81
82
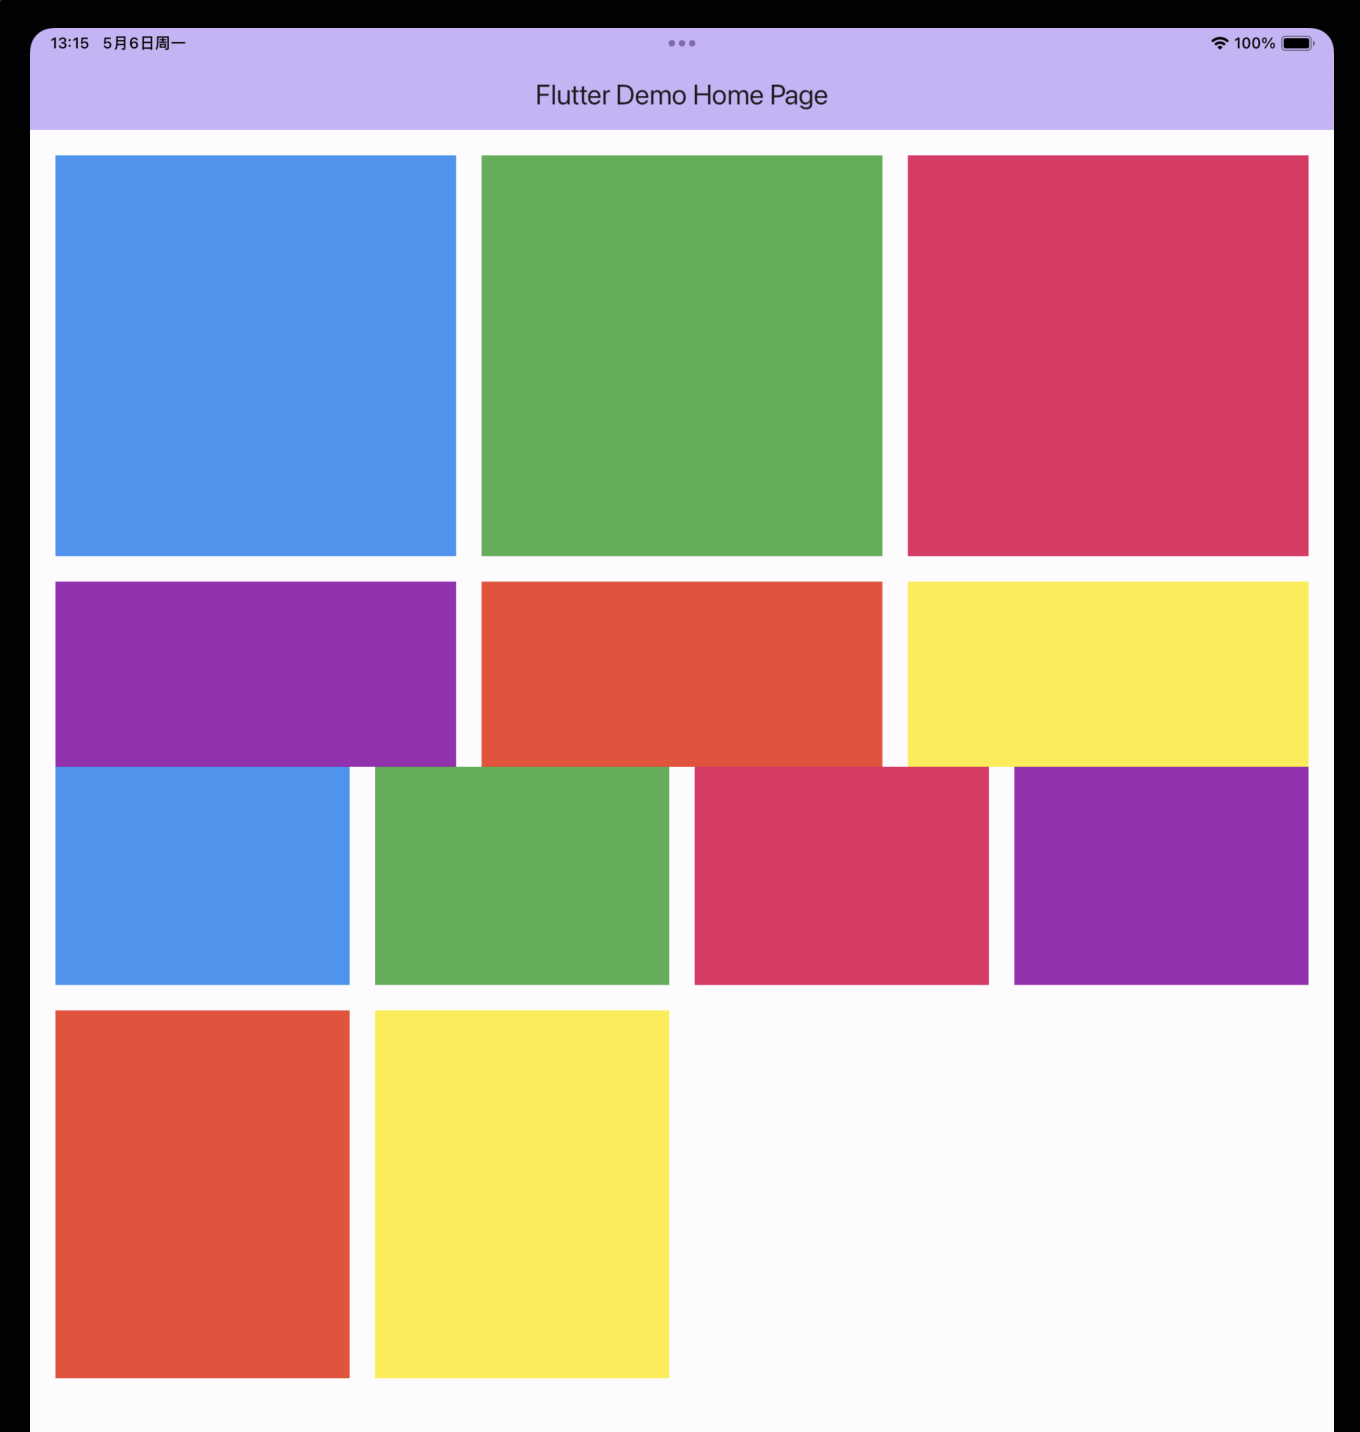
GridView 展示效果1
dart
// GridView.count 示例
class GridViewCountDemo extends StatelessWidget {
  const GridViewCountDemo({super.key});

  @override
  Widget build(BuildContext context) {
    return Container(
        child: GridView.count(
      padding: const EdgeInsets.symmetric(horizontal: 20, vertical: 20),
      crossAxisCount: 3,
      mainAxisSpacing: 20,
      crossAxisSpacing: 20,
      childAspectRatio: 0.75,
      children: List.generate(
        20,
        (index) => Image.asset('assets/img/product1.png', fit: BoxFit.cover),
      ),
    ));
  }
}
1
2
3
4
5
6
7
8
9
10
11
12
13
14
15
16
17
18
19
20
2
3
4
5
6
7
8
9
10
11
12
13
14
15
16
17
18
19
20
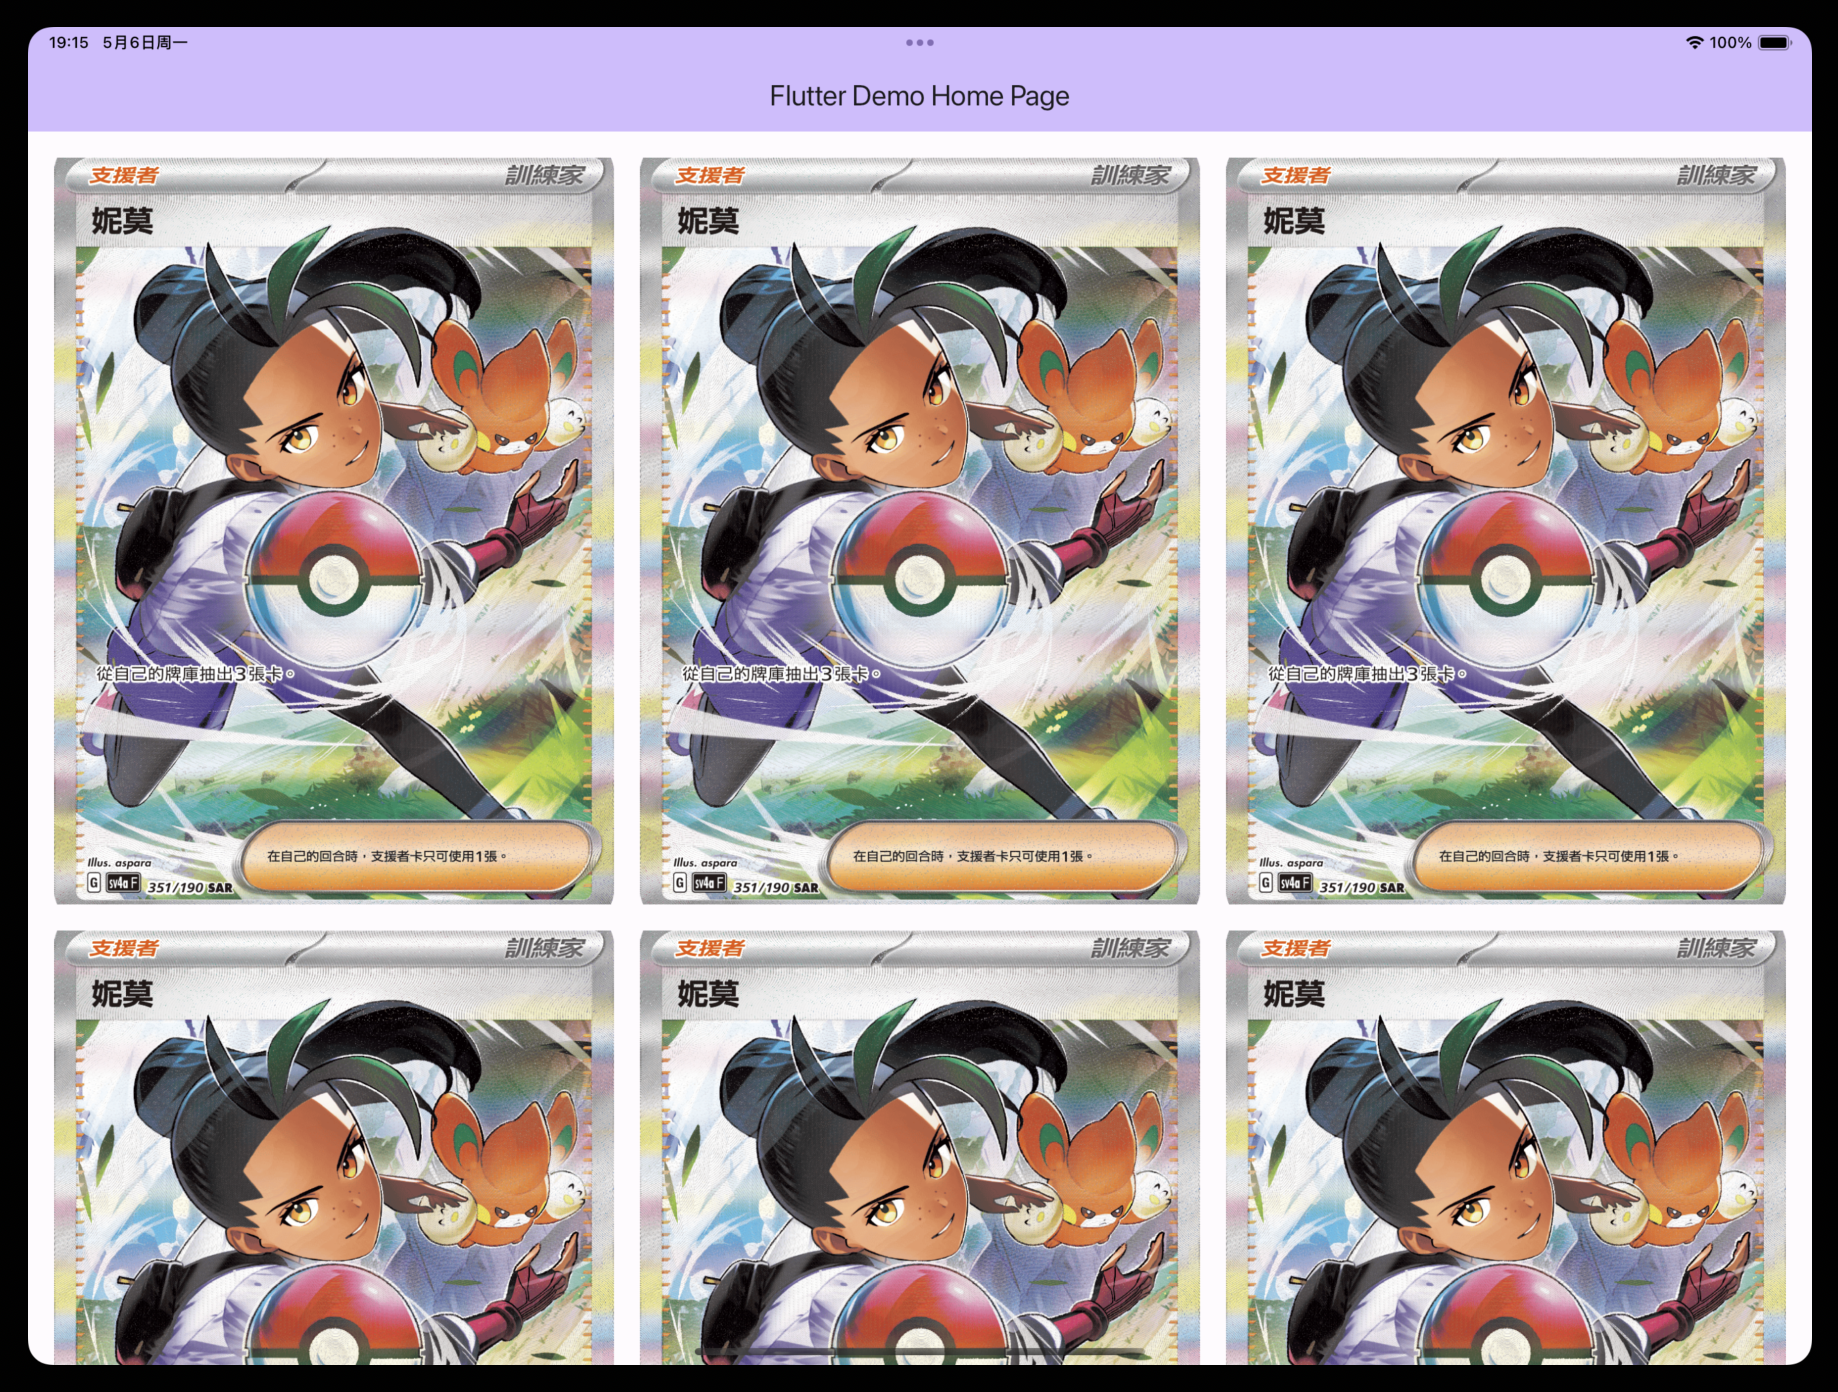
GridView.count 展示效果
dart
// GridView.extent 示例
class GridViewExtentDemo extends StatelessWidget {
  const GridViewExtentDemo({super.key});

  @override
  Widget build(BuildContext context) {
    return Container(
        child: GridView.extent(
      padding: const EdgeInsets.symmetric(horizontal: 20, vertical: 20),
      maxCrossAxisExtent: 220,
      mainAxisSpacing: 30,
      crossAxisSpacing: 30,
      childAspectRatio: 0.75,
      children: List.generate(
        20,
        (index) => Image.asset('assets/img/product2.png', fit: BoxFit.cover),
      ),
    ));
  }
}
1
2
3
4
5
6
7
8
9
10
11
12
13
14
15
16
17
18
19
20
2
3
4
5
6
7
8
9
10
11
12
13
14
15
16
17
18
19
20
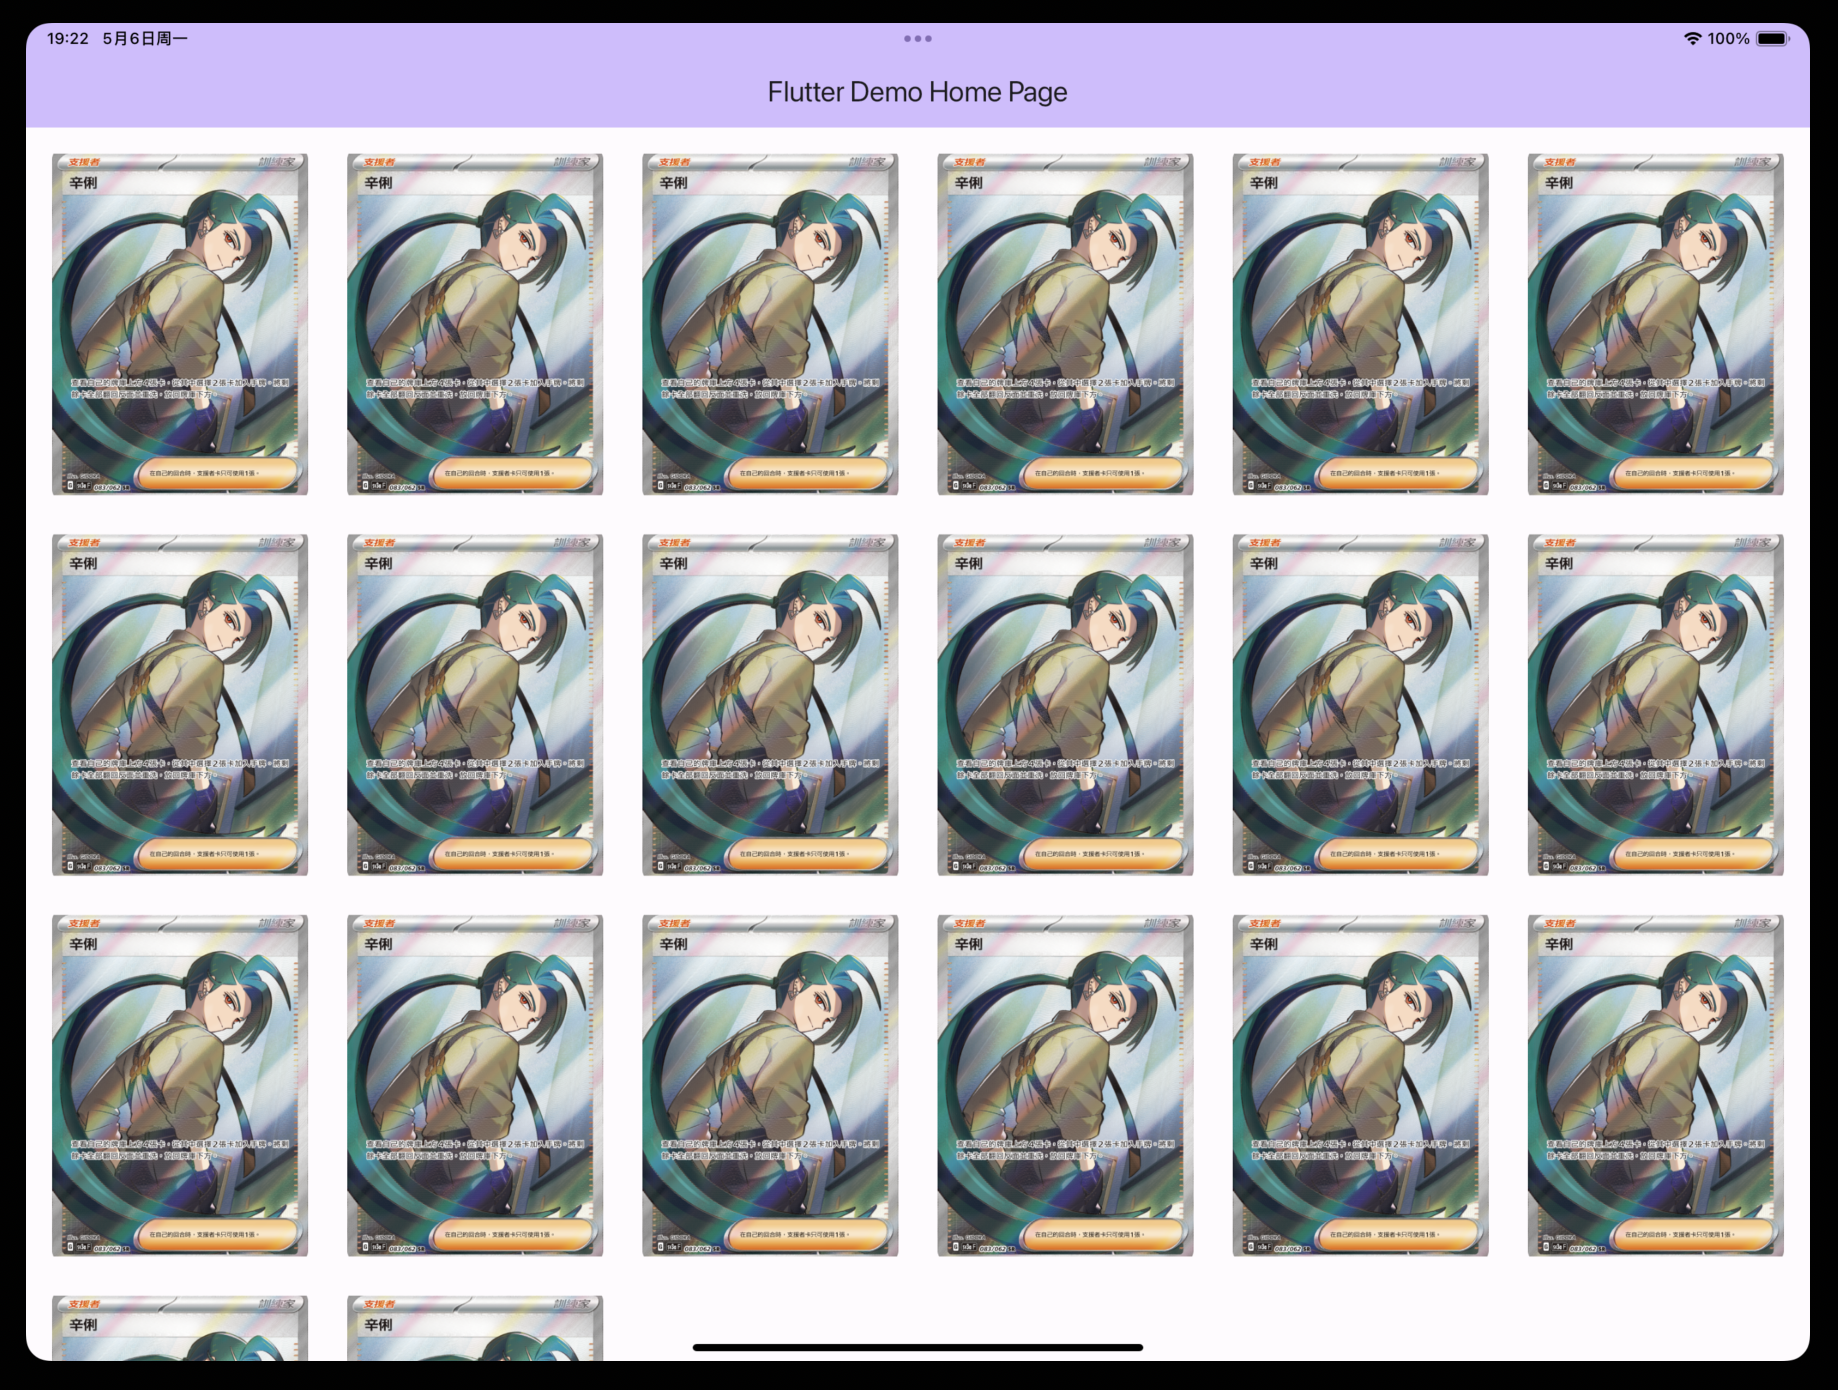
GridView.extent 展示效果
dart
// GridView.builder 示例
class GridViewBuilderDemo extends StatelessWidget {
  const GridViewBuilderDemo({super.key});

  @override
  Widget build(BuildContext context) {
    return Container(
        child: GridView.builder(
      gridDelegate: const SliverGridDelegateWithFixedCrossAxisCount(
        // 显示列数
        crossAxisCount: 4,
        // 竖的方向间距
        crossAxisSpacing: 50,
        // 横的方向间距
        mainAxisSpacing: 50,
        // 宽高比
        childAspectRatio: 0.75,
      ),
      padding: const EdgeInsets.symmetric(horizontal: 20, vertical: 20),
      itemBuilder: (context, index) {
        int i = (index % 5)+1;
        return Image.asset('assets/img/product$i.png', fit: BoxFit.cover);
      },
    ));
  }
}
1
2
3
4
5
6
7
8
9
10
11
12
13
14
15
16
17
18
19
20
21
22
23
24
25
26
2
3
4
5
6
7
8
9
10
11
12
13
14
15
16
17
18
19
20
21
22
23
24
25
26
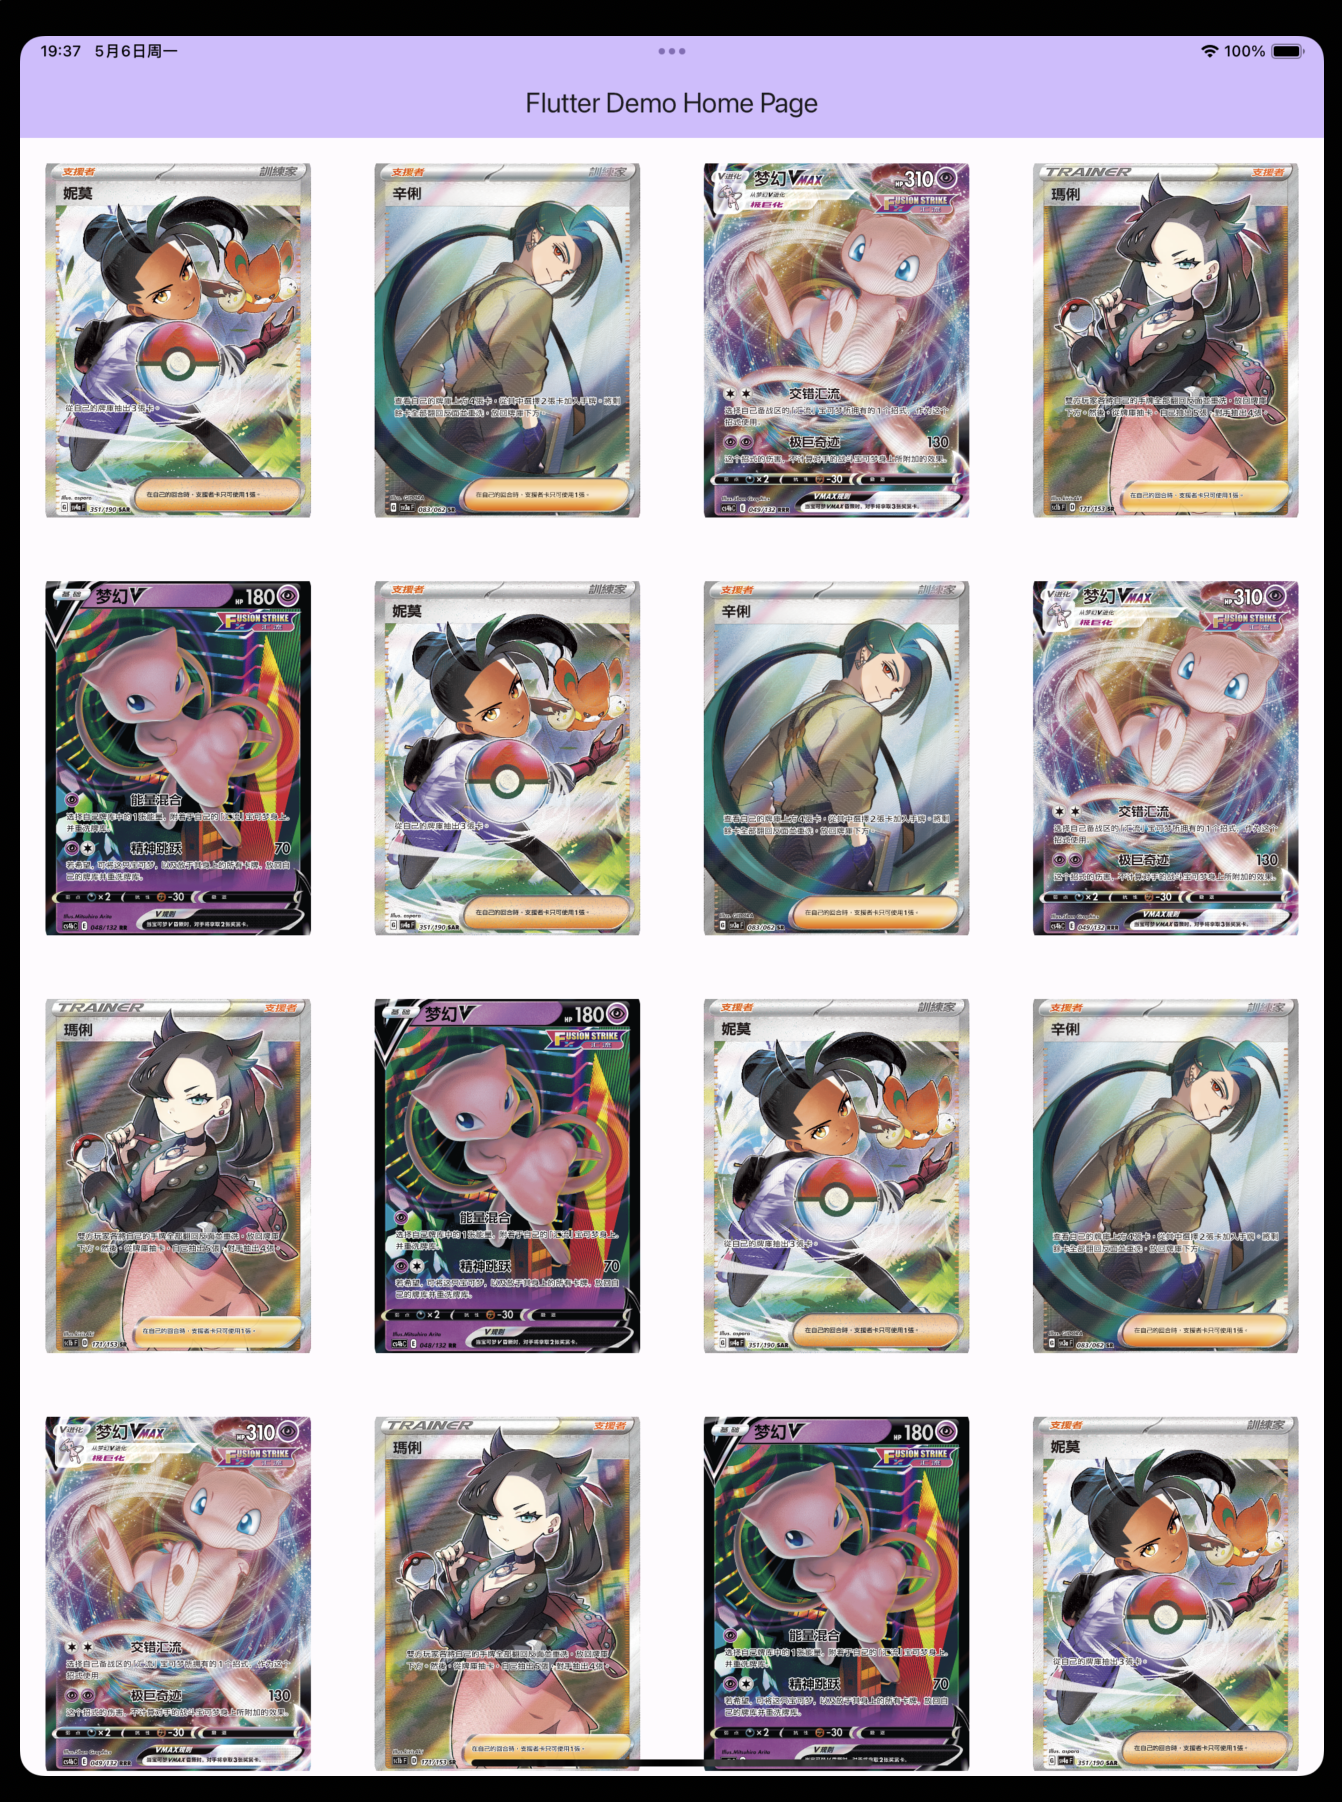
GridView.builder 展示效果
DataTable() - 表格
- DataTable 是 Flutter 中的表格
- columns (声明表头列表)
- DataColumn (表头单元格)
- rows (声明数据列表)
- DataRow (一行数据)
- DataCell (数据单元格)
- DataRow (一行数据)
- 其它属性
- columns (声明表头列表)
dart
// DataTable 示例
class DataTableDemo extends StatefulWidget {
  const DataTableDemo({super.key});

  @override
  State<DataTableDemo> createState() => _DataTableDemoState();
}

class _DataTableDemoState extends State<DataTableDemo> {
  // 基础数据
  List<User> data = [
    User('张三', 39),
    User('李四', 20, selected: true),
    User('王五', 22),
    User('马超', 38)
  ];

  // 通过基础数据循环出表格行
  List<DataRow> _getUserRows() {
    List<DataRow> rows = [];
    for (int i = 0; i < data.length; i++) {
      rows.add(DataRow(
        selected: data[i].selected!,
        onSelectChanged: (selected) {
          setState(() {
            data[i].selected = selected!;
          });
        },
        cells: [
          DataCell(Text(data[i].name!)),
          DataCell(Text(data[i].age.toString())),
          DataCell(Text(data[i].selected! ? '男' : '女')),
          DataCell(Text(data[i].selected! ? '张三是一个好人' : '张三不是一个好人')),
        ],
      ));
    }
    return rows;
  }

  bool _sortAscending = true;

  @override
  Widget build(BuildContext context) {
    return Container(
      alignment: Alignment.topCenter,
      child: SingleChildScrollView(
        child: SizedBox(
          height: 500,
          child: DataTable(
              sortColumnIndex: 1,
              sortAscending: _sortAscending, // 排序是否可用
              dataRowMinHeight: 60, // 最小行高
              dataRowMaxHeight: 100, // 最大行高
              horizontalMargin: 150, // 水平边距
              columns: [
                const DataColumn(label: Text('姓名')),
                DataColumn(
                  label: const Text('年龄'),
                  numeric: true, // 可排序属性
                  onSort: (int index, bool asscending) {
                    setState(() {
                      _sortAscending = asscending;
                      if (asscending) {
                        data.sort((a, b) => a.age!.compareTo(b.age!));
                      } else {
                        data.sort((a, b) => b.age!.compareTo(a.age!));
                      }
                    });
                  }, // 排序的方法
                ),
                const DataColumn(label: Text('性别')),
                const DataColumn(label: Text('简介')),
              ],
              rows: _getUserRows()),
        ),
      ),
    );
  }
}

// User类
class User {
  String? name;
  int? age;
  bool? selected;
  User(this.name, this.age, {this.selected = false});
}
1
2
3
4
5
6
7
8
9
10
11
12
13
14
15
16
17
18
19
20
21
22
23
24
25
26
27
28
29
30
31
32
33
34
35
36
37
38
39
40
41
42
43
44
45
46
47
48
49
50
51
52
53
54
55
56
57
58
59
60
61
62
63
64
65
66
67
68
69
70
71
72
73
74
75
76
77
78
79
80
81
82
83
84
85
86
87
2
3
4
5
6
7
8
9
10
11
12
13
14
15
16
17
18
19
20
21
22
23
24
25
26
27
28
29
30
31
32
33
34
35
36
37
38
39
40
41
42
43
44
45
46
47
48
49
50
51
52
53
54
55
56
57
58
59
60
61
62
63
64
65
66
67
68
69
70
71
72
73
74
75
76
77
78
79
80
81
82
83
84
85
86
87
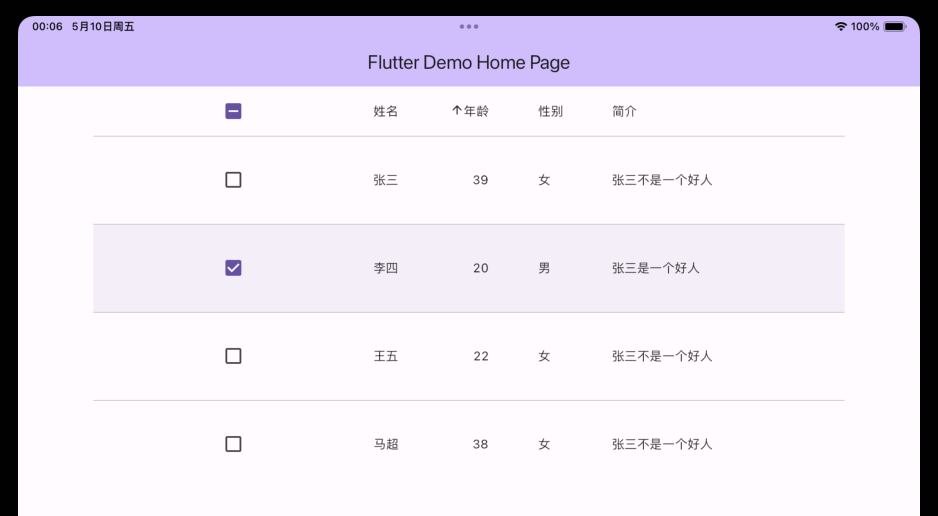
DataTable 展示效果
SafeArea() - 安全区域
- SafeArea
- 可以有效解决异形屏的问题
Switch() - 开关
- Switch
- value (开关的值, 一般与状态字段绑定)
- onChanged (开关状态变更时调用)
- activeColor (开关开启时的圆圈颜色)
- activeTrackColor (开关开始时的轨道颜色)
- inactiveThumbColor (开关关闭时的圆圈颜色)
- inactiveTrackColor (开关关闭时的轨道颜色)
- CupertinoSwitch (iOS 风格的开关)
Checkbox() - 复选框
- Checkbox
- value (复选框的值)
- onChanged (复选框状态更改时调用)
- acitveColor (选中时,复选框背景的颜色)
- checkColor (选中时,复选框中对号的颜色)
- CheckboxListTile (对 ListTile 的封装)
- title (标题)
- subtitle (子标题)
Radio() - 单选框
- Radio
- value (开关的值, 一般与状态字段绑定)
- onChanged (开关状态变更时调用)
- groupValue (选择组的值)
- RadioListTile (单选列表)
- value (开关的值, 一般与状态字段绑定)
- onChanged (开关状态变更时调用)
- groupValue (选择组的值)
TextField() - 文本框
- TextField
- autofocus (是否自动获取焦点)
- keyboardType (键盘类型)
- obscureText (设置为密码框)
- decoration (样式修饰)
- onChanged (内容更改时自动调用-value)
- labelText (标题)
- hintText (提示文字-placeholder)
- maxLines (显示行数-文本域)
CalendarDatePicker() - 日历选择器
- CalendarDatePicker (日历选择器)
- initialCalendarMode
- DatePickerMOde.day
- DatePickerMOde.year
- initialCalendarMode
- showDatePicker (日期选择器)
- initialDatePickerMode (year | day)
- initialEntryMode (calendar | input)
- showTimePicker (时间选择器)
Form() - 表单
- 使用步骤
- 创建表单 Form, 并以 GlobalKey 作为唯一性标识
- 添加带验证逻辑的 TextFormField 到 Form 中
- 创建按钮以验证和提交表单
- Form (表单容器)
- 创建表单唯一键:
final GlobalKey<FormState> formKey = GlobalState<FormState>(); - 验证表单:
formKey.currentState.validate(); - 提交表单:
formKey.currentState.save(); - 重置表单:
formKey.currentState.reset();
- 创建表单唯一键:
- TextFormField (输入框)
- 与 TextField 的区别: 必须在 Form 内使用, 带有验证器
- validator (验证器)
- obscureText (密码框)
- onSaved
- 设置表单字段的值
- 在表单的 save() 方法之后执行
dart
// 表单验证示例代码一
class FormDemo extends StatefulWidget {
  const FormDemo({super.key});

  @override
  State<FormDemo> createState() => _FormDemoState();
}

class _FormDemoState extends State<FormDemo> {
  GlobalKey<FormState> formKey = GlobalKey<FormState>();
  @override
  Widget build(BuildContext context) {
    return Container(
      padding: const EdgeInsets.all(30),
      child: Column(
        children: [
          Form(
            key: formKey,
            child: Column(
              children: [
                TextFormField(
                  decoration: const InputDecoration(
                    hintText: '手机号',
                  ),
                  validator: (value) {
                    if (value == null || value.isEmpty) {
                      return '手机号不能为空';
                    }
                    RegExp reg = RegExp(r'^\d{11}$');
                    if (!reg.hasMatch(value)) {
                      return '手机号不正确';
                    }
                    return null;
                  },
                ),
                const SizedBox(height: 20),
                ElevatedButton(
                  onPressed: () {
                    if (formKey.currentState!.validate()) {
                      print('验证通过');
                    } else {
                      print('验证不通过');
                    }
                  },
                  child: const Text('提交'),
                )
              ],
            ),
          )
        ],
      ),
    );
  }
}
Form 展示效果
dart
// 表单验证示例代码二
class FormDemo extends StatefulWidget {
  const FormDemo({super.key});

  @override
  State<FormDemo> createState() => _FormDemoState();
}

class _FormDemoState extends State<FormDemo> {
  GlobalKey<FormState> formKey = GlobalKey<FormState>();
  String? phone;
  String? password;
  @override
  Widget build(BuildContext context) {
    return Container(
      padding: const EdgeInsets.all(30),
      child: Column(
        children: [
          Form(
            key: formKey,
            child: Column(
              children: [
                TextFormField(
                  decoration: const InputDecoration(
                    hintText: '手机号',
                  ),
                  validator: (value) {
                    if (value == null || value.isEmpty) {
                      return '手机号不能为空';
                    }
                    RegExp reg = RegExp(r'^\d{11}$');
                    if (!reg.hasMatch(value)) {
                      return '手机号不正确';
                    }
                    return null;
                  },
                  onSaved: (value) {
                    phone = value;
                  },
                ),
                const SizedBox(height: 20),
                TextFormField(
                  decoration: const InputDecoration(
                    hintText: '密码',
                  ),
                  validator: (value) {
                    if (value == null || value.isEmpty) {
                      return '密码不能为空';
                    }
                    if (value.length < 6) {
                      return '密码长度不能小于6位';
                    }
                    return null;
                  },
                  onSaved: (value) {
                    password = value;
                  },
                ),
                const SizedBox(height: 20),
                Row(
                  mainAxisAlignment: MainAxisAlignment.spaceAround,
                  children: [
                    ElevatedButton(
                      onPressed: () {
                        if (formKey.currentState!.validate()) {
                          // 提交表单
                          formKey.currentState!.save();
                        } else {
                          print('验证不通过');
                        }
                      },
                      child: const Text('提交'),
                    ),
                    ElevatedButton(
                      onPressed: () {
                        // 重置表单
                        formKey.currentState!.reset();
                      },
                      child: const Text('重置'),
                    ),
                  ],
                )
              ],
            ),
          )
        ],
      ),
    );
  }
}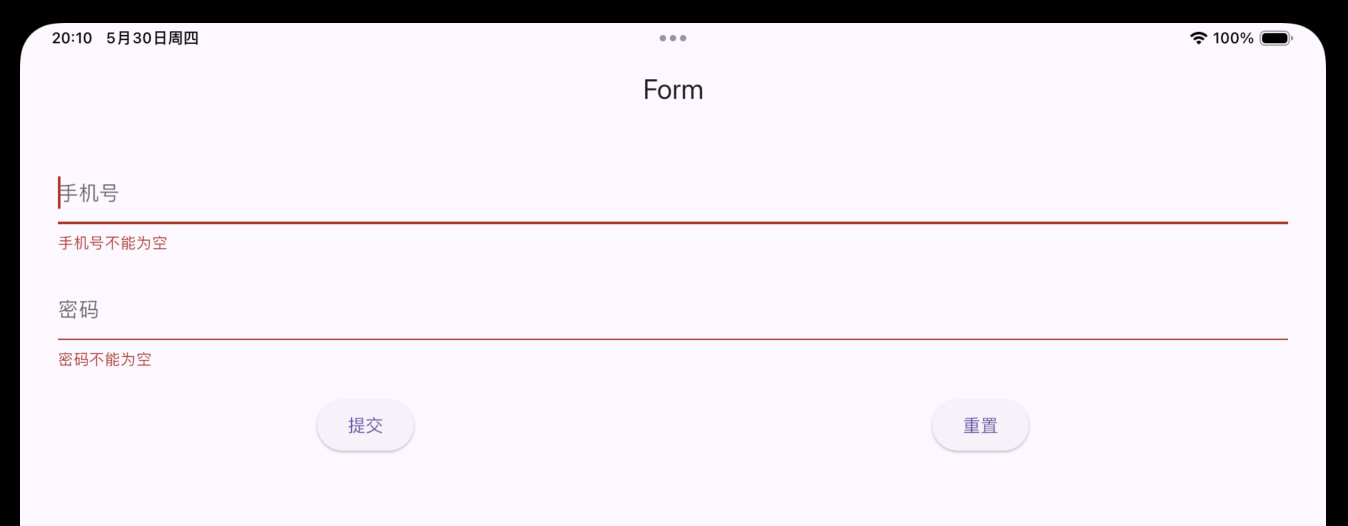
Form 展示效果
Cupertino - iOS 风格组件库
- Material
- 安卓风格的组件库
import 'package:flutter/material.dart';
- Cupertino
- iOS 风格的组件库
import 'package:flutter/cupertino.dart';- https://docs.flutter.dev/ui/widgets/cupertino
第三方库
Dio
- Dio 是一个强大的 Dart Http 请求库 (类似 axios)
- 使用步骤
- 在 pubsepc.yaml 中添加 dio 依赖
- 安装依赖 (pub get | flutter pub get)
- 引入
import 'package:dio/dio.dart' - 使用指南: https://github.com/cfug/dio/blob/main/dio/README-ZH.md
shared_preferences
- shared_preferences 是一个本地数据缓存库 (类似浏览器 LocalStorage)
- 使用步骤
- 在 pubspec.yaml 中添加 shared_preferences 依赖
- 安装依赖
- 引入
import 'package:shared_preferences/shared_preferences.dart'; - 使用 https://pub.dev/packages/shared_preferences/example
GetX
- GetX: GetX 是 Flutter 上的一个轻量且强大的解决方案:高性能的状态管理、智能的依赖注入和便捷的路由管理。
- GetX 有 3 个基本原则:
- 性能: GetX 专注于性能和最小资源消耗。GetX 打包后的 apk 占用大小和运行时的内存占用与其他状态管理插件不相上下。如果你感兴趣,这里有一个性能测试。
- 效率: GetX 的语法非常简捷,并保持了极高的性能,能极大缩短你的开发时长。
- 结构: GetX 可以将界面、逻辑、依赖和路由完全解耦,用起来更清爽,逻辑更清晰,代码更容易维护。
- 文档: https://github.com/jonataslaw/getx/blob/master/README.zh-cn.md
Provider
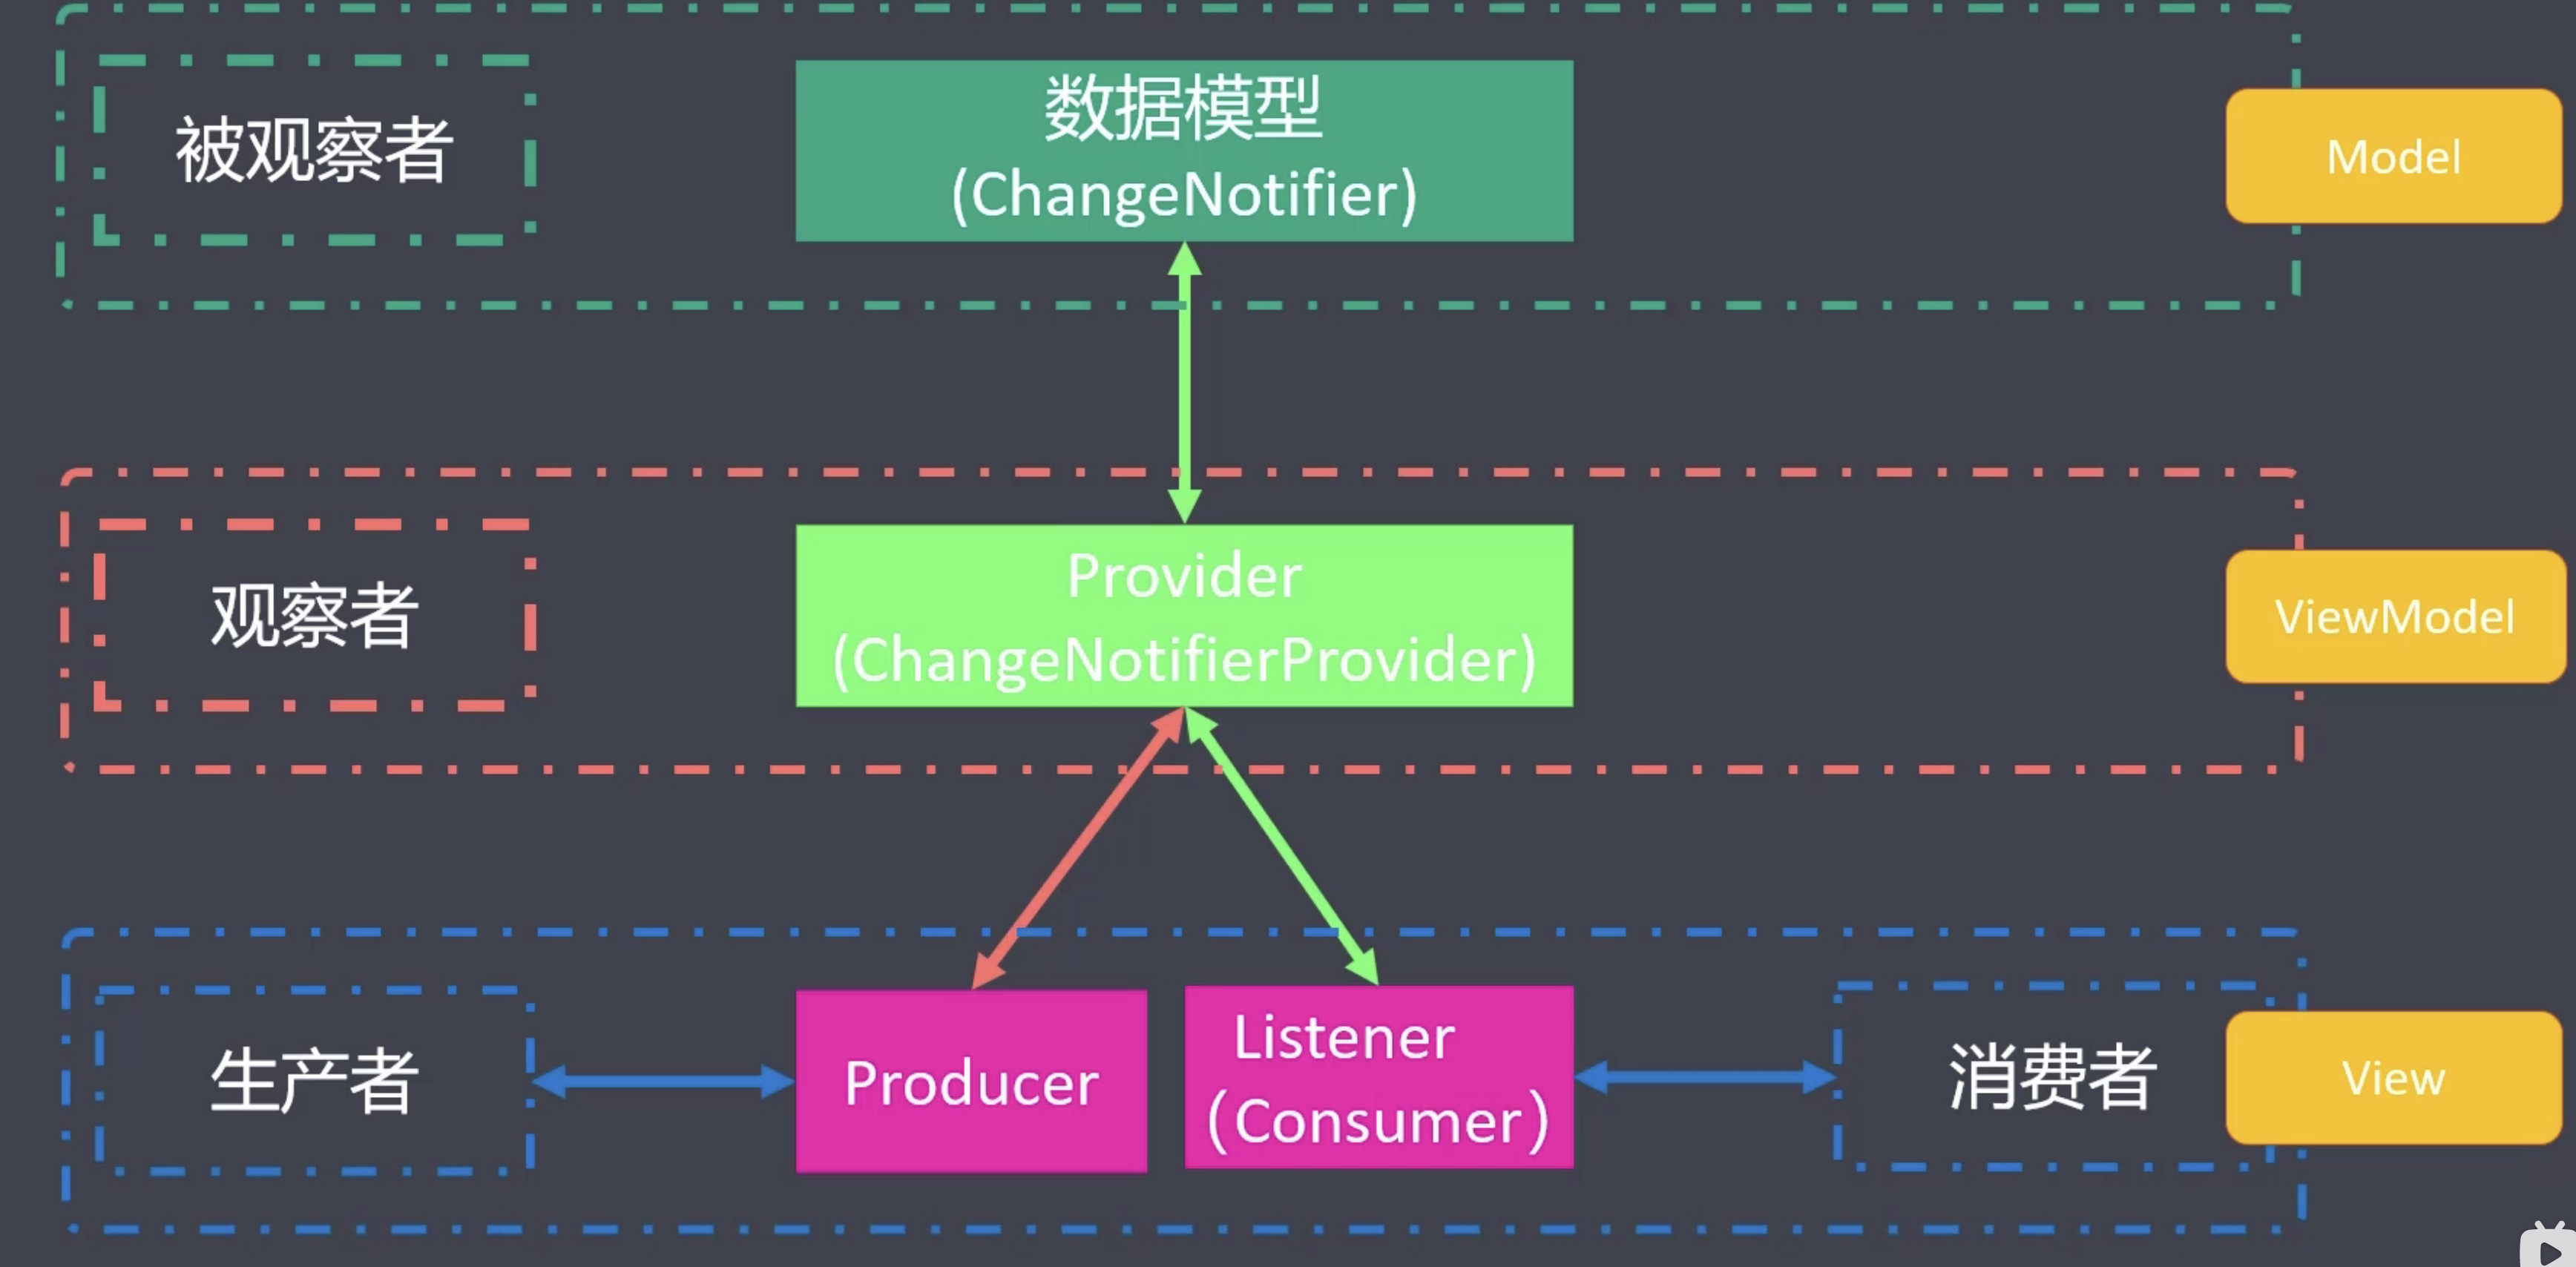
- Provider 是对 InheritedWidget 的封装
- 优点
- 简化资源的分配与处置
- 懒加载
- Provider 的工作原理
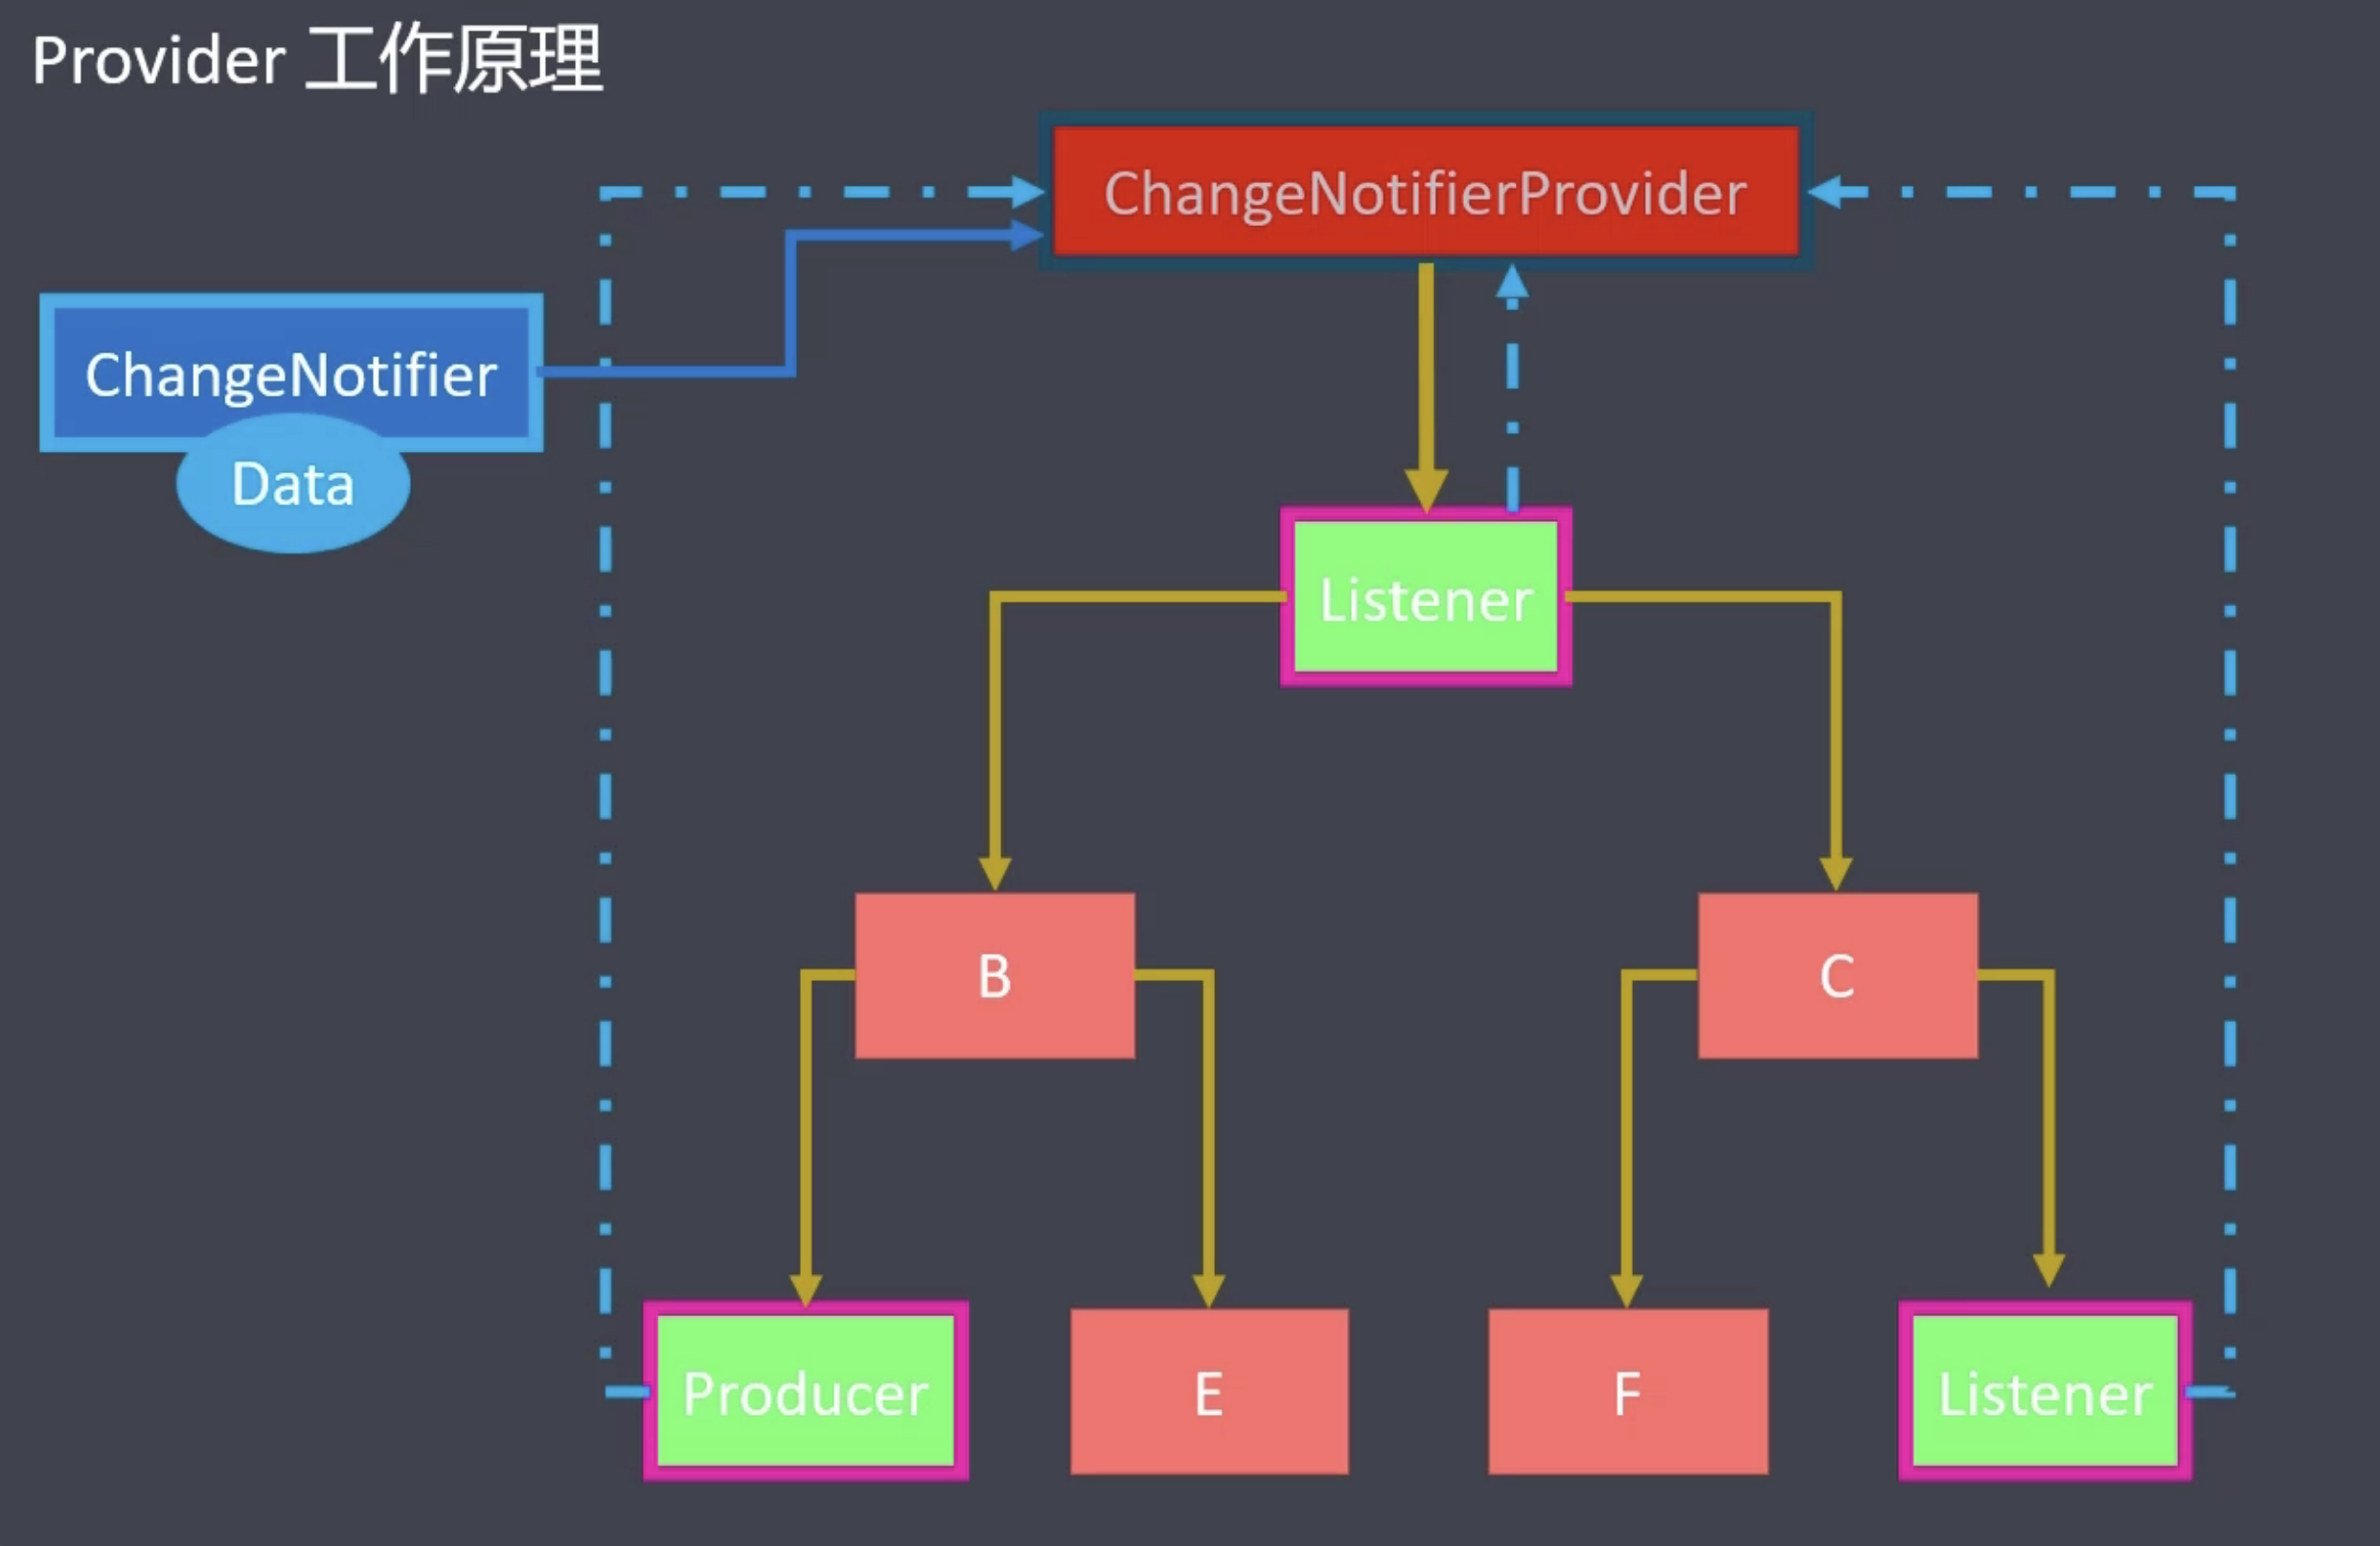
Provider 的实现原理1
Provider 的实现原理2
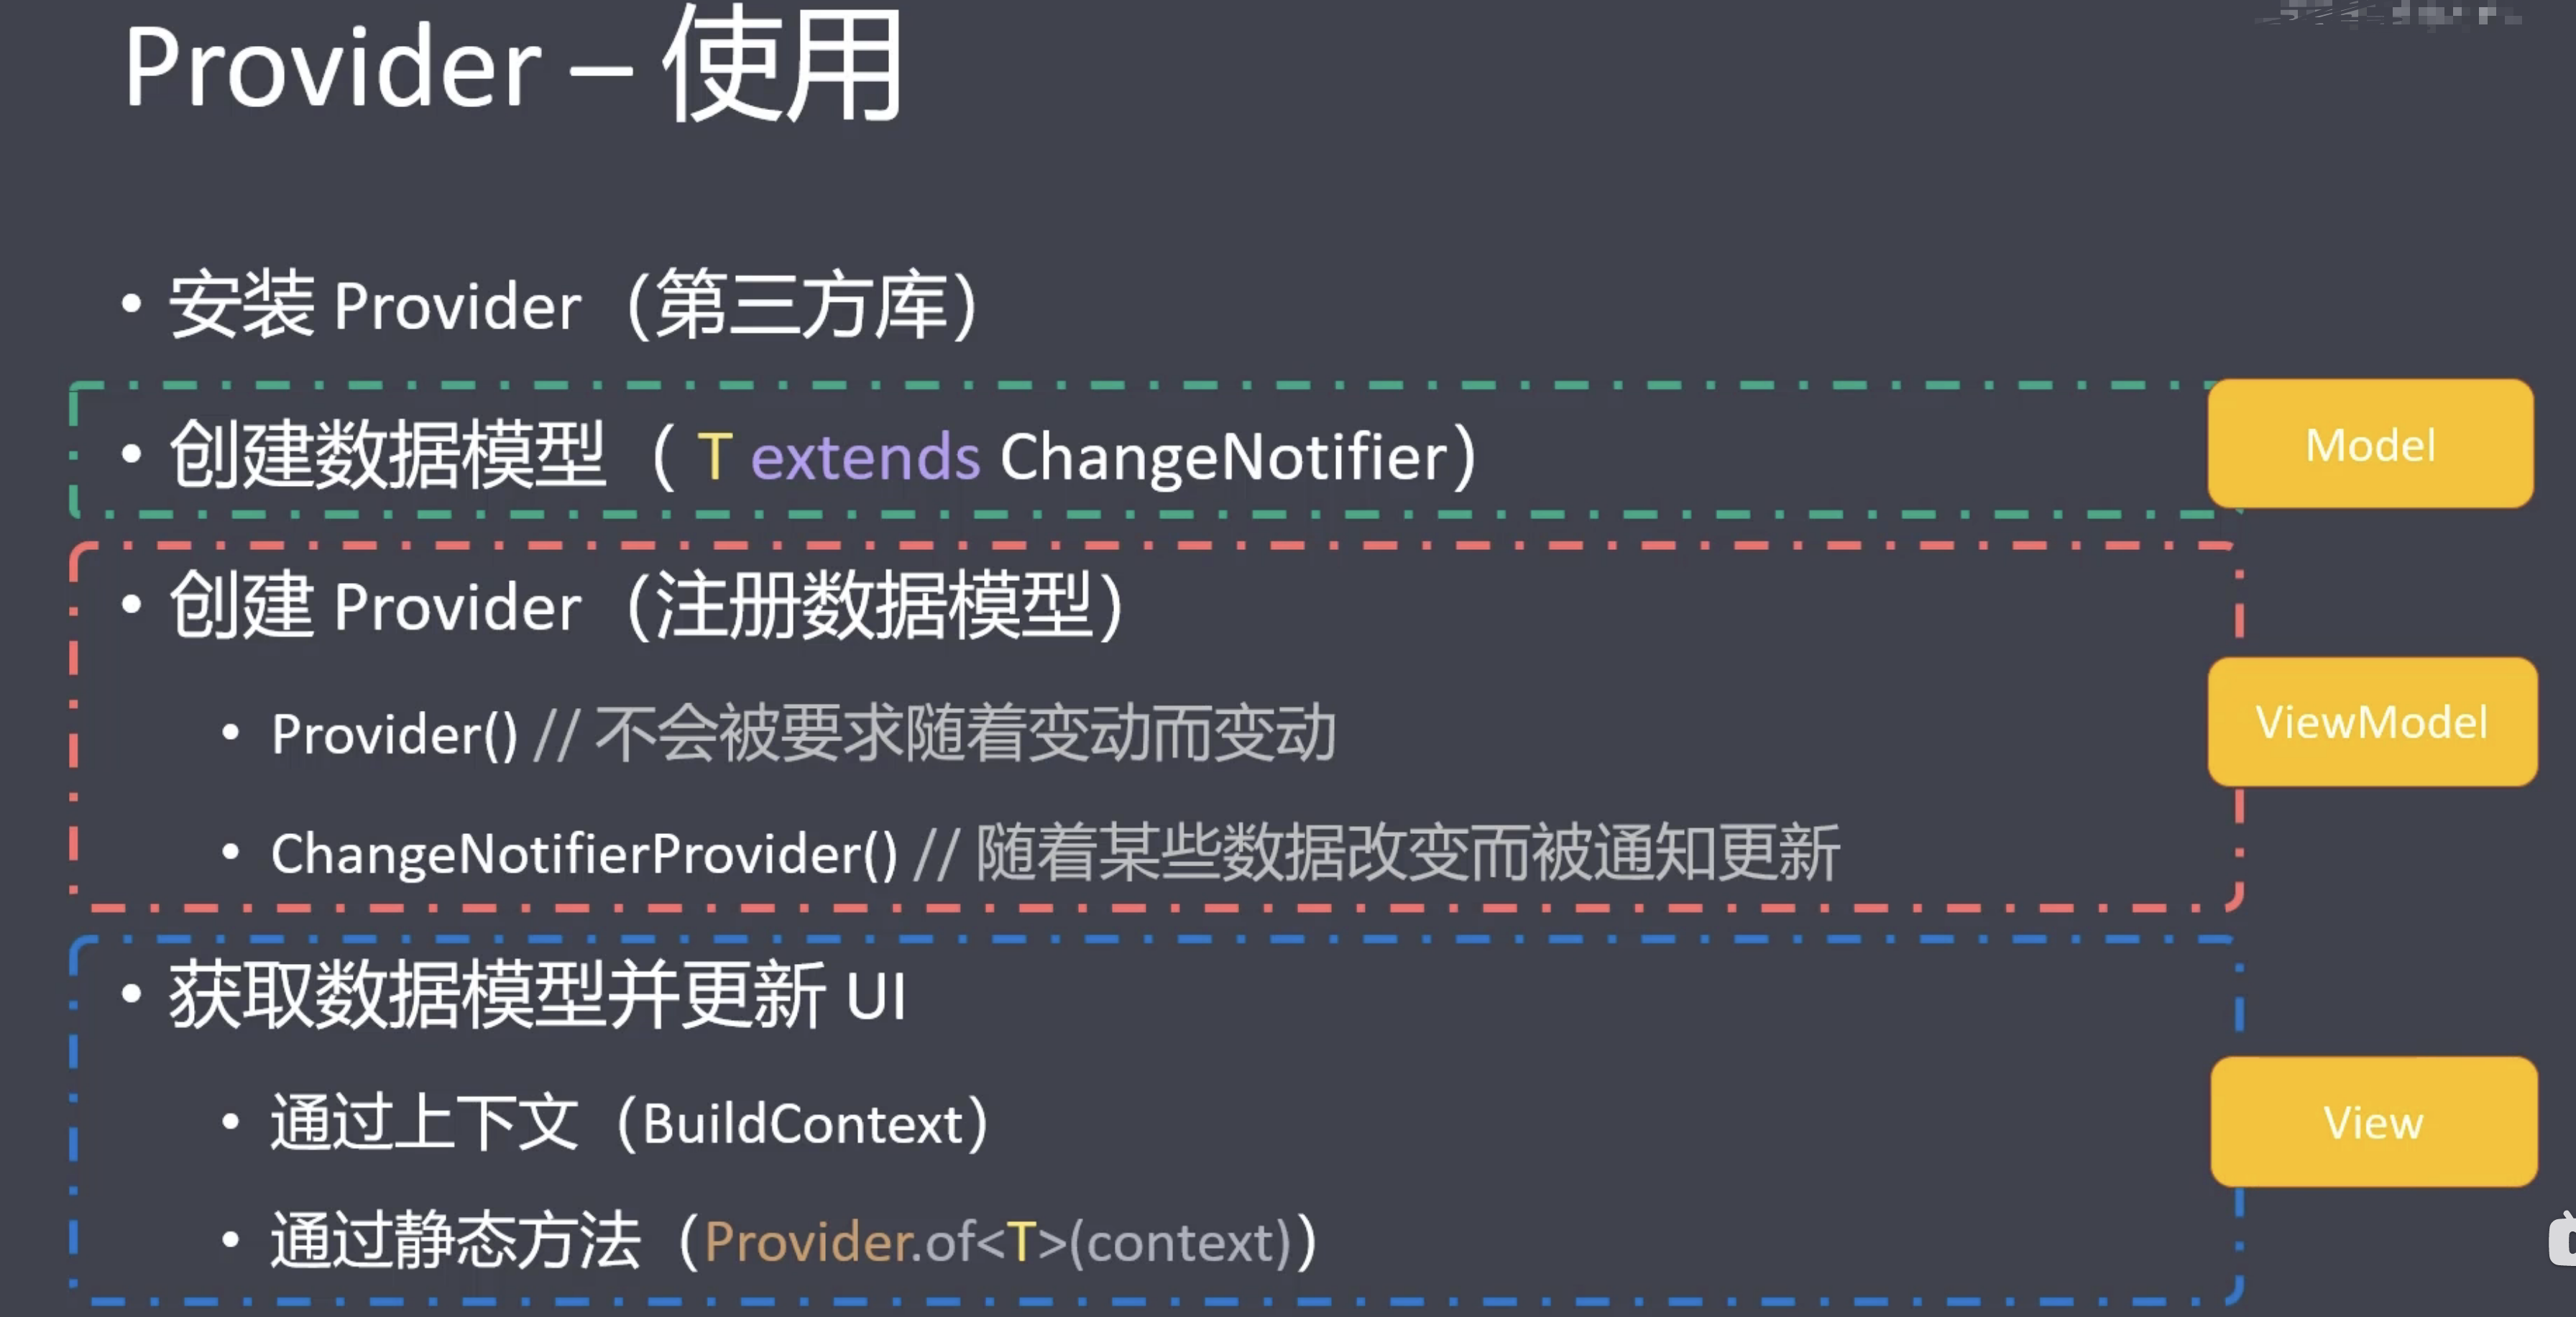
Provider 的使用
dart
// Provider 代码示例
import 'package:flutter/material.dart';
import 'package:provider/provider.dart';

void main() {
  runApp(const MyApp());
}

class MyApp extends StatelessWidget {
  const MyApp({super.key});
  @override
  Widget build(BuildContext context) {
    return MaterialApp(
      title: 'Flutter Demo',
      debugShowCheckedModeBanner: false,
      theme: ThemeData(
        useMaterial3: true,
      ),
      // 2. 使用 ChangeNotifierProvider 包裹根组件, 并传入数据模型
      home: ChangeNotifierProvider(
        create: (context) => LikesModel(),
        child: Scaffold(
          appBar: AppBar(
            title: const Text('Provider'),
          ),
          body: const ProviderDemo(),
        ),
      ),
    );
  }
}

// 1. 创建数据模型
class LikesModel extends ChangeNotifier {
  int _counter = 0;

  int get counter => _counter;

  incrementCounter() {
    // 累加
    _counter++;

    // 通知 UI 更新
    notifyListeners();
  }
}

class ProviderDemo extends StatelessWidget {
  const ProviderDemo({super.key});

  @override
  Widget build(BuildContext context) {
    return Center(
      child: Column(
        children: [
          // 3. 在子组件中使用数字模型
          Text('${context.watch<LikesModel>().counter}'),
          TextButton(
            onPressed: () => context.read<LikesModel>().incrementCounter(),
            child: const Icon(Icons.thumb_up),
          )
        ],
      ),
    );
  }
}
1
2
3
4
5
6
7
8
9
10
11
12
13
14
15
16
17
18
19
20
21
22
23
24
25
26
27
28
29
30
31
32
33
34
35
36
37
38
39
40
41
42
43
44
45
46
47
48
49
50
51
52
53
54
55
56
57
58
59
60
61
62
63
64
65
66
2
3
4
5
6
7
8
9
10
11
12
13
14
15
16
17
18
19
20
21
22
23
24
25
26
27
28
29
30
31
32
33
34
35
36
37
38
39
40
41
42
43
44
45
46
47
48
49
50
51
52
53
54
55
56
57
58
59
60
61
62
63
64
65
66

Provider 示例效果
